
Seco-Larm ENFORCER Wireless Video Door Phone Kit (DP-266-1C7Q) — Installation Manual
Installation manual for the Seco-Larm ENFORCER Wireless Video Door Phone Kit (DP-266-1C7Q), covering wiring, pairing, and operation.
Full text manual (for reference)
Installation manual for the Seco-Larm ENFORCER Wireless Video Door Phone Kit (DP-266-1C7Q) — a wireless video intercom system that lets homeowners see, speak with, and unlock a door for visitors from a lightweight indoor monitor, from up to 492 ft (150m) away.
Key Features
- Wireless operation between camera and monitor up to 492 ft (150m) line-of-sight
- Remotely and securely talk to visitors and unlock doors/gates via the monitor
- Portable monitor with kickstand — carry it around while talking to a visitor
- Expandable up to 2 additional monitors and 1 additional camera (sold separately)
- Intercom calling between paired monitors
- Built-in IR LEDs for nighttime video and a built-in PIR sensor that auto-activates the camera and takes photos when a visitor approaches
- 170° wide field of view; camera pan/tilt adjustable up to 20° from centerline in any direction
- Egress input for a Request-to-Exit plate; camera powered by 9~16 VAC or 5~16 VDC
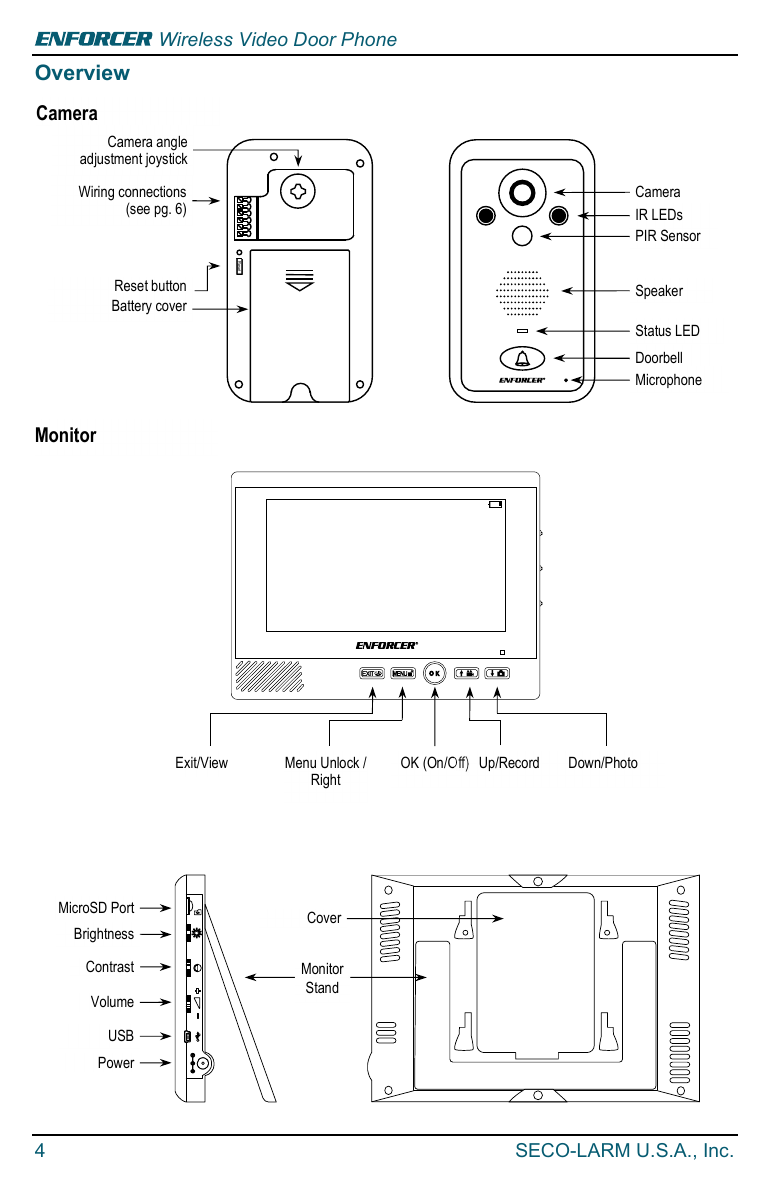
Specifications
| Camera | Spec | Monitor | Spec |
|---|---|---|---|
| Type / Chip | Color camera, CMOS | Display | 7" (178mm) TFT |
| Resolution | 640 TV Lines | Operating voltage | 12VDC (adapter) or 3.7VDC (battery) |
| Lens / Field of view | 2mm / 170° | Current draw (Active/Standby) | 600mA / 5mA @3.7VDC |
| Camera angle adjustment | Up to 20° any direction | Battery life (Active/Standby) | ~2.5 hours / ~7 days |
| Operating voltage | 9~16 VAC / 5~16 VDC | Wireless range | 492' (150m)* |
| Relock delay | 3/6/8 seconds | Operating frequency | 2402~2480 MHz |
| Relay output | 3A @24VAC/24VDC | Dimensions | 8"×6"×1⅛" (203×153×27 mm) |
| Battery life (Active/Standby) | ~7 hours / ~60 days | Weight | 1.2 lbs (544g) |
| IR LED Range / PIR Detection range | 5' (1.5m) / 9' (3m) | Operating temp | 32°~95° F (-5°~35° C) |
| Weight | 4.3 oz (122g) | — | — |
*Line-of-sight range. Actual range may vary depending on installation and operating environment.
Camera Wiring
The camera's 6-terminal strip provides: (1) Positive power input, (2) Negative power input, (3) Egress input (N.O., –) for an optional request-to-exit device, (4) N.O. relay output for fail-secure lock operation, (5) N.C. relay output for fail-safe lock operation, and (6) Common output wired to the lock device's power supply. For 16VAC doorbell installations, wire directly from the doorbell's transformer.
Camera Installation
- Position the camera roughly 5 ft (1.5m) above the ground, out of direct sunlight, rain, or snow. Visitors should stand 2.5–5 ft away from the camera.
- Cut a hole large enough to run min. 21AWG 2-conductor wire to the door unlock device and power supply.
- Mount the camera bracket to the wall with three screws (use anchors for drywall or brick).
- Run the 2-conductor wire from the camera through the bracket's wire hole to the optional door unlock device.
- Install the rechargeable lithium-ion battery (backup power source for outages) and connect the AC adapter.
- Install the monitor battery, then power on the camera and monitor. If the camera isn't in the bracket yet, the tamper alarm will sound — press "OK" repeatedly on the monitor to disable it.
- Adjust the camera angle using the rear joystick while viewing the image on the monitor.
- Mount the camera into the bracket (top first, then bottom), screw it in, and snap the screw cover over the screw. Do not block the PIR sensor.
Monitor Installation
- Remove the battery cover and insert the included DP-266-BM7 lithium-ion battery.
- Mount the monitor bracket with four screws (use anchors for drywall or brick).
- Hold "ON/OFF" for 3 seconds to power on; the red LED flashes once every 3 seconds in standby, and once per second when the battery is low.
- To power off, hold "ON/OFF" for 3 seconds and select "YES" on the Shutdown menu.
On-Screen Display Menu
- Photos — view/delete up to 240 photos (manual, automatic on doorbell press, tamper alarm, or PIR-triggered).
- Messages — view/delete up to 10 missed-call photo records.
- Time — set time/date (24-hour format).
- Ring — choose Telephone, Doorbell, Für Elise, or Jingle Bells, plus ring volume.
- Video — view/delete recorded videos.
- Setup — Motion Detection (PIR on/off), Backlight Time (10–60 sec), Unlocking Duration (3/6/8 sec), Pairing, Alarm Setting, Version info.
Operating the System
- Receiving a visitor: press "OK" to accept the call, "Menu/Unlock" to activate the relay/lock, "Exit/View" to mute, "Down/Photo" for a manual photo.
- Checking the camera unprompted: press "OK"/Power then "Exit/View" to monitor; press "Exit/View" again for two-way audio.
- Intercom (2 monitors): press "OK" to call the other monitor; auto-timeout after 60 seconds.
- Intercom (3 monitors): each monitor shows an ID (1–3); press "Up"/"Down" to call the next higher/lower ID monitor.
Pairing
Resetting/re-pairing the original camera and monitor: remove the camera from the bracket, disconnect and reconnect power if the tamper alarm sounds, then hold the reset button 3–4 seconds until it beeps once (pairing mode, ~15 sec window). On the monitor, select "Match code" under Setup → Pairing.
Pairing an additional monitor: on the first monitor select "Give code" (Setup → Pairing); on the new monitor select "Receive code." Up to 3 monitors total are supported.
Pairing an additional camera: hold the new camera's reset button 7–8 seconds (beeps confirm timing), then select "Give Code" on any paired monitor.
Tamper Alarm
Triggers whenever the camera is removed from its bracket. To disable: return the camera to the bracket, or repeatedly press "OK" on all paired monitors; if it persists, cycle power/battery on the camera and monitors. The alarm can be permanently disabled via Setup → Alarm Setting.
Troubleshooting
| Blank monitor screen | Press ON/OFF or OK to wake it; check battery charge; plug the charger directly into the monitor. |
| Monitor not charging | Clean battery and monitor contacts; ensure kickstand is extended in the charger stand; check the power adapter connection; try connecting the adapter directly to the monitor. |
| Monitor doesn't ring | Check volume, standby mode, and that the monitor is seated in its mounting bracket. |
| Monitor can't connect to camera | Confirm pairing and that the monitor is within wireless range. |
| Poor image quality | Adjust brightness, clean the lens, reposition the camera, and move the monitor away from interference sources (microwaves, TVs, lamps). |
| Can't activate the relay | Confirm two-way communication is active (microphone icon lit, no "X") and check wiring between the camera and lock device. |
Accessories (Sold Separately)
- Additional Monitor — DP-266-M7Q
- Additional Camera — DP-266-CAQ
- Replacement Monitor Battery — DP-266-BM7
- Replacement Camera Battery — DP-266-BC7
Warranty
This SECO-LARM product is warranted against defects in material and workmanship under normal use for one (1) year from the date of sale to the original customer. SECO-LARM's obligation is limited to repair or replacement of defective parts, transportation prepaid.