
SECO-LARM ENFORCER E-942FC-600/1300 — Electromagnetic Gate Lock Installation Manual
Installation manual for the SECO-LARM ENFORCER E-942FC-600/1300 Electromagnetic Gate Locks for swinging and sliding gates.
Full text manual (for reference)
Installation manual for the SECO-LARM ENFORCER E-942FC-600 and E-942FC-1300 Electromagnetic Gate Locks — for use with nearly all types of outdoor sliding and swinging electric gates.
Overview
- For use with nearly all types of outdoor sliding and swinging electric gates.
- Holding force: E-942FC-1300 — 1,300 lbs. (591kg); E-942FC-600 — 600 lbs. (271kg)
- Can be mounted horizontally or vertically.
- Housing dimensions: E-942FC-1300 — 8" x 2½" x 1½" (203 x 63 x 38mm); E-942FC-600 — 8" x 1 11/16" x 1 9/16" (203 x 43 x 40mm)
- Armature plate dimensions: E-942FC-1300 — 7¼" x 2⅜" x ⅝" (185 x 61 x 16mm); E-942FC-600 — 6¼" x 1⅝" x 9/16" (159 x 41 x 14mm)
- Power — 12VDC or 24VDC, current draw 500mA @ 12VDC (250mA @ 24VDC)
- Cable — 6.5' (2m) with dual-threaded conduit connector (3' / 90cm for E-942FC-600)
Mounting — Determine Gate Type
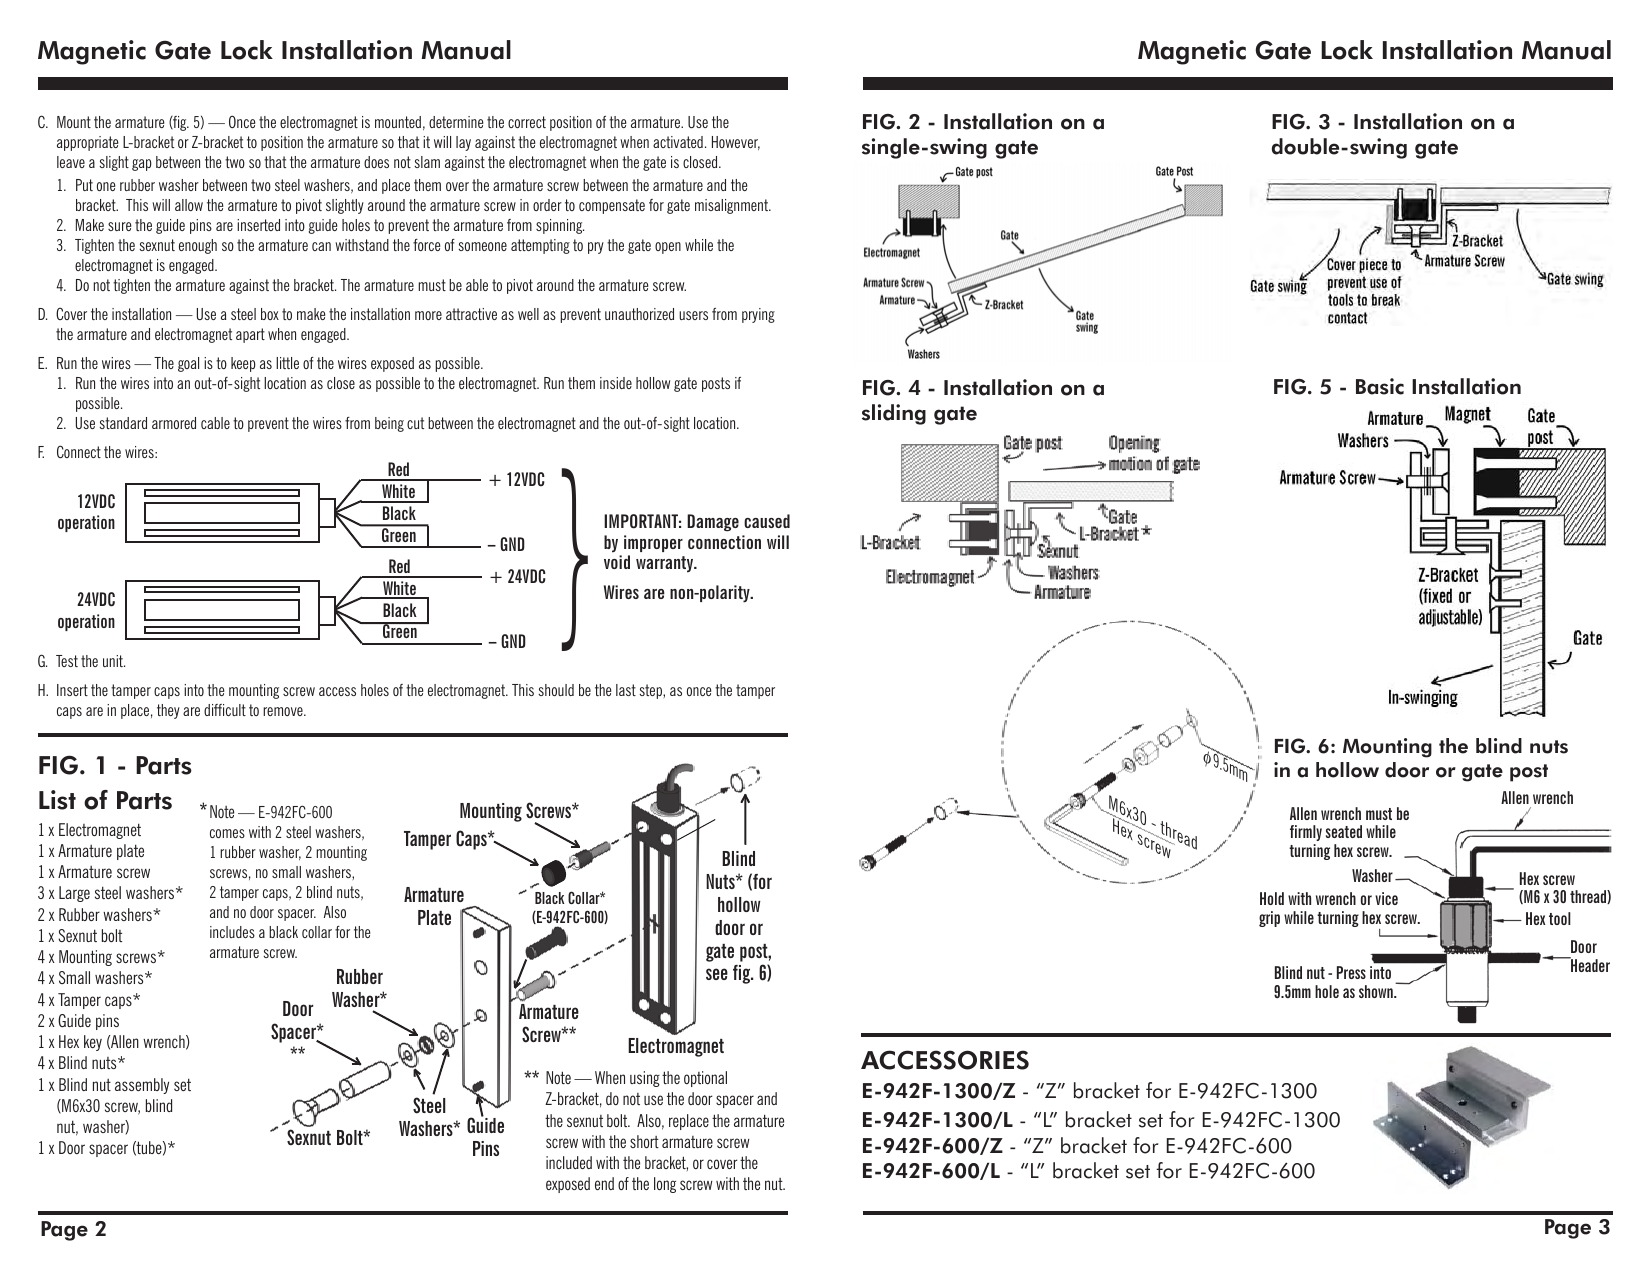
- Single-swing gate — gate swings on one end and rests on a fixed gate post when closed. Typical install: electromagnet fixed to the gate post, armature connected to the free end of the gate via a Z-bracket.
- Double-swing gate — two gates swing in the same direction. Electromagnet fixed to the free end of one gate, armature fixed to the free end of the other via a Z-bracket. Important: add a cover piece to the Z-bracket to shield the electromagnet from prying, and coordinate gate swing order so the armature-side gate opens before the electromagnet-side gate (to avoid catching on the cover piece).
- Sliding gate — the gate slides rather than swings. Use L-brackets to mount the electromagnet and armature perpendicular to each other.
Installation Steps
- Mount the electromagnet — the electromagnet's position will typically determine the armature plate location. Make sure there is space to run the cable. For hollow door headers or gate posts using blind nuts: tape the template to the location, drill four (E-942FC-1300) or two (E-942FC-600) 9.5mm (3/8") holes, insert a blind nut, and use the included hex tool + Allen wrench to compress it permanently into place. Push hex screws into the electromagnet's screw holes and tighten into the blind nuts.
- Mount the armature — use the appropriate L-bracket or Z-bracket to position the armature so it lays against the electromagnet when activated, leaving a slight gap so it doesn't slam shut. Put one rubber washer between two steel washers over the armature screw to allow slight pivot (compensating for gate misalignment). Make sure the guide pins sit in the guide holes to prevent the armature from spinning. Tighten the sexnut enough to withstand prying force, but do not tighten the armature against the bracket — it must be able to pivot.
- Cover the installation with a steel box for a more attractive, tamper-resistant finish.
- Run the wires — keep as little wire exposed as possible; run inside hollow gate posts where feasible, and use armored cable to prevent cutting between the electromagnet and the concealed run.
- Connect the wires — see wiring color codes below. Wires are non-polarity, but damage from improper connection voids the warranty.
- Test the unit.
- Insert the tamper caps into the mounting screw access holes last — they're difficult to remove once in place.
Wiring (12VDC / 24VDC)
| Operation | Wire | Connection |
|---|---|---|
| 12VDC | Red | + 12VDC |
| White | + 12VDC | |
| Black | - GND | |
| Green | - GND | |
| 24VDC | Red | + 24VDC |
| White | + 24VDC | |
| Black | - GND | |
| Green | - GND |
Regular Maintenance
- Clean the contact surfaces of the electromagnet and armature plate with a soft cloth and non-abrasive, non-corrosive cleaner.
- Apply a light coat of silicon lubricant to both contact surfaces and wipe away excess to prevent rust.
- Check that the armature plate is securely attached to the door yet can pivot slightly around the armature screw.
- Check that the electromagnet is securely attached to the gate or post.
Troubleshooting
| Problem | Possible Cause | Solutions |
|---|---|---|
| Gate does not lock | No power | Check that wires are secure, the power supply is connected and operating, and the unit is wired correctly. |
| Gate locks but can be easily forced open | Poor contact between electromagnet and armature plate | Ensure proper alignment and that contact surfaces are clean and free from rust. |
| Incorrect voltage setting | Check power leads with a meter to confirm correct voltage is present. | |
| Delay in gate releasing | A secondary diode was installed across the electromagnet | The electromagnet already has a metal oxide varistor to prevent interference — do not install a secondary diode. |
UL Certification
The E-942FC-1300 and E-942FC-600 conform to UL/10B "Fire Tests of Door Assemblies" and UL/10C "Positive Pressure Fire Tests of Door Assemblies" for swinging door assemblies, and are classified per Uniform Building Code standard 7-2.
Warranty
Warranted against defects in material and workmanship for one (1) year from date of sale to the original consumer customer while used in normal service. SECO-LARM's obligation is limited to repair or replacement of any defective part if returned, transportation prepaid, to SECO-LARM. Void if damage is caused by acts of God, misuse, abuse, neglect, unauthorized repair/alteration, improper/abnormal usage, or faulty installation.