
NAPCO iBridgeVideo IBV-DBELL — Video Doorbell Installation Guide
Installation guide for the NAPCO iBridgeVideo IBV-DBELL — an HD Infrared power-wired Wi-Fi outdoor motion-activated video doorbell with live video via the iBridgeVideo app.
Full text manual (for reference)
Installation guide for the NAPCO iBridgeVideo IBV-DBELL — an HD Infrared power-wired Wi-Fi outdoor motion-activated video doorbell with live/recorded video viewing via the iBridgeVideo app.
Description
The NAPCO IBV-DBELL allows viewing of live and recorded video clips through the iBridgeVideo App (Android or iOS). Its integral PIR sensor and two-way audio connect to your smartphone for motion-triggered video clip email notifications. Requires an active NAPCO ComNet Dealer account at www.NapcoComNet.com to activate.
Features
- Up to 1080P HD video with 140° horizontal viewing angle
- IR-powered night vision
- PIR detection with 3 configurable zones
- Works with existing mechanical/electronic chime
- Easy Wi-Fi installation, wide voltage power supply
- 2-way talk over the Internet, cloud storage
Included Components
- IBV-DBELL Video Doorbell
- Chime Kit Module
- Mounting Hardware
- Mounting Bracket
- Mounting Tools
Quick Install Summary
- Activate the doorbell at www.NapcoComNet.com
- Remove power to the doorbell at the breaker
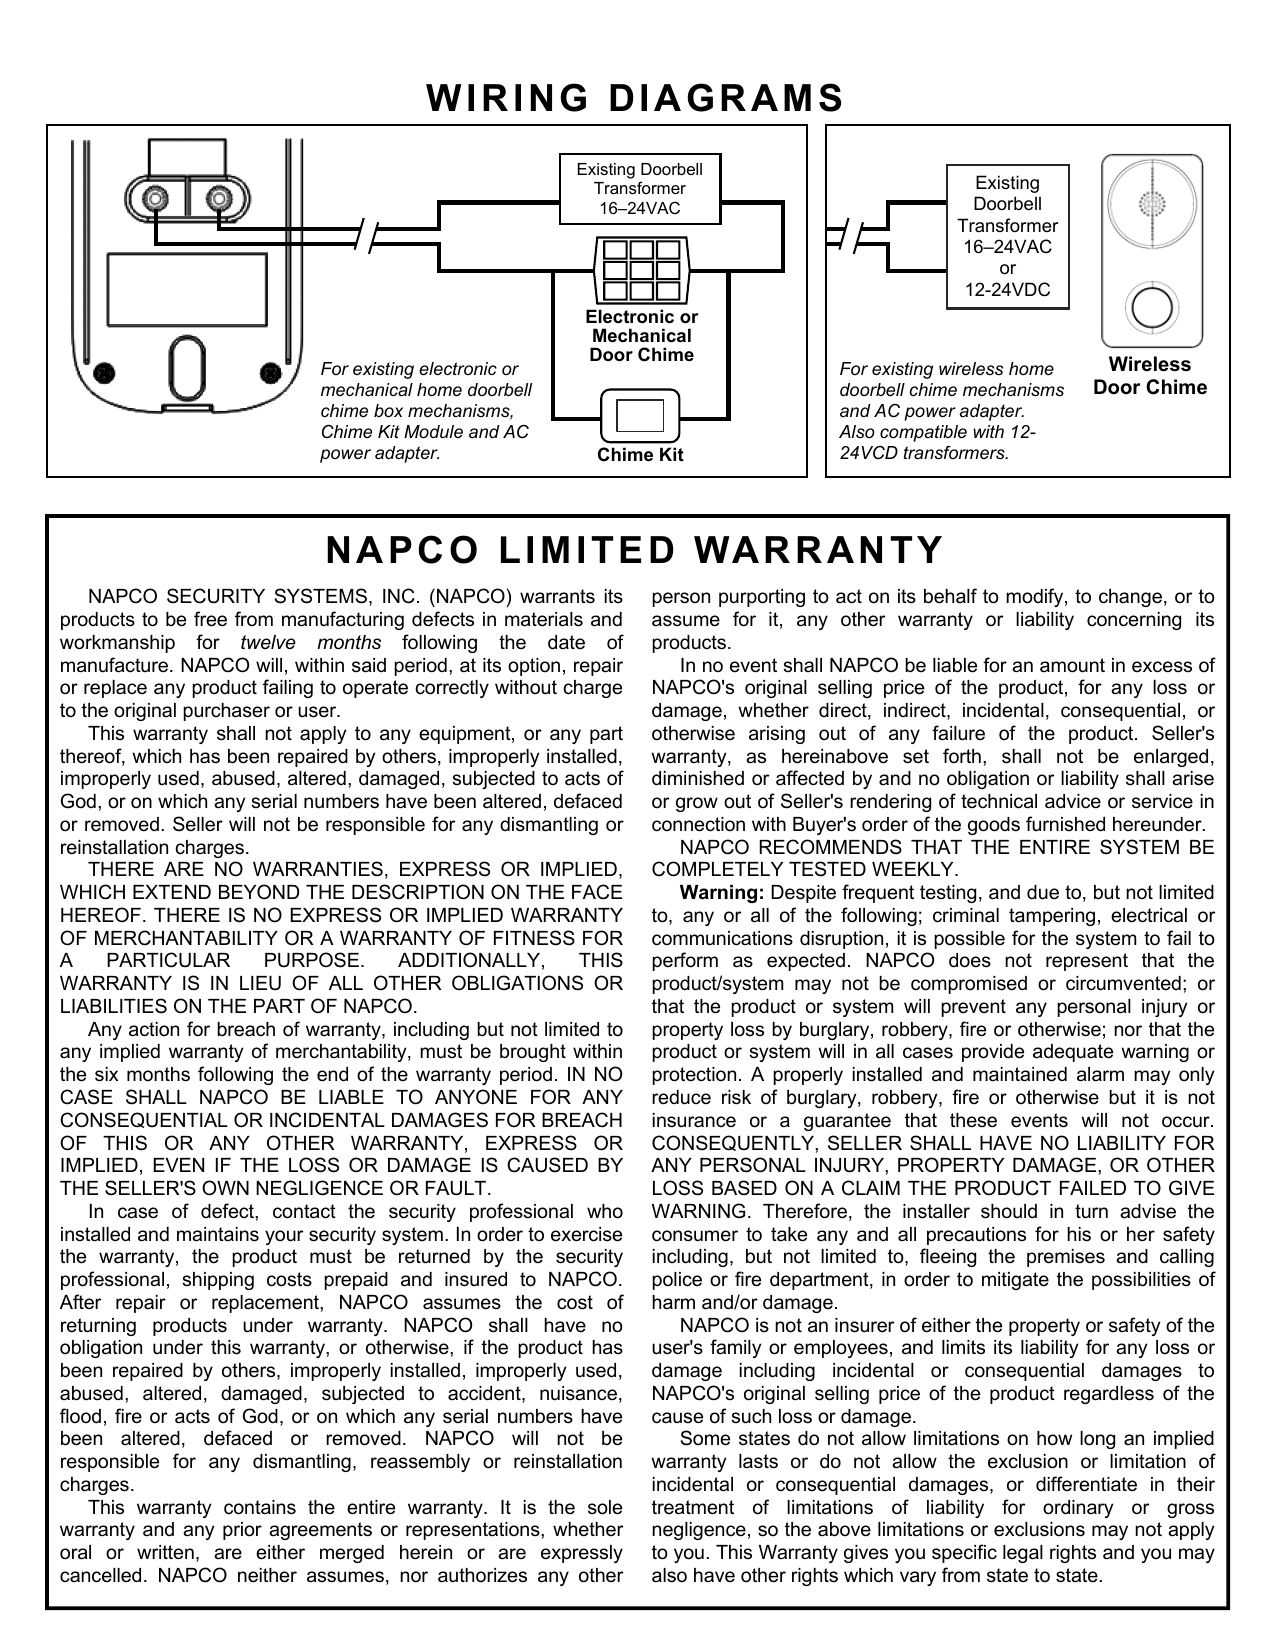
- Wire the doorbell and install the Chime Kit module
- Power the doorbell (do not fully mount yet)
- Install the iBridgeVideo app on your smart device
- Launch the iBridgeVideo app and log in
- Use the app to add and configure the doorbell
- Fully mount the doorbell (finish step 4)
Installing the Doorbell
- Remove power to the doorbell at the breaker.
- Remove the existing wired external doorbell push button from its installation surface and disconnect its two wires.
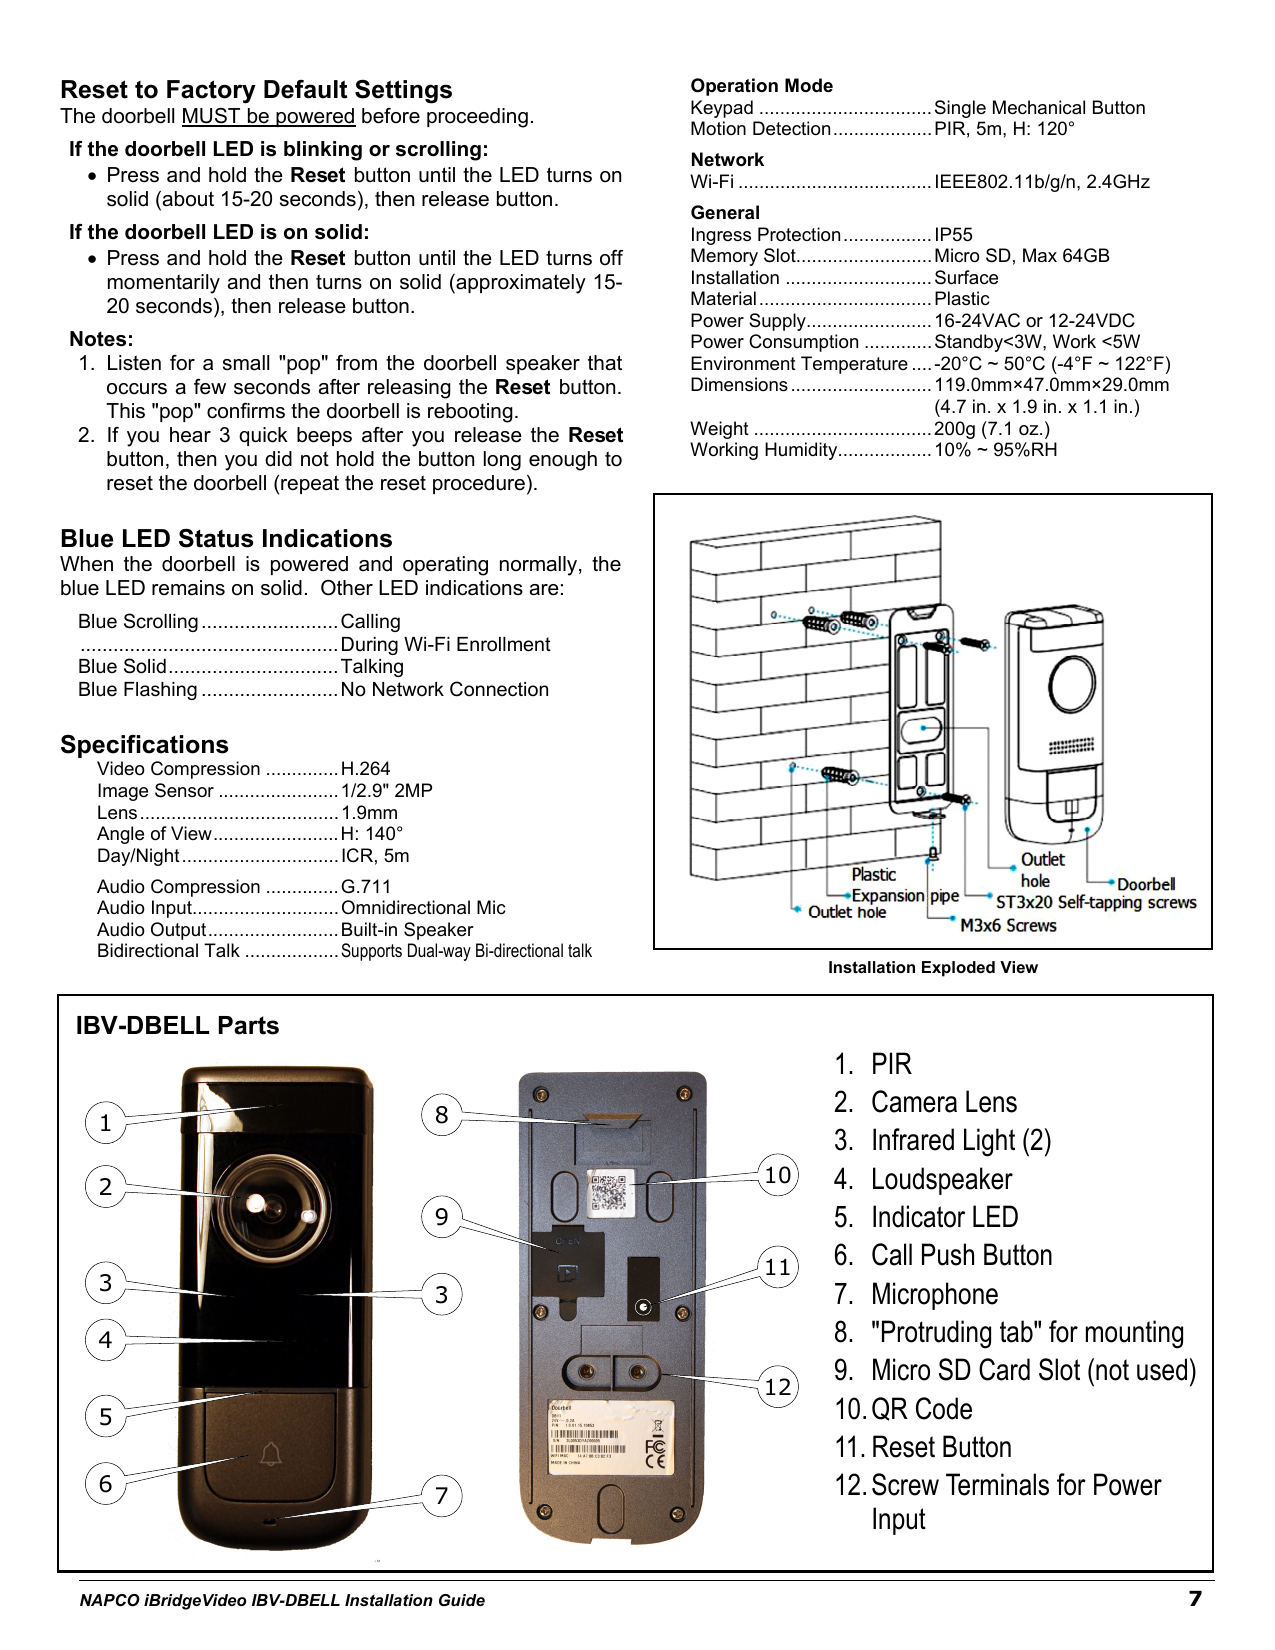
- Place the oval hole in the Mounting Bracket over the two doorbell wires, with the two mounting holes at the top. Use a level to ensure horizontal mounting, and mark the location of the three mounting holes.
- On brick, stucco, or concrete, drill holes and install anchors (not needed on wood or siding). Secure the Mounting Bracket to the mounting surface (see Installation Exploded View below).
- Connect the existing doorbell wiring to the IBV-DBELL terminals, then feed the wires back into the wall. Note: Wires are non-polarized — either wire can connect to either terminal.
Installing the Chime Module
The Chime Kit module (used only when connecting the IBV-DBELL to a wired doorbell chime) helps maintain correct power to trigger your existing home wired chime mechanism.
- Ensure the doorbell circuit is unpowered (remove power at the breaker).
- Locate the existing internal doorbell chime mechanism and remove its cover.
- On the side of the Chime Kit module is a socket — insert the harness plug until it snaps in place.
- Inside the existing chime mechanism are two wires connected to two terminals (usually labeled "FRONT" and "TRANS"/"COMM"). Without removing the existing wires, loosen each terminal and connect one Chime Kit wire to each.
- Restore power at the breaker. The LED at the front of the IBV-DBELL should light (may take a couple of minutes to fully power up). Then follow the Doorbell Enrollment process to enroll the IBV-DBELL into your iBridgeVideo account. After enrollment, secure the doorbell to its Mounting Bracket by sliding the top into the protruding tab and securing the bottom with the provided screw.
Doorbell Enrollment Using the App
Perform only after the doorbell has been activated at www.NapcoComNet.com and is powered, with its blue LED flashing continuously.
- Connect your smart device to the local Wi-Fi network.
- Open the iBridgeVideo app, type your Username (full email address) and Password, and tap Login.
- Tap "+" to add the doorbell.
- Scan the QR code on the back of the doorbell, then tap OK (or tap "Manually enter SN" and type the serial number if scanning fails).
- Tap Next to connect the doorbell to the Wi-Fi network.
- Enable the doorbell "hotspot": with the LED flashing, press and release the Reset button on the back of the doorbell. It will beep 3 times and the LED will begin to scroll. Tap Next.
- Connect your smart device to the doorbell: temporarily go into your smart device's Wi-Fi Settings and select the doorbell from the Wi-Fi list, then return to the app and tap Next.
- Tap to select the name of the 2.4GHz Wi-Fi network to connect the doorbell to.
- Type the SSID password (tap the "eye" icon to view characters; check "Save password" to remember it), then tap Connect. Important: an incorrect password will prevent the doorbell from connecting.
- Wait for the Wi-Fi connection to complete (may take up to a minute). On success, the LED stops flashing and turns solid blue — tap Yes to continue. If unsuccessful, tap Add Again to retry.
- After the confirmation screen appears, confirm your Time Zone and optionally enable Daylight Saving Time (DST). Enable "Set to default" to save these settings for future devices, then tap Next.
- Test the system by pressing the Call Push Button — a live video feed should appear.
If the Doorbell Does Not Connect (LED keeps flashing): check Wi-Fi signal strength from the doorbell location (3+ bars recommended) and verify the SSID password. Tap Add Again to repeat steps 6–11 if needed.
Linking to a Chime Mechanism
To program the IBV-DBELL to trigger a new or existing wired doorbell chime (mechanical or electronic):
- Tap the "gear" icon (Device Info screen) and tap Link Chime.
- Tap "+ New Link".
- To link a wireless IBV-CHIME, select it from the list and tap Save (it must be enrolled first — see the IBV-CHIME User's Guide). To use the existing wired chime mechanism, tap "Link Third Party Chime" at the bottom of the screen.
- Select the wired chime type — Electronic Chime or Mechanical Chime — then tap OK.
Set Up Motion Detection
Motion Detection sends notifications and video clips when movement is sensed in a selected area.
- In the Device "Home" screen, tap the ">" icon to open the Device Info screen.
- Tap PIR Area.
- In the detection area image, tap and hold the "zoom" slider at left to adjust the detection range — selected sensitivity zones turn blue. Tap a zone to disable it; tap again to re-enable.
- Tap the "save" (floppy disk) icon at top right when finished.
How to Answer a Doorbell
When the doorbell rings, your smart device receives a notification with Mute, Accept, and Hang Up options. Tap Accept (green telephone icon) to see live streaming video on your smart device.
How to Program a New Wi-Fi SSID
If you change your Wi-Fi network (e.g., replace your router):
- In the main Device screen, tap the doorbell thumbnail showing "Offline".
- Tap the Settings gear icon to open Device Info.
- Tap Delete Device to remove the doorbell from the app.
- Re-enroll the doorbell by following the Doorbell Enrollment steps above.
Reset to Factory Default Settings
The doorbell must be powered before proceeding.
- If the LED is blinking or scrolling: press and hold Reset until the LED turns on solid (~15–20 seconds), then release.
- If the LED is on solid: press and hold Reset until the LED turns off momentarily and then turns on solid (~15–20 seconds), then release.
Notes: Listen for a small "pop" from the speaker a few seconds after release, confirming the reboot. If you hear 3 quick beeps after releasing, you didn't hold the button long enough — repeat the reset procedure.
Blue LED Status Indications
| LED State | Meaning |
|---|---|
| Blue Scrolling | Calling, or during Wi-Fi Enrollment |
| Blue Solid | Talking (powered/operating normally) |
| Blue Flashing | No network connection |
Specifications
| Video Compression | H.264 |
| Image Sensor | 1/2.9" 2MP |
| Lens | 1.9mm |
| Angle of View | H: 140° |
| Day/Night | ICR, 5m |
| Audio Compression | G.711 |
| Audio Input / Output | Omnidirectional Mic / Built-in Speaker |
| Bidirectional Talk | Supports dual-way bi-directional talk |
| Keypad | Single mechanical button |
| Motion Detection | PIR, 5m, H: 120° |
| Wi-Fi | IEEE 802.11 b/g/n, 2.4GHz |
| Ingress Protection | IP55 |
| Memory Slot | Micro SD, max 64GB |
| Installation | Surface |
| Material | Plastic |
| Power Supply | 16-24VAC or 12-24VDC |
| Power Consumption | Standby <3W, Working <5W |
| Environment Temperature | -20°C to 50°C (-4°F to 122°F) |
| Dimensions | 119.0mm × 47.0mm × 29.0mm (4.7 × 1.9 × 1.1 in.) |
| Weight | 200g (7.1 oz.) |
| Working Humidity | 10% ~ 95% RH |
Parts Diagram & Installation Reference
Warranty
NAPCO warrants its products to be free from manufacturing defects in materials and workmanship for twelve months following the date of manufacture. NAPCO will, at its option, repair or replace any product failing to operate correctly without charge to the original purchaser, within that period. Does not apply to equipment repaired by others, improperly installed, misused, abused, altered, or damaged. There are no warranties beyond what's described here; NAPCO disclaims implied warranties of merchantability or fitness for a particular purpose.
Contact your security professional for warranty claims. NAPCO recommends the entire system be tested weekly.
NAPCO Security Systems, Inc. — 333 Bayview Avenue, Amityville, New York 11701. Sales/Repairs: (800) 645-9445. Technical Service (security professionals only): (800) 645-9440, tech.napcosecurity.com