
Jasco/GE AS2006 Z-Wave Add-on Switch (JA46200) — Quick Start Guide
Quick start guide for the Jasco/GE AS2006 (model 46200) Z-Wave Add-on Switch, which converts any GE/Jasco smart control into a multi-location (3-way) switch.
Full text manual (for reference)
Quick start guide for the Jasco/GE AS2006 (model 46200) Z-Wave Add-on Switch — an in-wall companion switch that converts any GE/Jasco smart control (Z-Wave, Zigbee, or Bluetooth) into a multi-location (3-way, 4-way, etc.) switch. Each smart control supports up to 4 add-on switches.
Important — Not a Standalone Device
The add-on switch is not wireless-enabled and must be used exclusively alongside one of the GE/Jasco wireless primary devices (Z-Wave, ZigBee, or Bluetooth). It cannot control an electrical load on its own, has no wireless functionality, and does not act as a network repeater.
Tools & Preparation
- 3-way switches can be wired multiple ways — these instructions cover the most common method. If your home wiring differs or you're unsure, contact a licensed electrician.
- Shut off power to the circuit at the breaker box or fuse box, and verify power is OFF before continuing.
- Remove both wallplates and switch mounting screws, then carefully remove both switches from their boxes without disconnecting the wires yet.
- Identify the "line switch" (connected to the fuse/breaker box) and label its common-terminal wire "LINE." Identify the "load switch" (connected to the light fixture) and label its common-terminal wire "LOAD."
Wiring Diagram Reference
The diagram below shows the standard 3-way switch layout alongside the GE-branded primary + add-on switch configuration, with all terminal labels (T1, T2, LINE, LOAD, COMMON, GROUND, NEUTRALS, and the GE-specific A/AA/B/BB/C/CC/D/DD terminals).
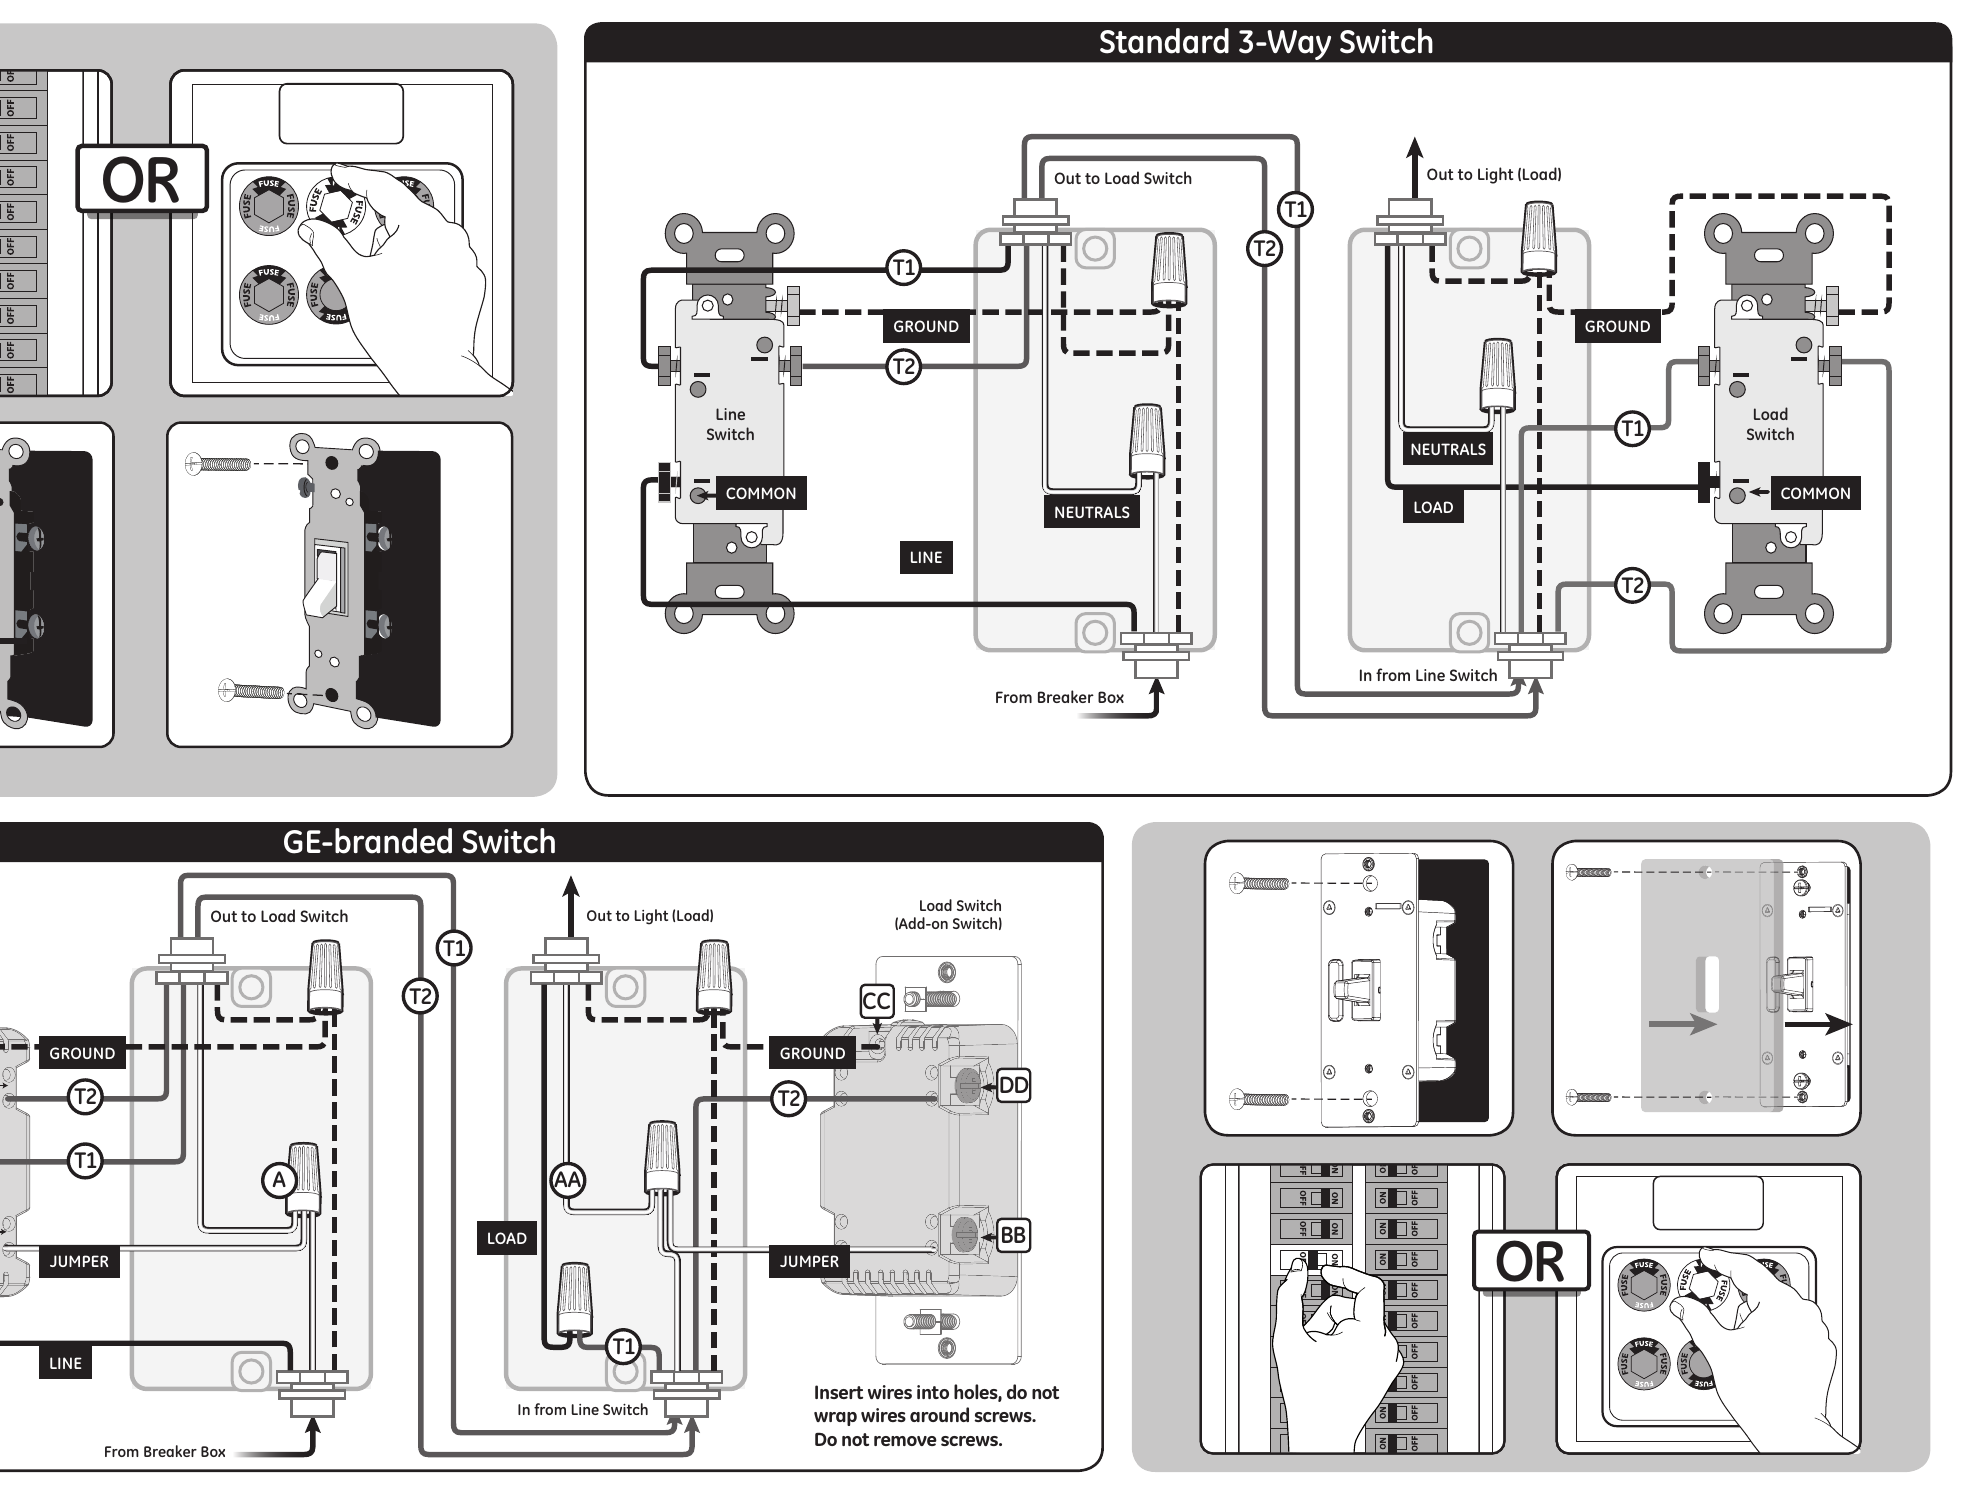
Wiring the Primary (Line) Switch — Replacing the Standard Switch with the GE Z-Wave Primary Switch
- Disconnect all wires on the existing switch.
- Locate the neutral wires inside the switch box (typically a bundle of white wires at the back). Remove the wire nut securing them (A).
- Locate the jumper wire included with the primary switch's packaging. Connect it to the neutral wires and secure with a wire nut (A).
- Connect the opposite end of the jumper wire to the NEUTRAL terminal on the Z-Wave primary switch (B).
- Connect the wire labeled "LINE" to one of the LINE/LOAD terminals on the primary switch (C).
- Connect the ground wire (bare/copper/green) to the GROUND terminal on the primary switch (D).
- Connect one of the two remaining wires (T1) to the other LINE/LOAD terminal (E). Write down this wire's color — you'll need it when installing the add-on switch.
- Connect the remaining wire (T2) to the TRAVELER terminal on the primary switch (F).
Wiring the Add-on (Load) Switch — Replacing the Standard Switch with the GE Add-on Switch
- Disconnect all wires on the existing switch.
- Locate the neutral wires inside the switch box. Remove the wire nut securing them (AA).
- Locate the jumper wire included with the primary switch's packaging. Connect it to the neutral wires and secure with a wire nut (AA).
- Connect the opposite end of the jumper wire to the NEUTRAL terminal on the Z-Wave add-on switch (BB).
- Connect the ground wire (bare/copper/green) to the GROUND terminal on the add-on switch (CC).
- Locate the same colored wire you wrote down earlier (T1) in the switch box. Using a wire nut, secure it only to the wire you labeled "LOAD."
- Connect the remaining wire to the TRAVELER terminal on the add-on switch (DD) — this will match the color of the wire connected to the TRAVELER terminal on the primary switch.
Finishing Up
- Place both switches into their respective boxes, being careful not to pinch or crush wires.
- Secure each switch using the supplied screws, then mount each wallplate.
- Reapply power to the circuit at the fuse box or circuit breaker, and test the system.
Wiring Requirements
- This add-on switch is rated for and must only be used with copper wire.
- Use 14 AWG or larger wire suitable for at least 80°C for line (hot), load, neutral, ground, and traveler connections.
- Attach wires using the enclosure's holes — insert wires into the holes, do not wrap them around the screws, and do not remove the screws.
- Wire strip length: 5/8 in. (16mm). UL specifies a screw tightening torque of 14 Kgf-cm (12 lbf-in).
- Installation must comply with the National Electric Code and local regulations (U.S.) or the Canadian Electrical Code and local regulations (Canada).
Safety Warnings
- Risk of fire, electrical shock, and burns. Turn off power to the branch circuit at the service panel before any wiring — all connections must be made with power OFF.
- Do not exceed ratings. Do not use to control any device where unintended operation could create unsafe conditions (heat lamps, sun lamps, etc.). Do not use to control receptacles. For indoor use only.
- Z-Wave-enabled devices should never be used to supply power to or control the ON/OFF status of medical or life-support equipment.
Specifications
| Model | AS2006 (46200) |
| Power | 120/277VAC, 60Hz |
| Operating temperature | 32–104°F (0–40°C) |
| Use | Indoor use only |
| Action type | Type 1 |
Warranty
Jasco Products Company warrants this product free from manufacturing defects for two years from the original date of consumer purchase (repair/replacement only). Contact U.S.-based Consumer Care at 1-800-654-8483 (option 1), M–F 7AM–8PM CST, or visit www.byjasco.com. Distributed by Jasco Products Company LLC, Building B, 10 E. Memorial Rd., Oklahoma City, OK 73114. Made in China.