
Ezlo Z-Wave Thermostat (EZL-TSTAT-US) — Installation Manual
Installation manual for the Ezlo Z-Wave Thermostat (EZL-TSTAT-US), covering wiring for 13 HVAC configurations, menu settings, and Z-Wave network inclusion.
Full text manual (for reference)
Overview
The Ezlo Z-Wave Thermostat (Model EZL-TSTAT-US) is a battery- or AC/DC-powered smart thermostat with touch button operation, a built-in ambient temperature sensor, and Z-Wave 800 series connectivity with S2 encryption. It supports gas/fuel boiler, electric heating, water heating, heat pump, and other HVAC control systems — 8 types of control systems in total.
Product Specifications
| Spec | Value |
|---|---|
| Power Supply | AC/DC 24V or 4x AAA dry battery (device enters low-power working state on battery) |
| Application Range | Gas/fuel boiler, electric heating, water heating, heat pumps & more |
| Display | Frameless, tempered glass + PC + ABS |
| Self-Consumption | <1W |
| Resistive Load | <1A |
| Temp. Setting Range | 0–40°C (32–99°F) |
| Precision | 0.1°C (1°F) |
| Dimension | 113 × 113 × 19mm (4.45 × 4.45 × 0.75 in.) |
| Installation | 60.3mm (2.37 in.) hole pitch |
| Z-Wave Frequency | 904.42 MHz with S2 encryption |
Package Contents
- 1x Thermostat
- 1x Back plate
- 4x Wall anchors
- 4x Wall mounting screws
- 2x Base plate securing screws
Required (not included): Philips head screwdriver, flat head screwdriver.
Safety Warnings
- Do not expose the device to moisture, water, or other liquids. This product is for indoor use only.
- Do not attempt to disassemble, repair, or modify the device yourself.
- Risk of electric shock — more than one disconnect switch may be required to de-energize the equipment before servicing.
- Always turn off power to the system before beginning any wiring work, and double-check all connections before restoring power.
- If the thermostat being replaced contains mercury, dispose of it according to federal, state, and local regulations.
- If you are not comfortable with electrical wiring, call a professional electrician.
Wiring Terminal Reference
| Terminal | Description |
|---|---|
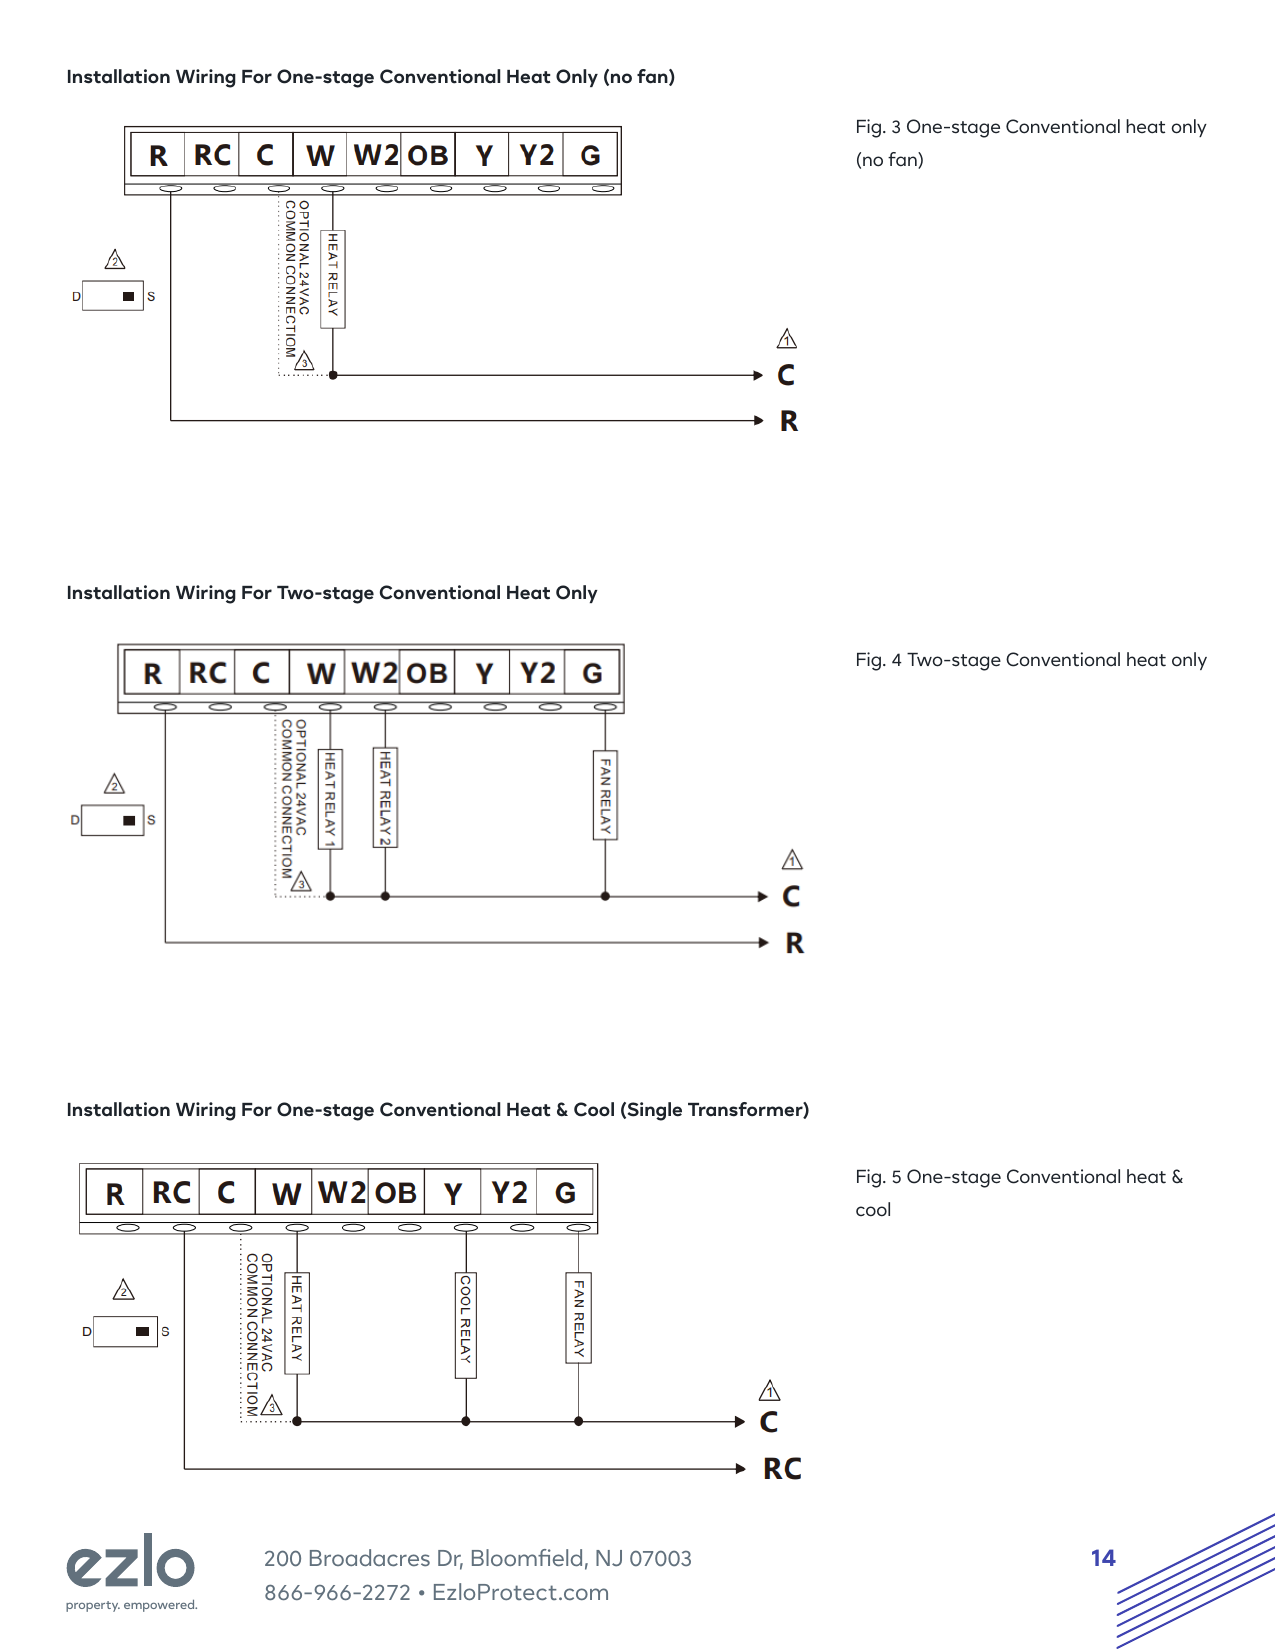
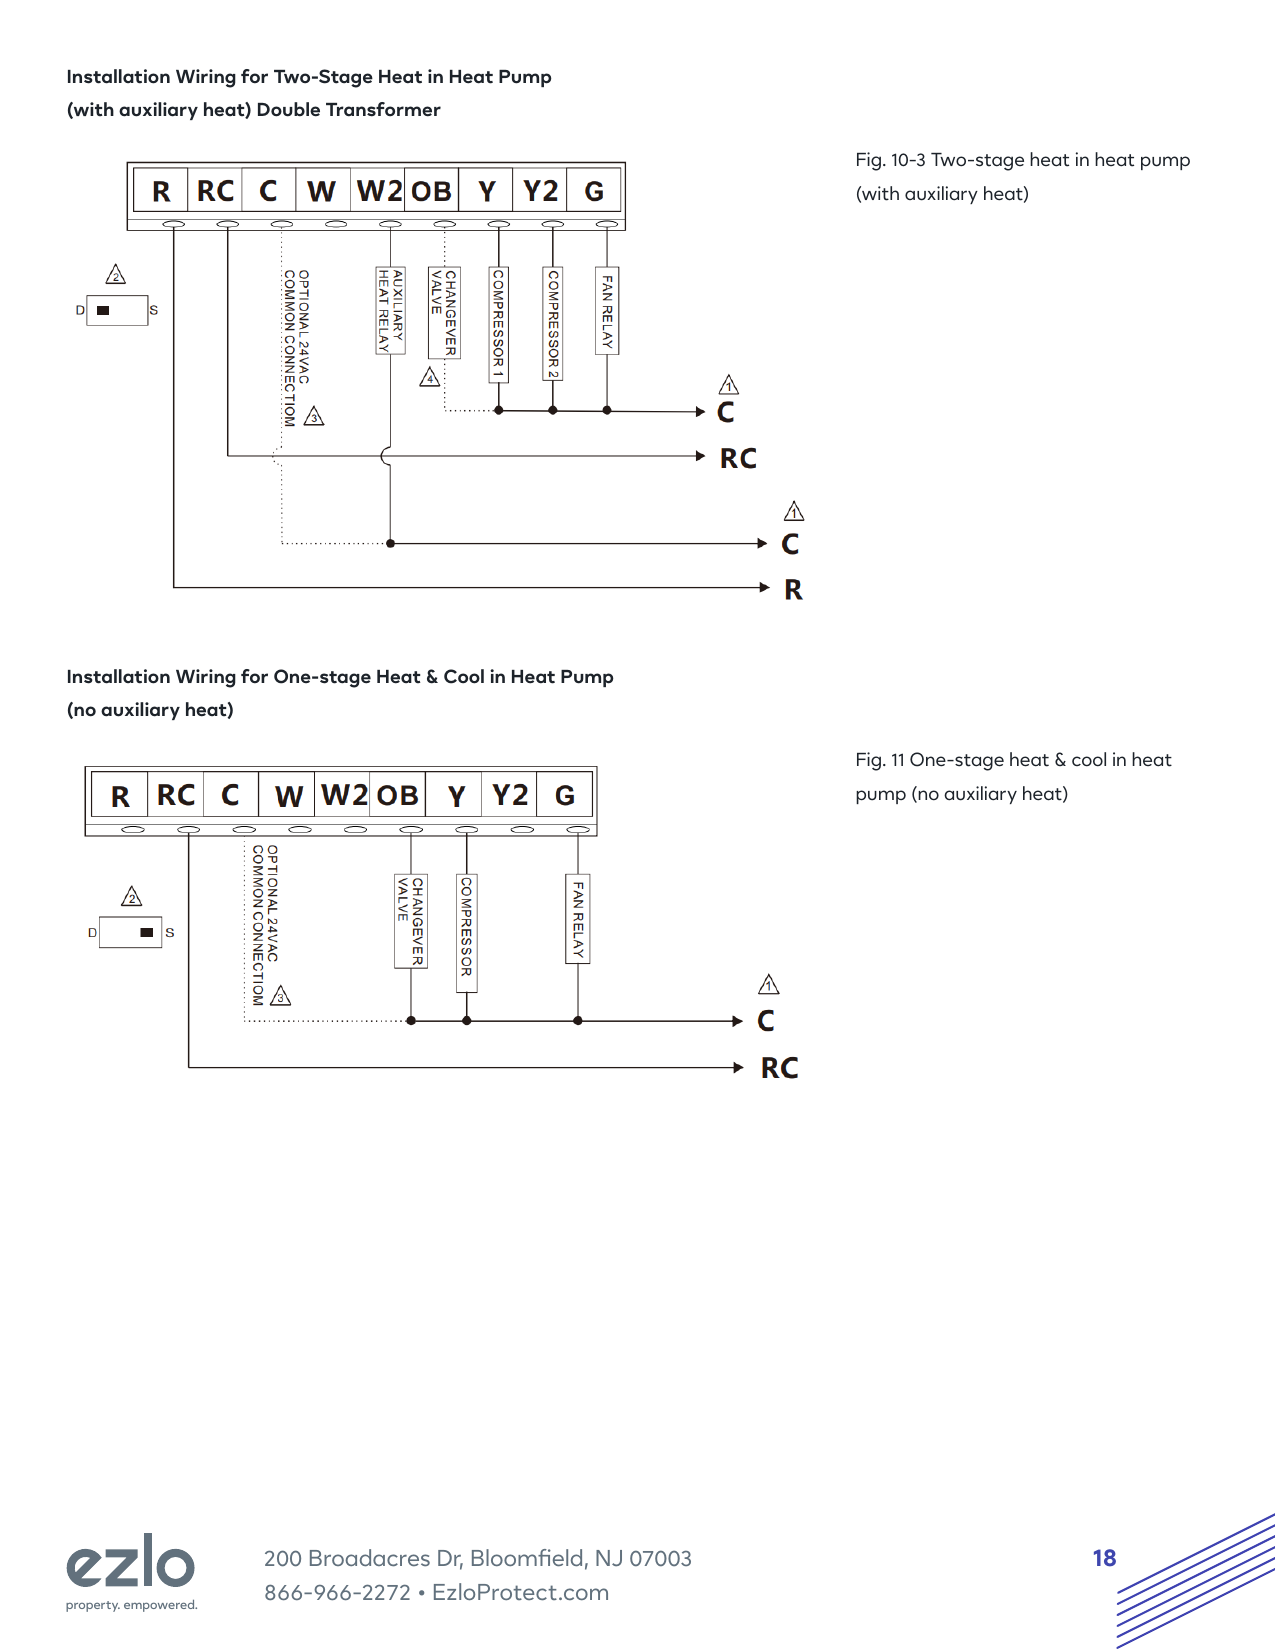
| R | Power for heating — connects to secondary side of heating system transformer |
| RC | Power for cooling — connects to secondary side of cooling system transformer |
| C | Common wire from secondary side of cooling or heating system transformer |
| W | Heat relay (stage 1) |
| W2 | Second-stage heat relay, or auxiliary heat relay |
| OB | Changeover valve for heat pump systems |
| Y | Compressor contactor (stage 1) |
| Y2 | Compressor contactor (stage 2) |
| G | Fan relay |
Note: R (Red), W (White), G (Green), Y (Yellow), and C (Blue) are the typical wire colors found on an existing thermostat, but always label wires by terminal, not by color, when removing an old thermostat.
Removing the Existing Thermostat
- Switch off power to the HVAC system, either at the unit itself or at the circuit breaker panel.
- Remove the cover of the existing thermostat to reveal the wiring terminals.
- Take a photo of the wiring terminals for reference.
- Label each wire according to its terminal (not by wire color).
- Remove the base of the old thermostat, taking care not to let the wires fall back into the wall.
Supported Wiring Configurations
The Ezlo Z-Wave Thermostat supports 13 wiring configurations, from simple conventional systems to complex two-stage heat pump systems with auxiliary heat:
- One-stage / Two-stage Conventional cool only
- One-stage Conventional heat only (with or without fan)
- Two-stage Conventional heat only
- One-stage / Two-stage Conventional heat & cool (single or double transformer)
- One-stage / Two-stage Cool in heat pump
- One-stage / Two-stage Heat in heat pump (optional Aux, single or double transformer)
- One-stage / Two-stage Heat & cool in heat pump (optional Aux, single or double transformer)
Menu & Configuration Highlights
| Menu # | Item | Default | Notes |
|---|---|---|---|
| 1 | Temp. Unit | F | C: Celsius, F: Fahrenheit |
| 2 | Power Failure Memory | 1 | 0: shuts down on power restore, 1: resumes last working mode |
| 5 | Backlight Brightness | 8 | 1–8 level, 1 dimmest, 8 brightest |
| 6 / 7 | Temp. Upper / Lower Limit | 37°C/98°F, 5°C/41°F | Sets the allowable setpoint range |
| 15 | System Control Type | 7 | 0=cool only 2C, 1=heat only 2H, 2=cool/heat 2C/2H, 3–7 for various heat pump configurations with/without AUX |
| 16 | Changeover Valve Logic | 0 | Determines whether O/B energizes on cooling or heating call |
| 18 | EM (AUX) Emergency Heat Mode | 0 | Only valid for heat pump systems with heating function |
| 45–141 | Schedule Function | — | 4 periods per day with independent heat/cool setpoints, configurable per day of week |
| 98 | Reset Factory | 0 | 1: restores factory settings |
To access the Secret Menu for full parameter configuration: under the “OFF” interface, long-press “▼” + the center button for 3 seconds.
Including the Thermostat in a Z-Wave Network
With an Ezlo Z-Wave Hub (MiOS app):
- Open the MiOS app, tap “More” then “Devices,” then “+”.
- Select your Ezlo Z-Wave Hub from the Controllers list.
- Choose “Generic Z-Wave Devices” and press “Next”.
- On the thermostat, long-press the “▼” and “▲” buttons simultaneously for 3 seconds to enter the Z-Wave inclusion/exclusion menu.
- Short-press the center button to enter learning mode. A node ID displays on success.
With a third-party Z-Wave hub: Put the hub into inclusion mode first, then follow the same on-device steps above. To exclude, follow the same steps — the device restores Z-Wave factory settings when removed.
Z-Wave Command Classes
S2 Supported: Version, Device Reset Locally, Battery, Thermostat Setpoint, Thermostat Mode, Thermostat Operating State, Thermostat Fan Mode/State, Time, Time Parameters, Configuration, Association, Association Grp Info, Manufacturer Specific, Powerlevel, Sensor Multilevel, Multi Channel Association, Firmware Update MD.
Non-S2 Support: Zwaveplus Info, Security 2, Transport Service, Supervision.
Regulatory & Warranty
This device complies with Part 15 of the FCC Rules and Industry Canada's licence-exempt RSS standards, and CAN ICES-3 (B)/NMB-3(B). This equipment should be installed and operated with a minimum distance of 20cm between the radiator and your body.
1-Year Limited Warranty against defects in material and workmanship under normal and proper use, from the original purchase date. Does not cover damage from improper installation, accident, abuse, misuse, natural disaster, abnormal electrical/mechanical/environmental conditions, or unauthorized disassembly/repair/modification.
Ezlo Innovation, 200 Broadacres Dr, Bloomfield, NJ 07003. Toll-free: 866-966-2272 • EzloProtect.com