
Aeotec TriSensor 8 (ZWA045) — Z-Wave Plus Multi-Sensor User Guide
User guide for the Aeotec TriSensor 8 (ZWA045) Z-Wave Plus multi-sensor — motion, light, and temperature detection with Gen8 technology.
Full text manual (for reference)
User guide for the Aeotec TriSensor 8 (ZWA045) — a Z-Wave Plus multi-sensor that detects motion, ambient light, and temperature, powered by Aeotec's Gen8 technology.
Overview
The Aeotec TriSensor 8 was developed to detect ambient values and movement and transmit them via Z-Wave Plus. It is battery-powered (CR123A only, non-rechargeable) and pairs with any Z-Wave gateway. Check Aeotec's Z-Wave gateway comparison listing to confirm compatibility with your specific hub.
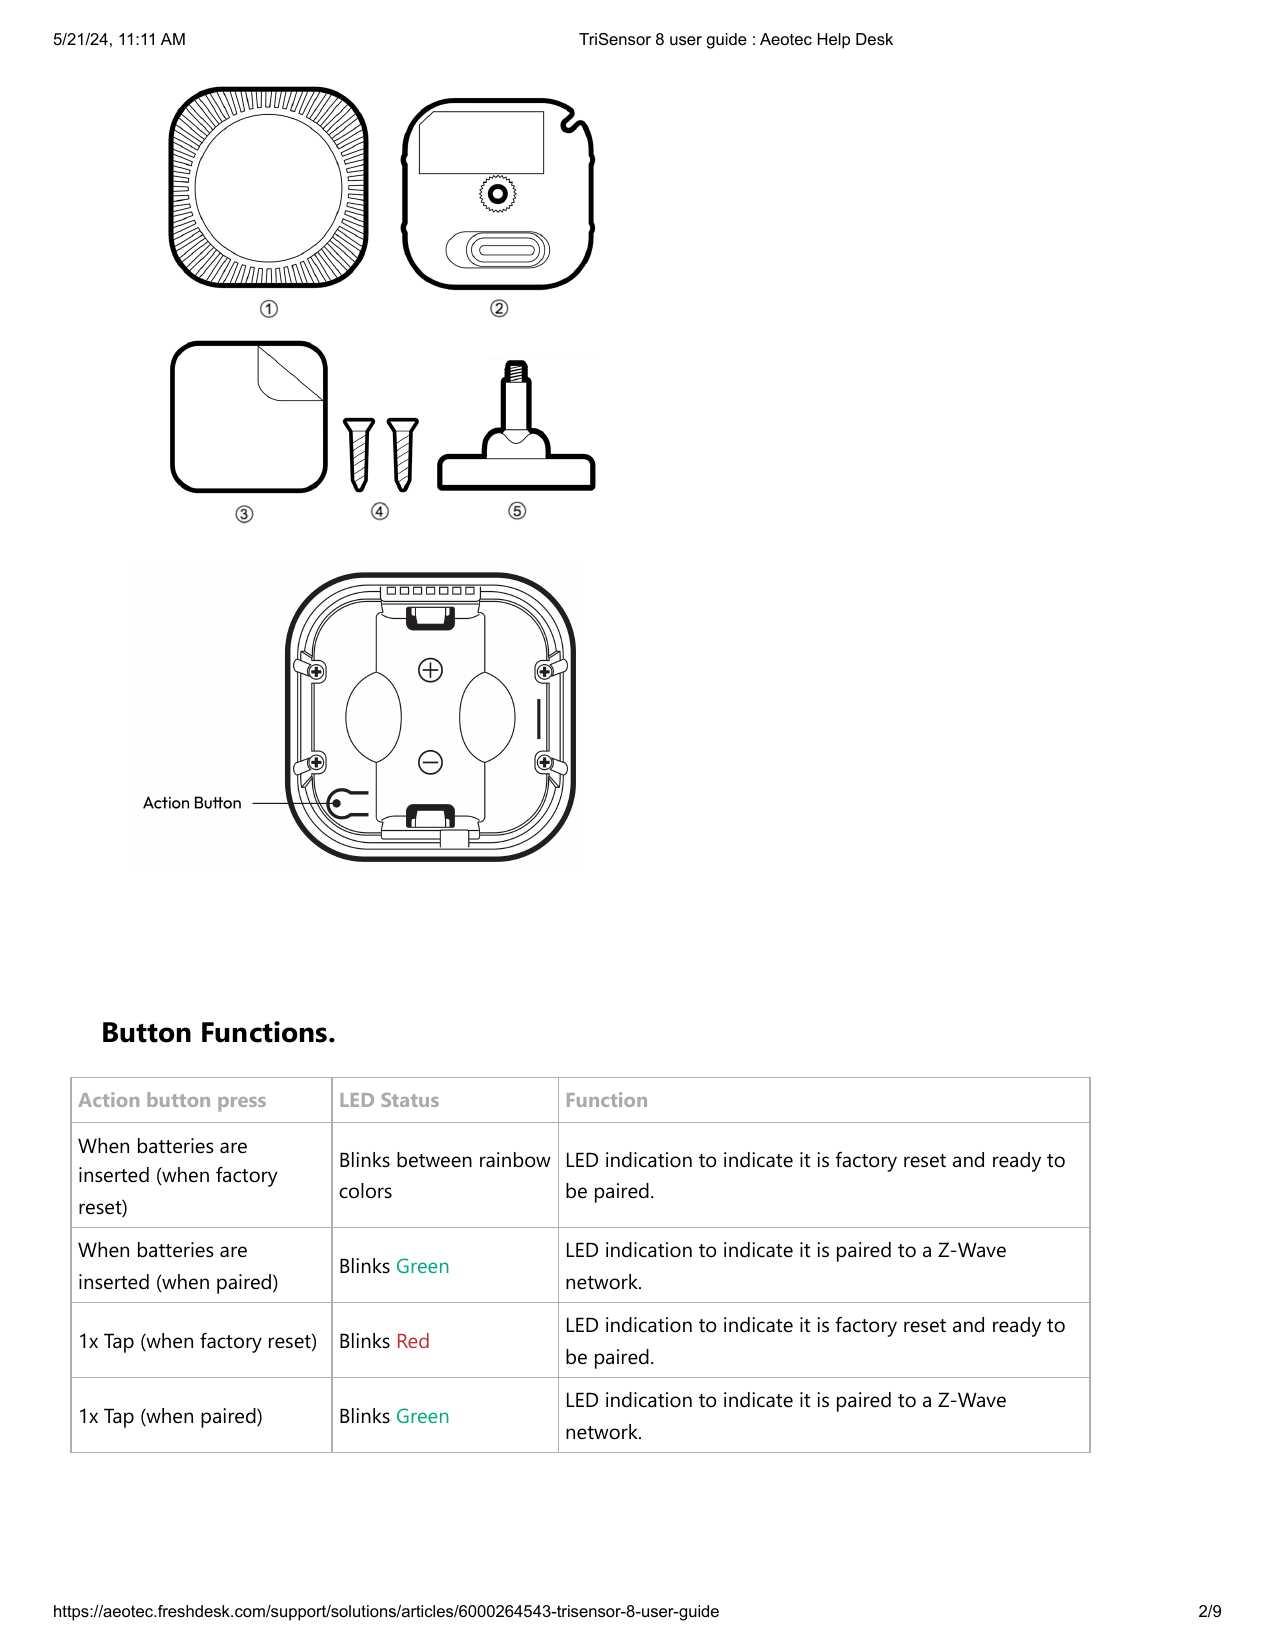
Package Contents
- TriSensor
- Battery Cover
- Double-Sided Tape
- Screws (×2)
- Back Arm Mount
- Warranty Card
- Quick Start Guide
Important Safety Information
- Intended for use in dry locations only — do not use in damp, moist, or wet locations.
- Do not use rechargeable CR123A batteries.
- Keep the product and batteries away from open flames and extreme heat; avoid direct sunlight or heat exposure.
- Remove all batteries from products being stored and not used — leaking batteries may damage the appliance.
- Ensure correct polarity when inserting batteries; improper use may damage the product.
- Contains small parts — keep away from children.
Quick Start — Powering Up
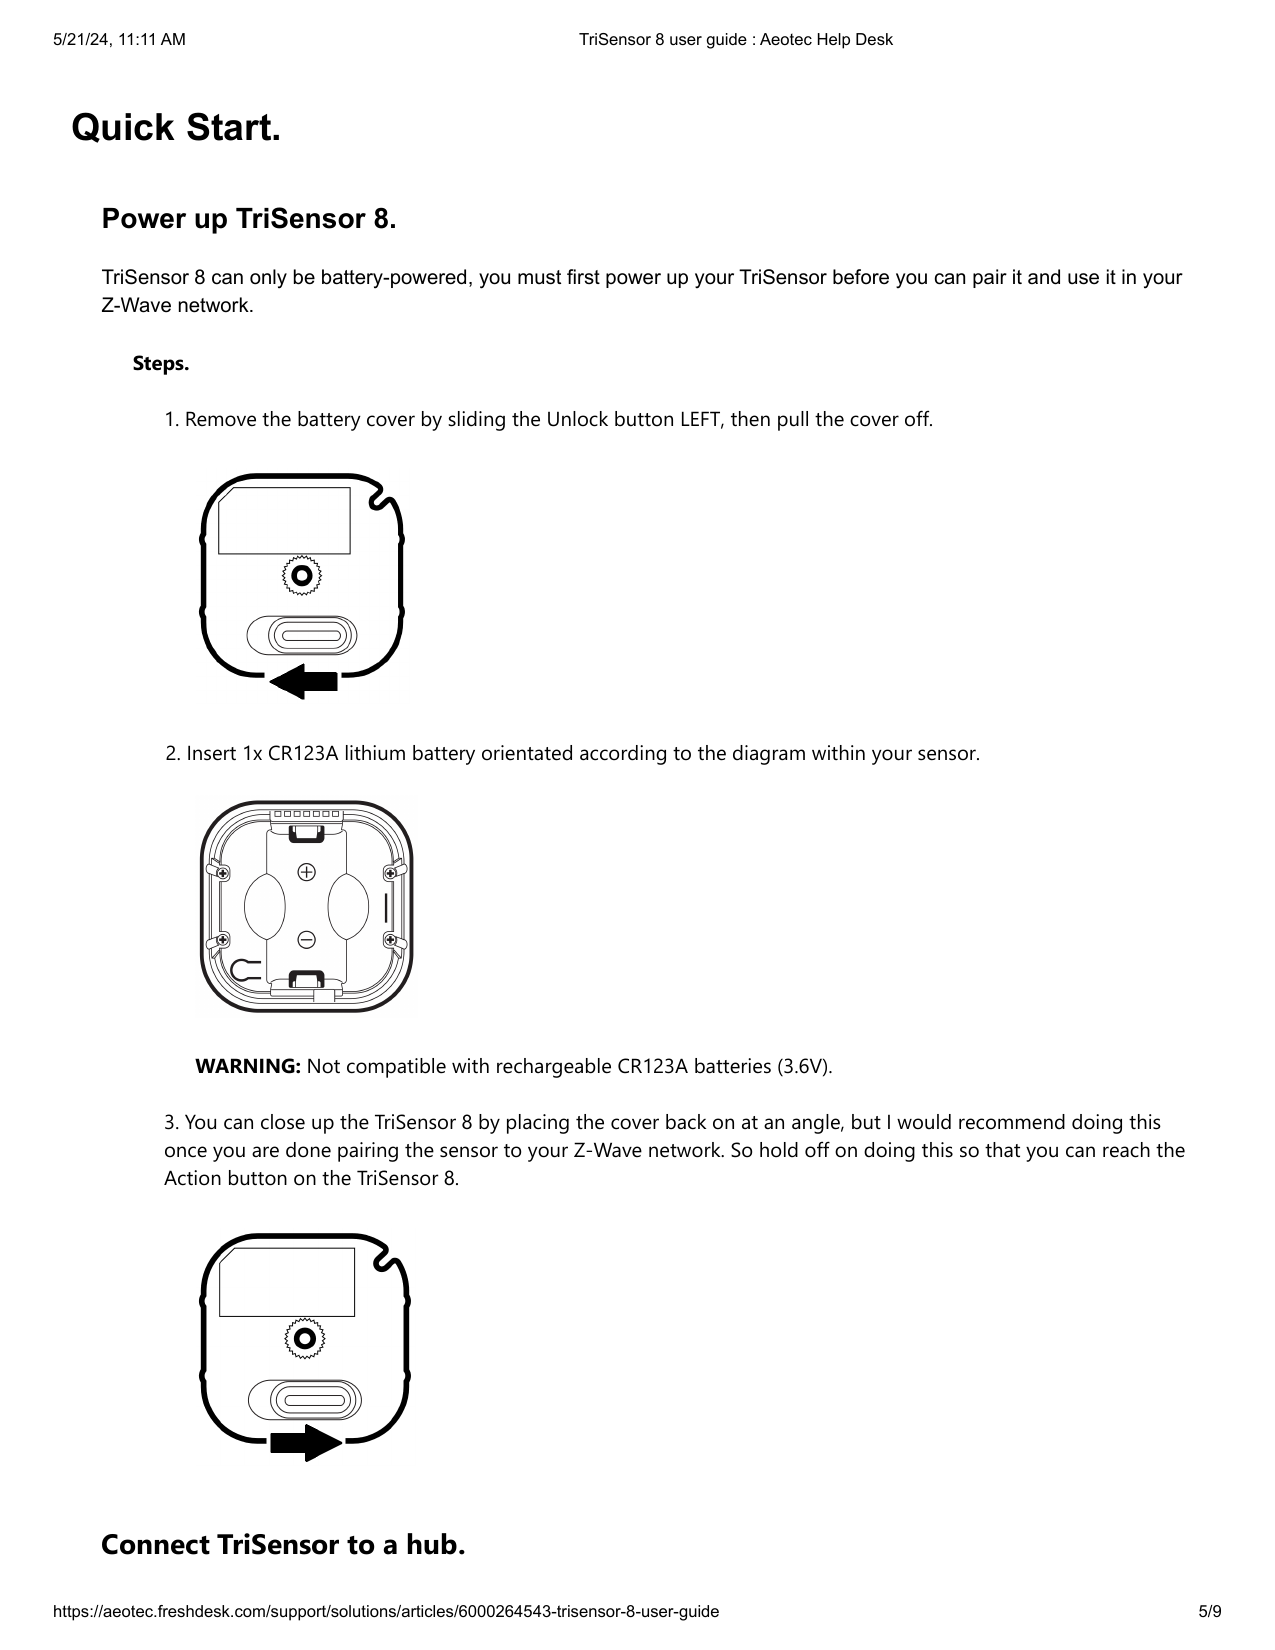
- Remove the battery cover by sliding the Unlock button LEFT, then pull the cover off.
- Insert 1x CR123A lithium battery, oriented per the diagram inside the sensor. Warning: not compatible with rechargeable CR123A batteries (3.6V).
- You can close the cover by placing it back on at an angle, but it's best to wait until pairing is finished so you can still reach the Action button.
Connecting TriSensor to a Hub
- Aeotec Smart Home Hub / SmartThings: open the SmartThings app → tap + → Add (next to Partner devices) → select "Aeotec" → Add without QR Code → "Motion Sensor" or "Multipurpose Sensor" → tap the Action Button 3x within 1.5 seconds on the TriSensor 8 → select "Secure Setup" → scan the QR code or enter the 5-digit DSK code.
- Home Assistant / Z-WaveJS: Configuration → Integrations → Configure → ADD NODE → START INCLUSION, then tap the Action button 3x within 1.5 seconds to pair.
- Hubitat: Devices → Discover Devices → Z-Wave → Start Z-Wave Inclusion, then tap the Action button 3x within 1.5 seconds to pair.
- SmartStart QR code: if your Z-Wave gateway supports SmartStart, scan the QR code on the TriSensor 8 to auto-pair.
- Most other hubs: set your Z-Wave hub to connect new devices, tap the Action button 3x within 1.5 seconds, then scan the QR code or enter the 5-digit DSK code if prompted.
Action Button Functions
| Action | LED Status | Function |
|---|---|---|
| Batteries inserted (factory reset) | Blinks between rainbow colors | Ready to be paired |
| Batteries inserted (already paired) | Blinks Green | Paired to a Z-Wave network |
| 1x Tap (factory reset) | Blinks Red | Ready to be paired |
| 1x Tap (paired) | Blinks Green | Paired to a Z-Wave network |
| 3x Tap (factory reset) | Flashes Red | Enters Z-Wave Pair Mode; flashes green 5x on success, or keeps flashing red then stops on failure |
| 3x Tap (already paired) | Flashes Red | Sends NIF / excludes device if the controller is in unpair mode |
| Press & hold 1–2 seconds | No LED | N/A |
| Press & hold 3 seconds | Blinks Blue once | Quick Wakeup — sends a wakeup report to the Z-Wave Controller for queued commands; LED disappears on release |
| Press & hold 3–11 seconds | No LED | Release here to cancel Factory Reset |
| Press & hold 12+ seconds | Flashes red/green on release | Factory Reset Complete |
Placement Considerations
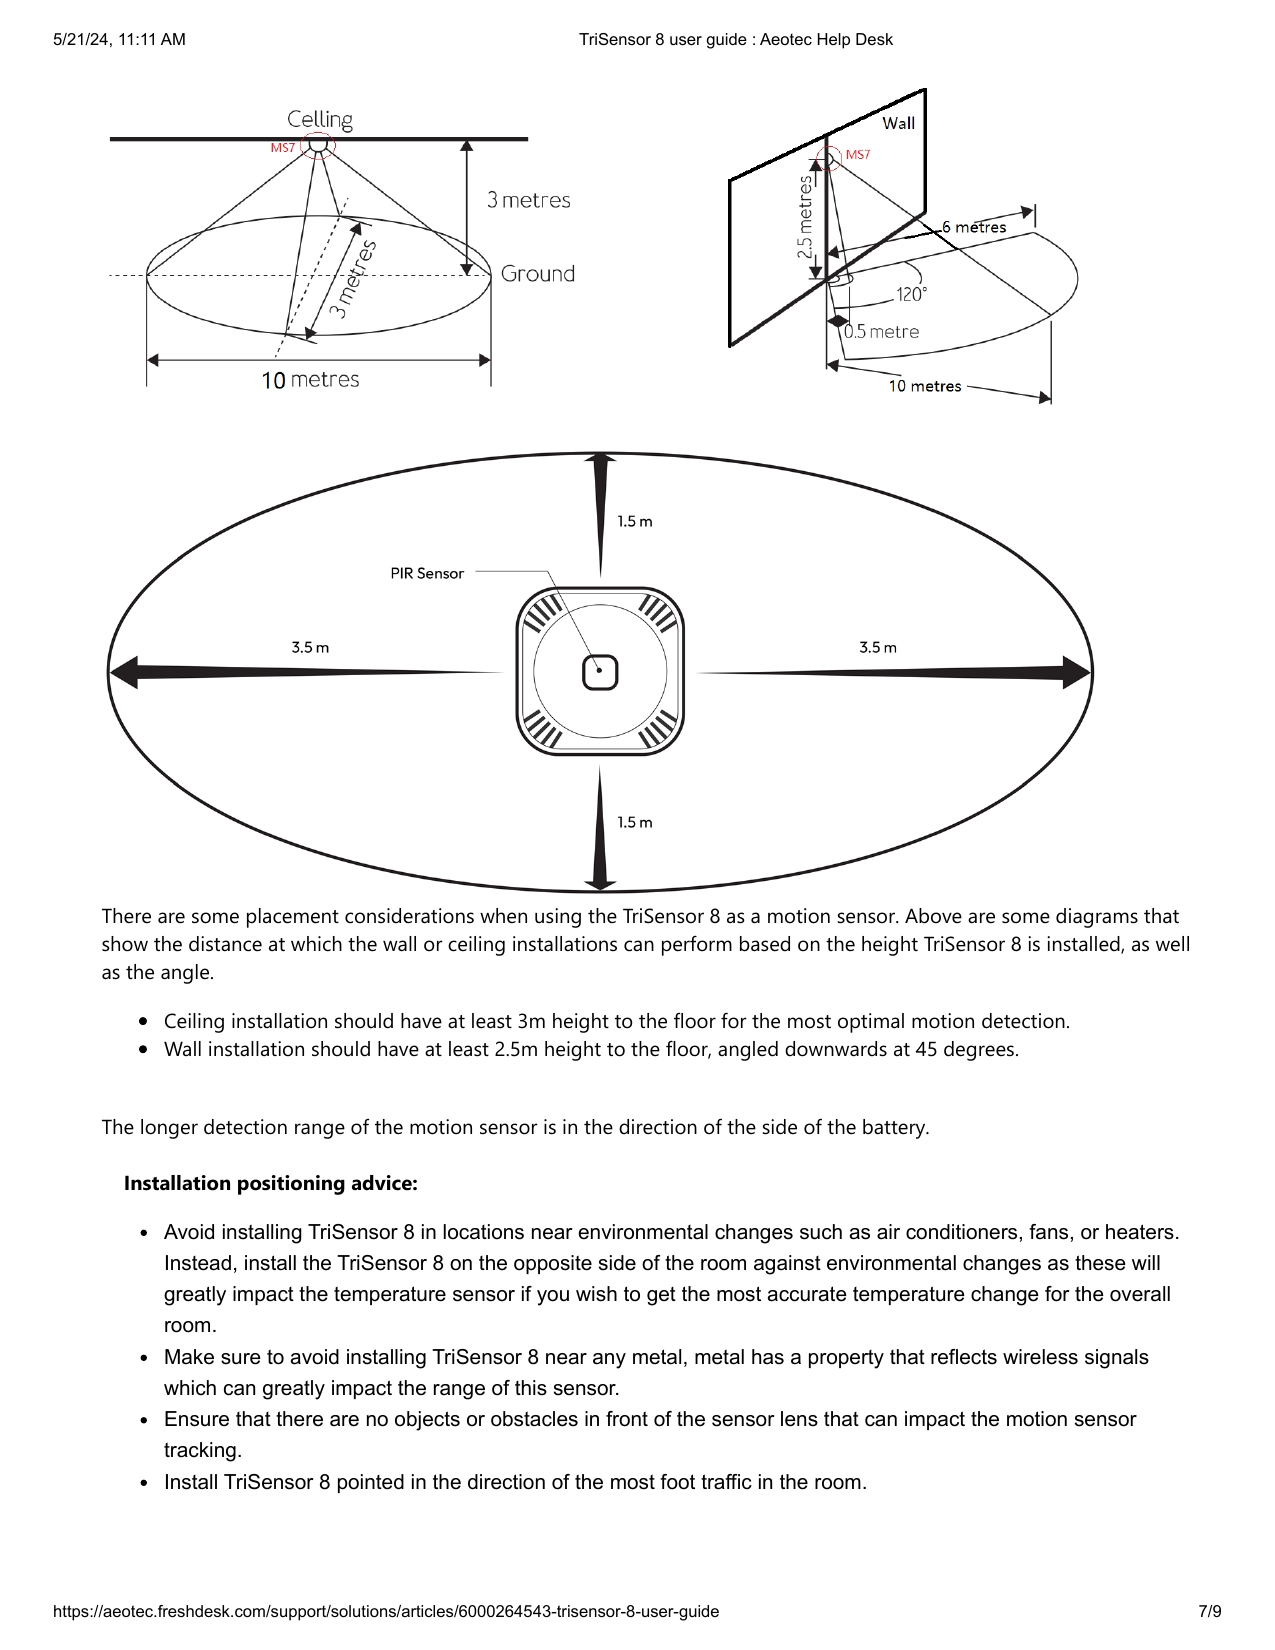
- Ceiling installation should be at least 3m (10ft) above the floor for optimal motion detection.
- Wall installation should be at least 2.5m (8ft) above the floor, angled downward at 45 degrees.
- The motion sensor's longer detection range is toward the side where the battery is located.
- Avoid installing near environmental changes such as air conditioners, fans, or heaters — install on the opposite side of the room from these to get the most accurate temperature readings.
- Avoid installing near metal, which reflects wireless signals and can reduce range.
- Ensure no objects obstruct the sensor lens.
- Point the TriSensor 8 toward the direction of the most foot traffic in the room.
Removing / Resetting TriSensor 8
Z-Wave Exclusion (Using an Existing Gateway)
- Set your Z-Wave gateway into Z-Wave unpair (exclusion) mode.
- Tap the Action button 3x within 1.5 seconds — the red LED will light up.
Manual Hard Reset
Not fully advised unless your gateway has failed — this will factory reset the TriSensor 8 even if currently paired.
- Make sure the device is powered.
- Press and hold the button for 12+ seconds, then release.
- Success is confirmed by the LED flashing red/green quickly.
Waking Up TriSensor 8
The TriSensor 8 typically wakes automatically via the Wakeup command class, with a default interval of once every 43,200 seconds (12 hours). To manually wake it for configuration:
- Press and hold the Action button for 3 seconds.
- Wait until the LED flashes blue.
- Release the button — any queued commands in your Z-Wave Controller will be sent over.
Advanced Settings
Further advanced parameter settings (Configuration Command Class) and group association settings (Association Command Class) are documented in Aeotec's separate engineering sheet, available as a download from Aeotec's support site, and are not covered in this guide.