
Menu
-
-
Home Automation
- Home Automation Controllers
- Lighting & Appliance Controls
- Home Automation Sensors
-
Ventilation, Temperature & Flood Controls
- Ecovent Ventilation Controls
- Keen Home Ventilation Controls
- La Crosse Weather Reporting System
- Sensaphone Temperature/Flood
- Winland Temperature/Flood Reporting
- Ezlo Water/Flood Detection
- WaterBug Water/Flood Detection
- WaterCop Water/Flood Detection
- Specialty Water/Flood Detection
- Temperature & Heat Sensors
- Smart Irrigation Controllers
- Smart Thermostats & Ventilation Controls
- Drapery & Blind Opener Systems
- Window Opener Systems
- Door & Gate Opener Systems
- Garage Remotes & Controllers
- Smart Door Locks
-
Security
-
Home Intercom Systems
-
Specials
-
Audio/Video
-
Independent Living
-
Structured Wiring
-
More...
-
Our Brands
- 2GIG
- A&D Medical
- ABB
- Adorne
- Advanced Dynamics
- Aeotec
- Alfred
- American Hunter
- Applied Digital (ADI)
- AprilAire
- Aria Audio Technology
- Arlington Industries
- Applied Digital (ADI)
- AprilAire
- BackBoxx™
- Bellman & Symfon
- BlueSpray
- Cabletronix
- Caregiver Smart Home Automation
- Chamberlain
- Chief Manufacturing
- Cool Components
- Dakota Alert
- Danalock
- DataComm
- Data-Tronix
- D+H
- Displine
- DoorBell Fon
- DynaQuip Controls - Watercop
- Ecovent
- Elk Products
- Enbrighten
- Evolve Technologies
- Ezlo
- FirstAlert
- Flipper
- Flic
- GE
- GoControl
- Go Simply Connect
- Greenfield Direct
- Hamilton CapTel
- Home Controls In-House Exclusives
- HomeSeer
- Honeywell Home
- ION Digital
- Inovonics Wireless
- Interstate Batteries
- Intrasonic Technology (IST)
- Jasco
- KBSound
- Keen Home
- Kwikset
- La Crosse Alerts
- Letzgo Products
- Leviton
- Linear
- Linxura
- Lithe Audio
- Luxul
- Mail Chime
- MedReady
- myTouchSmart
- Napco Security Systems
- NETIO
- Nice North America
- NuTone
- OEM Systems Co.
- Presence Speakers
- On-Q By Legrand
- Open Sesame
- Optex
- Platinum Tools
- Powerline Control Systems
- Qolsys
- Resideo
- Risco Group
- Russound
- RYSE
- STI
- Sanus
- Satco
- Seco-Larm
- Security Door Controls (SDC)
- Sensaphone
- Sensative
- Serene Innovations
- Shelly
- Simply Automated, Inc. (SAI)
- Skylink
- Somfy Systems
- Sonic Alert
- Speco Technologies
- Stelpro
- Street Smart Security
- Structured Cable Products (SCP)
- TekTone
- Tripp Lite
- Truth Hardware
- U-Tec
- UCS
- USP
- Vera
- Versa
- VMP - Video Mount Products
- VSSL
- WeBoost
- Winland Electronics
- X10
- Yale
- ZTECH
- Shop By Compatibility
- Home Essentials
- Central Vac
-
Our Brands
-
- Orders
- Profile
- 1-858-693-8887
- Login
-
United States (USD $)
Add description, images, menus and links to your mega menu
A column with no settings can be used as a spacer
Link to your collections, sales and even external links
Add up to five columns
Add description, images, menus and links to your mega menu
A column with no settings can be used as a spacer
Link to your collections, sales and even external links
Add up to five columns
ABB-Welcome IP Touch 7 — Mounting & Installation Illustrated Guide
September 08, 2026 2 min read
Illustrated mounting reference for the ABB-Welcome IP Touch 7 panel — flush-mount, surface-mount, and desktop stand installation with dimensions.
Full text manual (for reference)
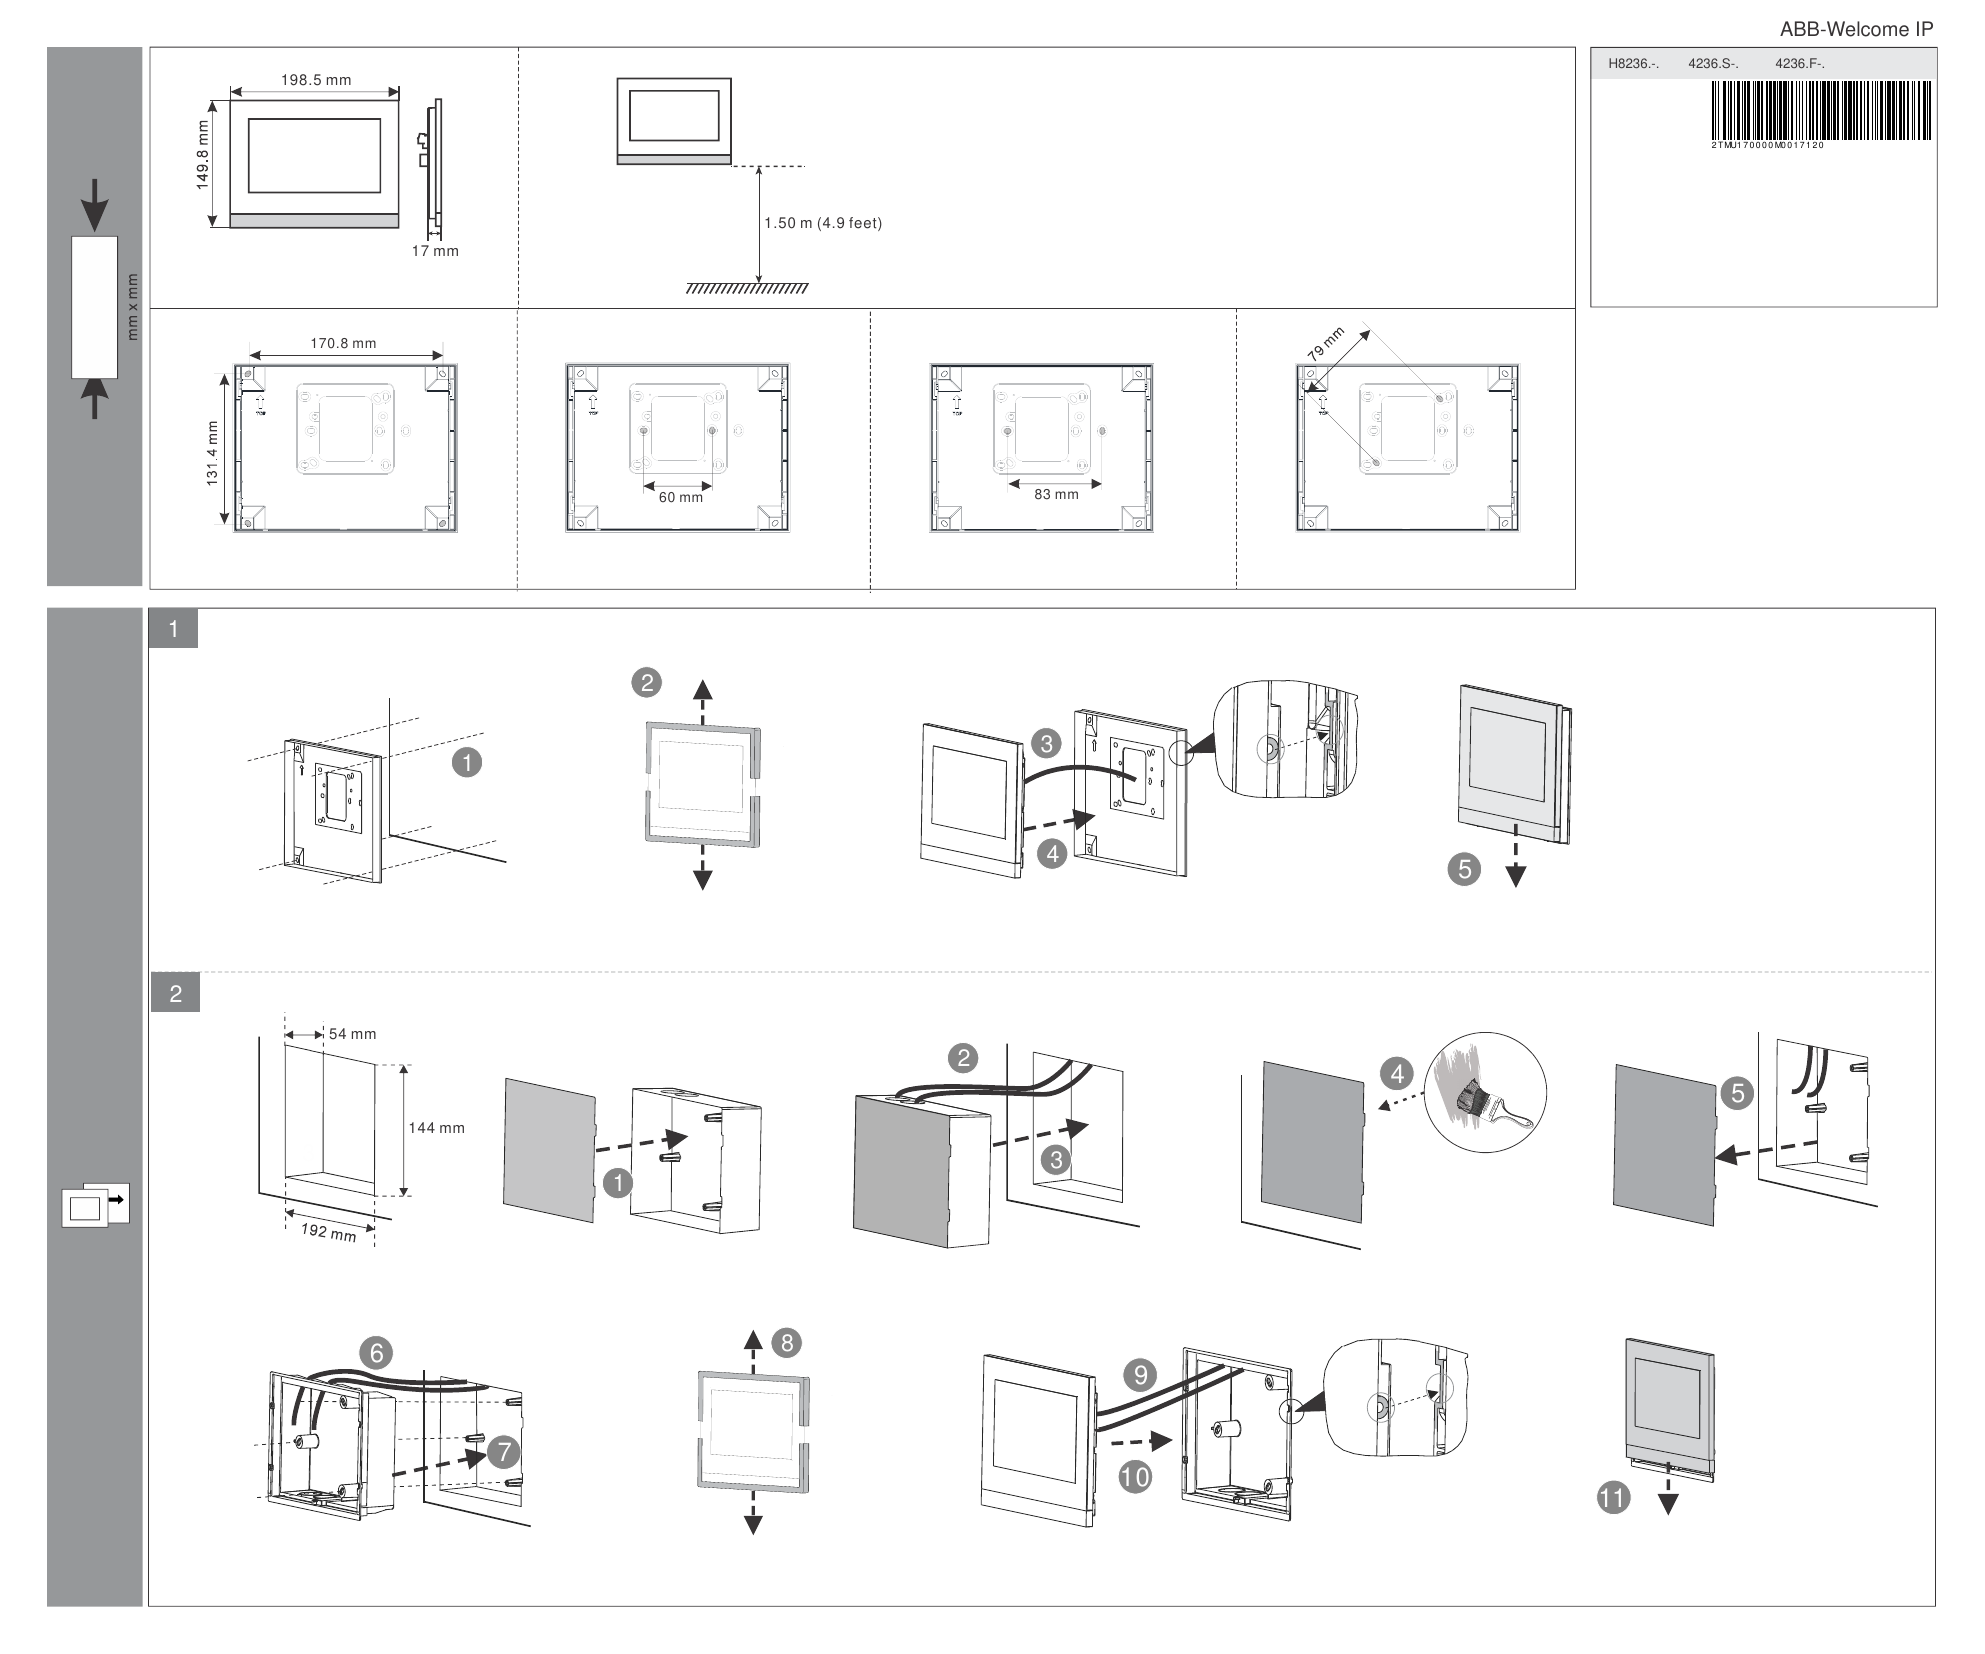
Illustrated mounting and installation reference for the ABB-Welcome IP Touch 7 panel (H8236.-, 4236.S-, 4236.F- series) — covers flush-mount, surface-mount, and desktop stand installation, plus the rear connector layout.
Panel Dimensions
| Panel size (W x H x D) | 198.5 mm x 149.8 mm x 17 mm |
| Recommended mounting height | 1.50 m (4.9 feet) from finished floor |
| Back-box frame | 170.8 mm x 131.4 mm |
| Bracket screw spacing (variant 1) | 60 mm |
| Bracket screw spacing (variant 2) | 83 mm |
| Diagonal bracket spacing (variant 3) | 79 mm |
| Surface box cutout template | 54 mm x 144 mm x 192 mm |
Installation Overview
The panel supports four mounting methods, each shown step-by-step in the full illustrated manual (download link above):
- Flush (in-wall) mount with simple bracket — bracket goes into the wall opening, cable is routed through, and the panel hooks onto the bracket's tab before the bezel snaps down.
- Surface-mount back box (front cable access) — the surface box is marked and mounted to the wall using the cutout template above, sealed with adhesive/caulk for weatherproofing, then cable is routed and dressed inside before the panel hooks on and the bezel is closed.
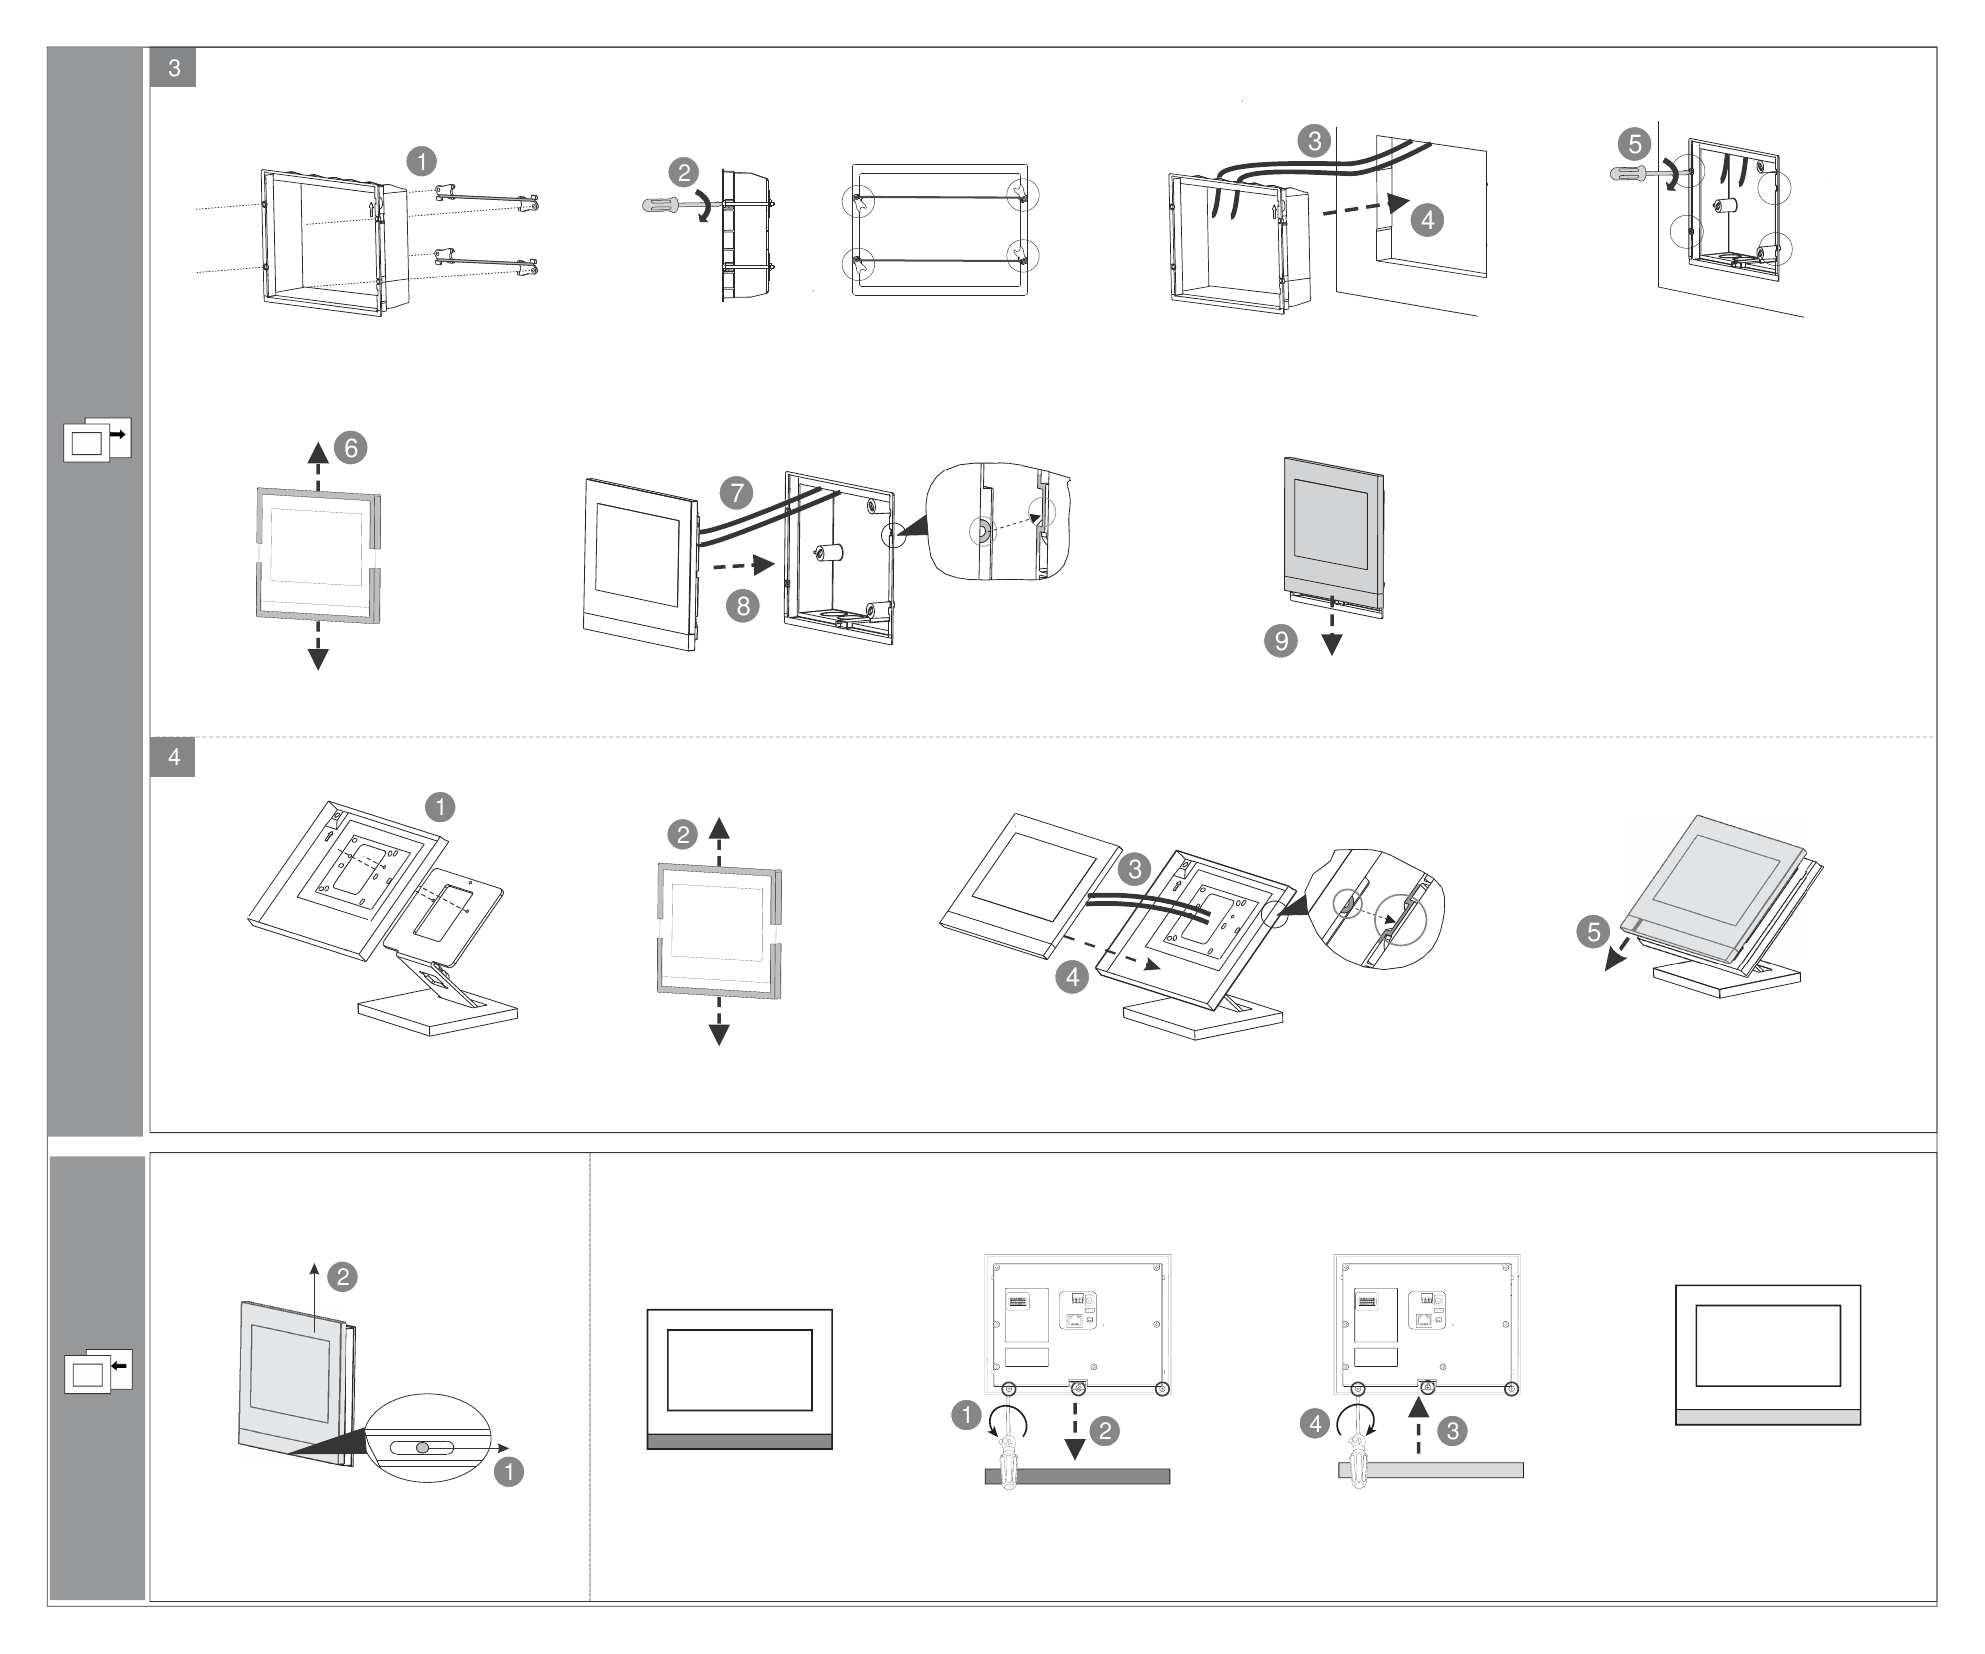
- Surface-mount back box (rear/arm access) — long screws through mounting arms secure the box to the wall from the back before the panel and bezel are attached the same way.
- Desktop stand — a mounting plate attaches to the stand base; the panel hooks onto the plate and the bezel snaps back on for a tabletop-angled installation.
In every mounting method, the panel hooks onto its bracket/box via the same tab-and-latch mechanism, and is removed the same way — pressing a release latch on the side of the panel to lift it free for service.
Mounting & Connector Diagrams
Model Variants Covered
H8236.-, 4236.S- (surface mount), and 4236.F- (flush mount) — see the User Manual & Technical Data page for full electrical specifications.
Subscribe
Sign up to get the latest on sales, new releases and more …