
ZEN Thermostat — Installer Guide (Specs, Configuration Codes & Wiring Diagrams)
Complete installer guide for the ZEN Thermostat — technical specs, HVAC configuration codes, wiring diagrams, and ZigBee network setup.
Full text manual (for reference)
Complete installer guide for the ZEN Thermostat (Zen Within Inc.) — technical specifications, HVAC configuration system, wiring diagrams, and ZigBee network setup.
Overview
ZEN is a touchscreen home thermostat connected to the internet, controllable from a compatible home automation system. It uses magnetic wall-mounting (no screws) and focuses on simple installation and everyday use.
Technical Specifications
| User input | Touch interface |
| Display | LED matrix |
| Wall mounting | Mounting bracket, magnetic connection to main body |
| Colors | White body/white display (ZEN-01-WHITE), Black body/white display (ZEN-01-BLACK) |
| HVAC system rating | 24V AC (nominal), 2A max per relay |
| Battery life | 2 years (4x AA, typical use); continuous operation if C-wire connected |
| Display language | English, French, Spanish |
| Wireless protocol | ZigBee HA1.2 compatible |
| Firmware upgrade | Over-the-air (OTA) |
| Compatible platforms | OpenHome, SmartThings, SwannOne, Almond+, Securifi |
HVAC System Compatibility
- Heating system types: Forced Air, Heat pump, Gas, Electric, Millivolt, Hydronic
- Heating stages: 1 or 2, plus emergency heat
- Cooling systems: Heat pump, Evaporative, Hydronic
- Cooling stages: 1 or 2
- Heat pump support: Two-stage reversible heat pump (with auxiliary/emergency heat)
Package Contents
ZEN Thermostat display, wall-mounting plate, 4x AA batteries, mounting hardware, instruction manual, wall blanking plate.
Basic Configuration — CONFIG Codes
To enter basic configuration mode: remove ZEN from the wall, turn it over, and press the CONFIG button once. Touch up/down to scroll, center touch to select. Exit by placing the display back on the wall plate.
Heating Type (1st digit)
| Digit | Heating Type | Max Cycles/Hour |
|---|---|---|
| 0 | No heating | N/A |
| 1 | Single Stage, Fuel (Gas/Oil) | 6 |
| 2 | Single Stage, Electric | 12 |
| 3 | Single Stage, Heatpump | 3 |
| 4 | Single Stage, Hydronic | 3 |
| 6 | 2 Stage, Fuel (Gas/Oil) | 6 |
| 7 | 2 Stage, Electric | 12 |
| 8 | 2 Stage, Heatpump | 3 |
| 9 | 2 Stage, Hydronic | 3 |
Cooling Type (2nd digit)
| Digit | Cooling Type | Max Cycles/Hour |
|---|---|---|
| 0 | No cooling | N/A |
| 1 | Single Stage, Heatpump/Evaporative/Hydronic | 3 |
| 6 | 2 Stage, Heatpump/Evaporative/Hydronic | 3 |
Heatpump & Fan Options (3rd digit)
| Digit | Fan Control | Emergency Heat? | Switching Changeover Cools | Has Changeover Valve |
|---|---|---|---|---|
| A | N | N | N | N |
| B | Y | N | N | N |
| C | N | Y | N | N |
| D | Y | Y | N | N |
| I | N | N | N | Y |
| J | Y | N | N | Y |
| K | N | Y | N | Y |
| L | Y | Y | N | Y |
| M | N | N | Y | Y |
| N | Y | N | Y | Y |
| O | N | Y | Y | Y |
| P | Y | Y | Y | Y |
Example: Config 10A = 1-stage heating, no cooling, no fan control. Config 31P = heatpump heating and cooling with emergency heat and fan control.
Advanced Settings
For professional HVAC installers to set more detailed parameters. Changes in Advanced Settings override Basic Configuration — only knowledgeable HVAC installers should use this mode.
- Enter: remove ZEN from the wall, turn it over, press CONFIG 5 times.
- Navigate: touch left/right to move between settings, up/down to change value, center touch to select.
- Recommended method: use the ZEN online installation guide (www.zenthermostat.com/install) — it generates the correct advanced configuration codes to input on the thermostat.
- Advanced Settings persist through battery replacement and OTA upgrades — but are lost if Basic Configuration is changed.
- Reset Advanced Settings to factory default: press CONFIG button 20 times.
Typical Wiring Configurations
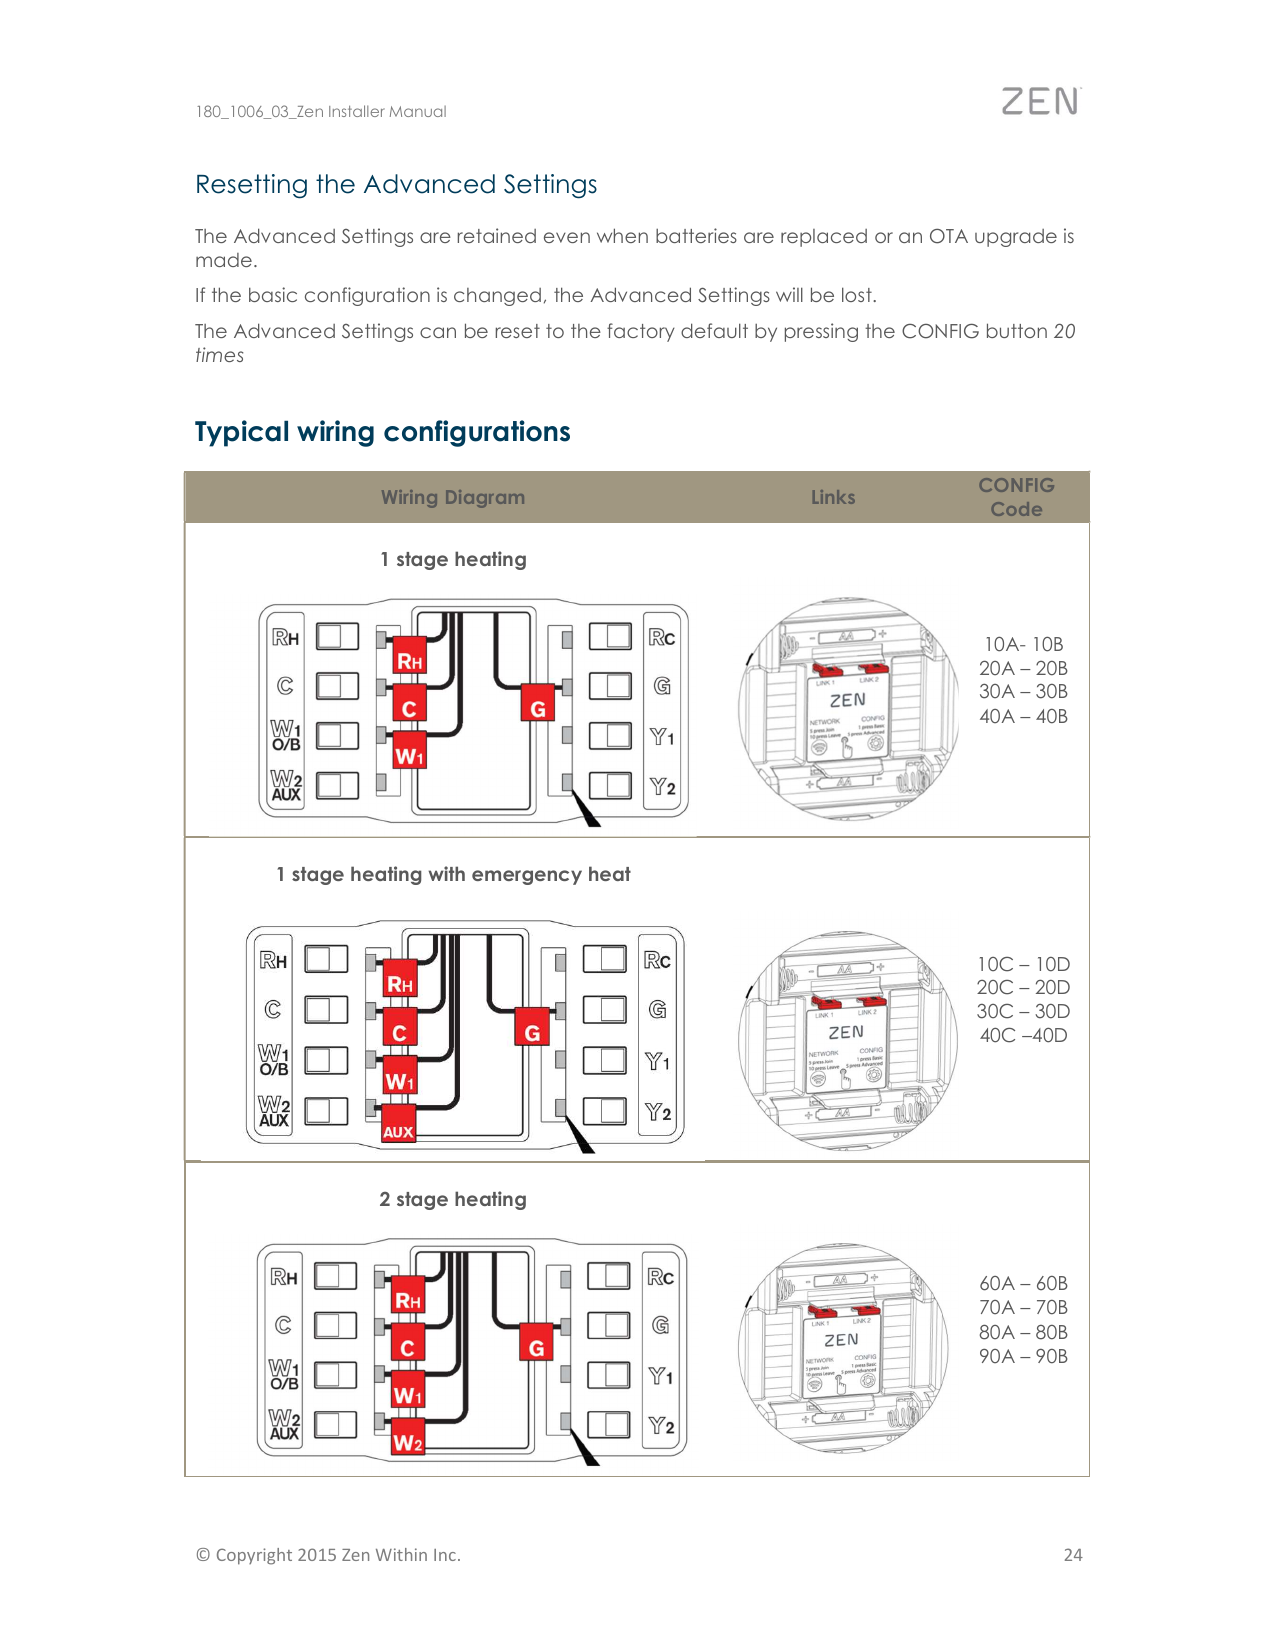
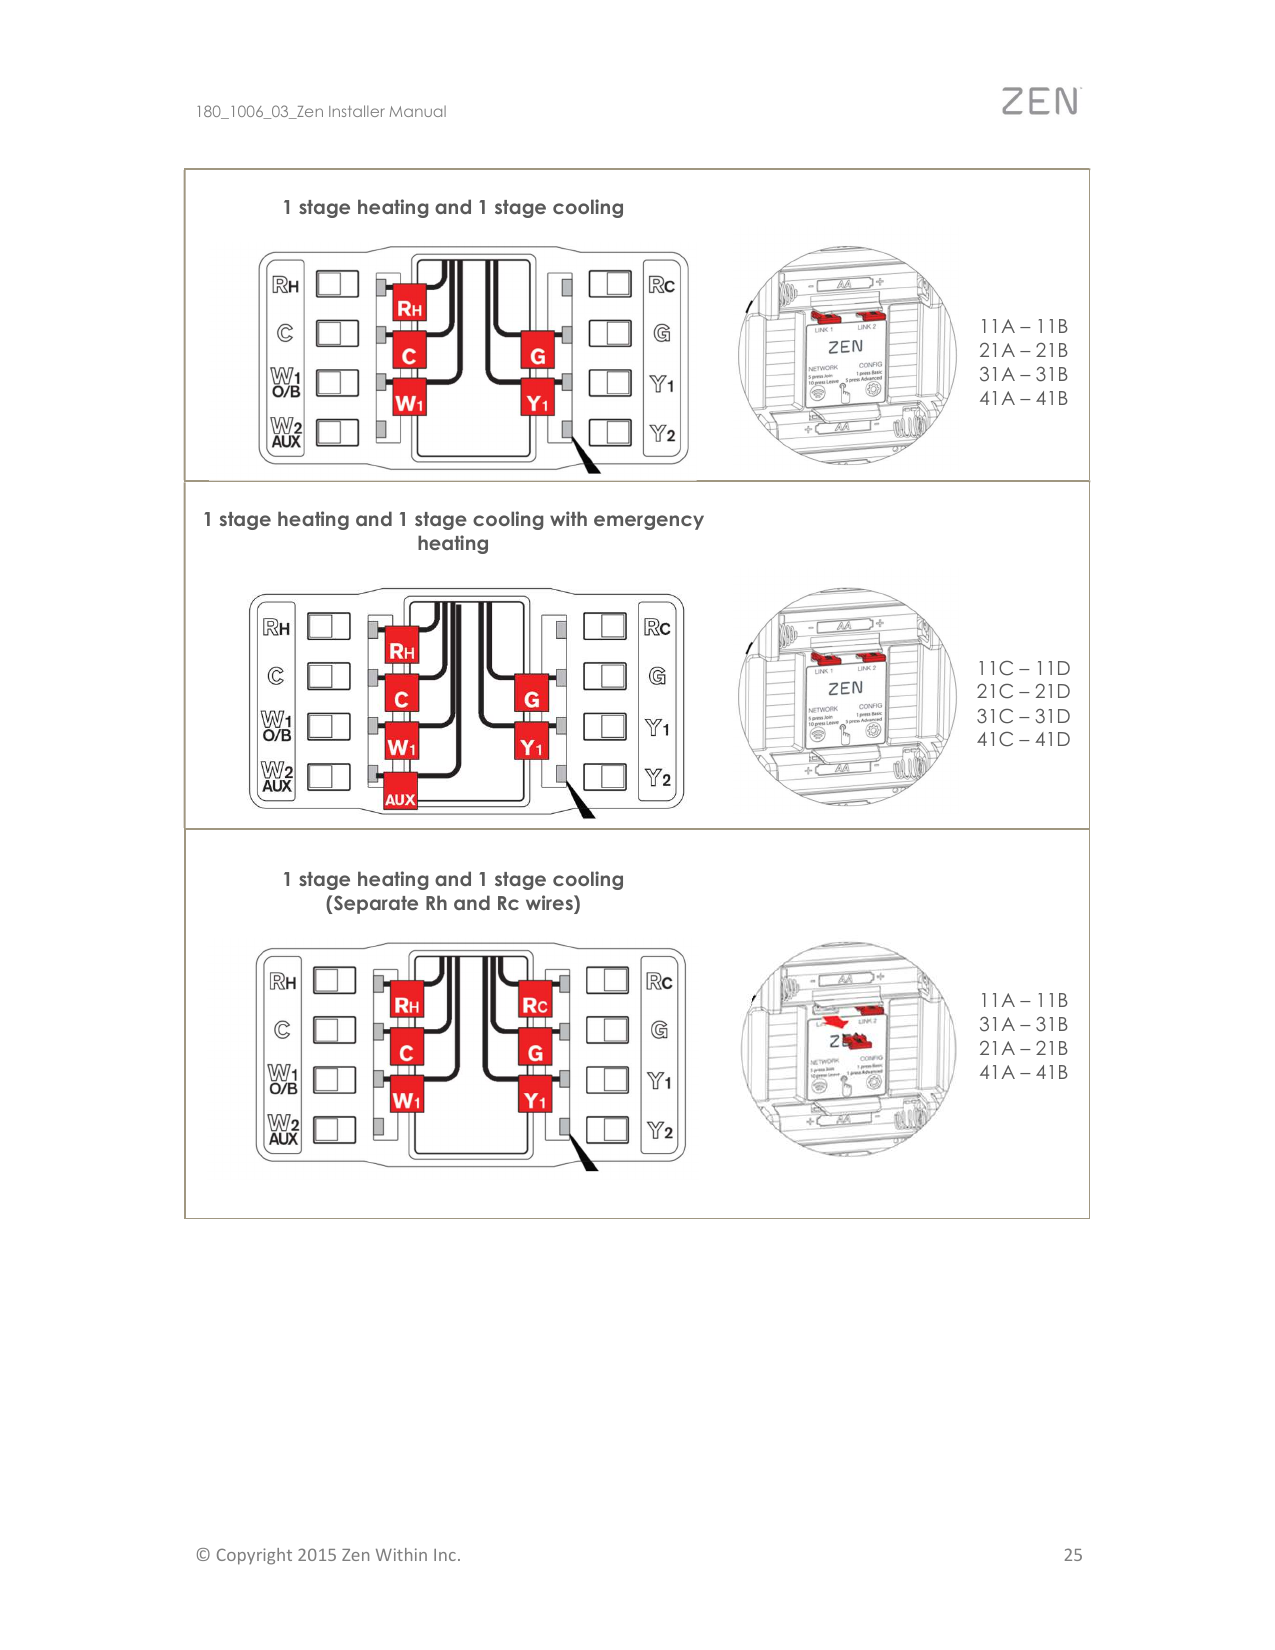
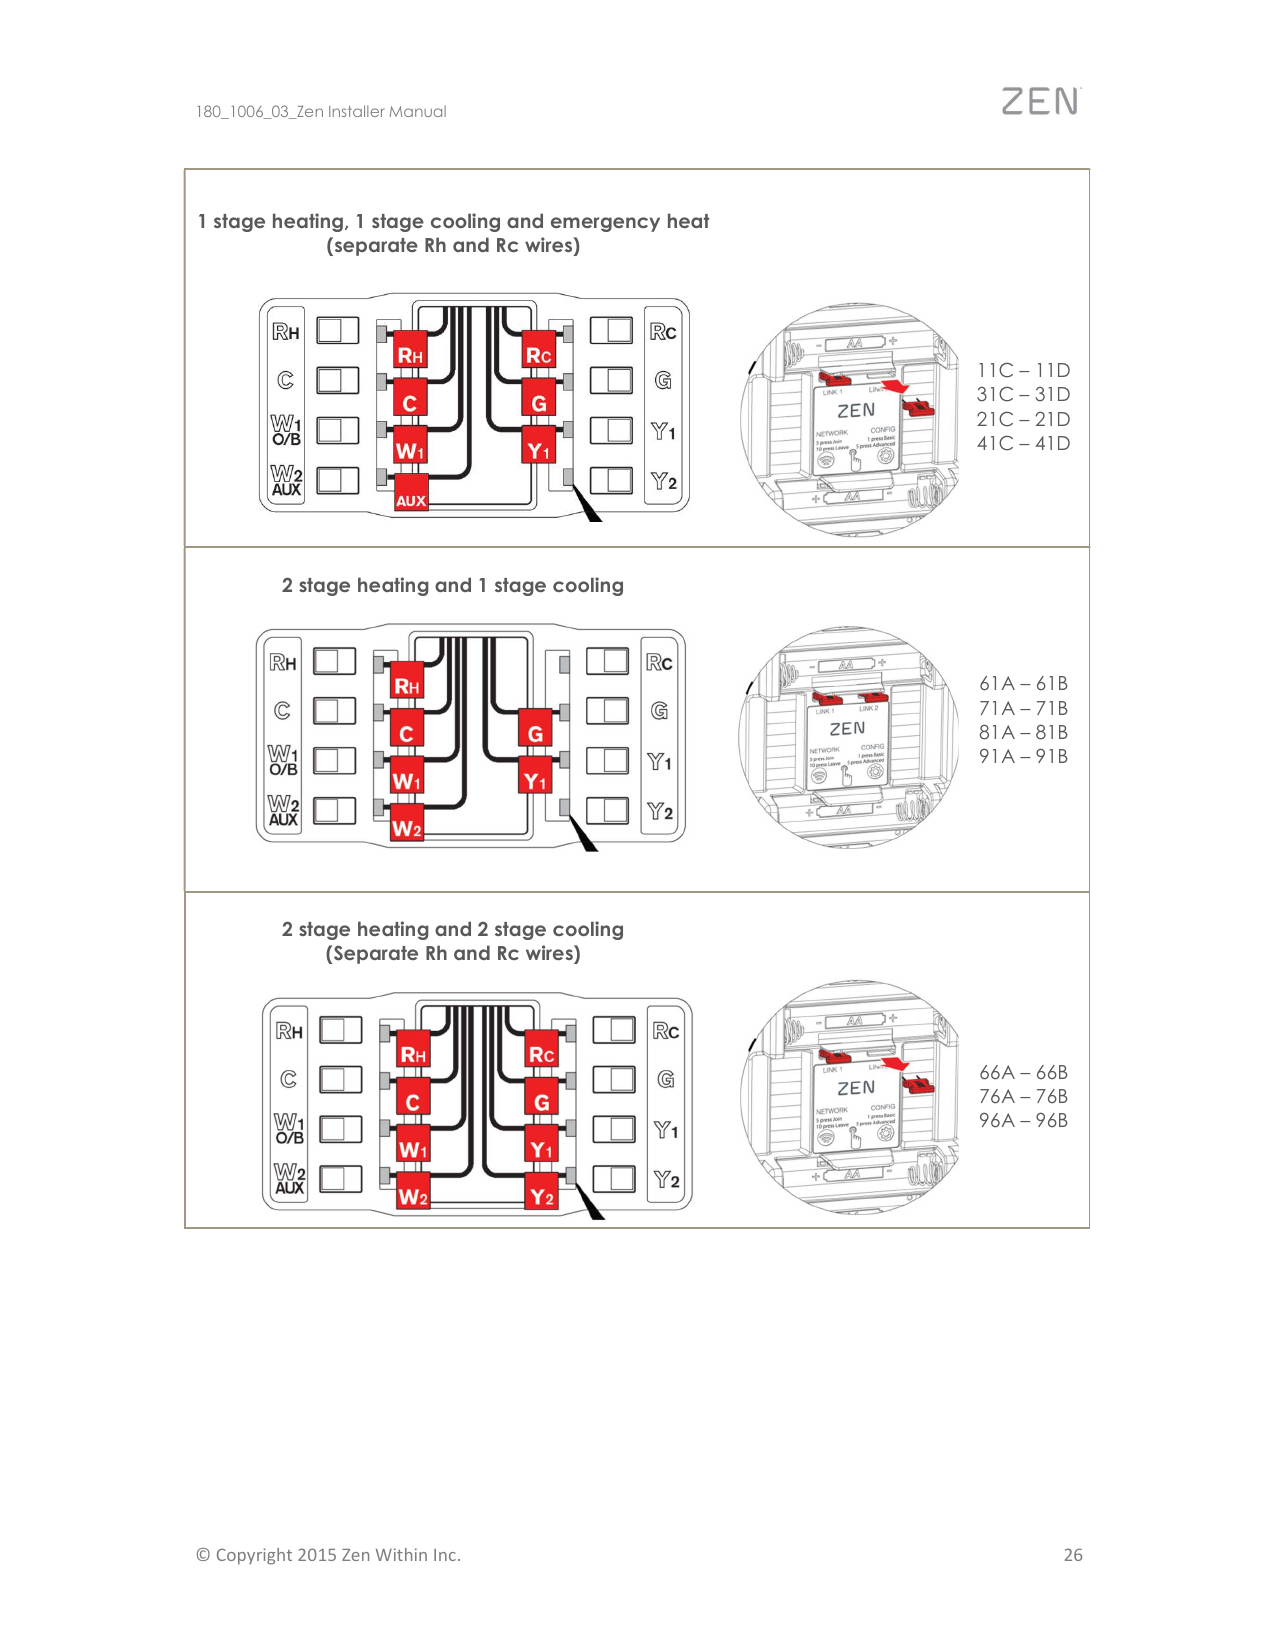
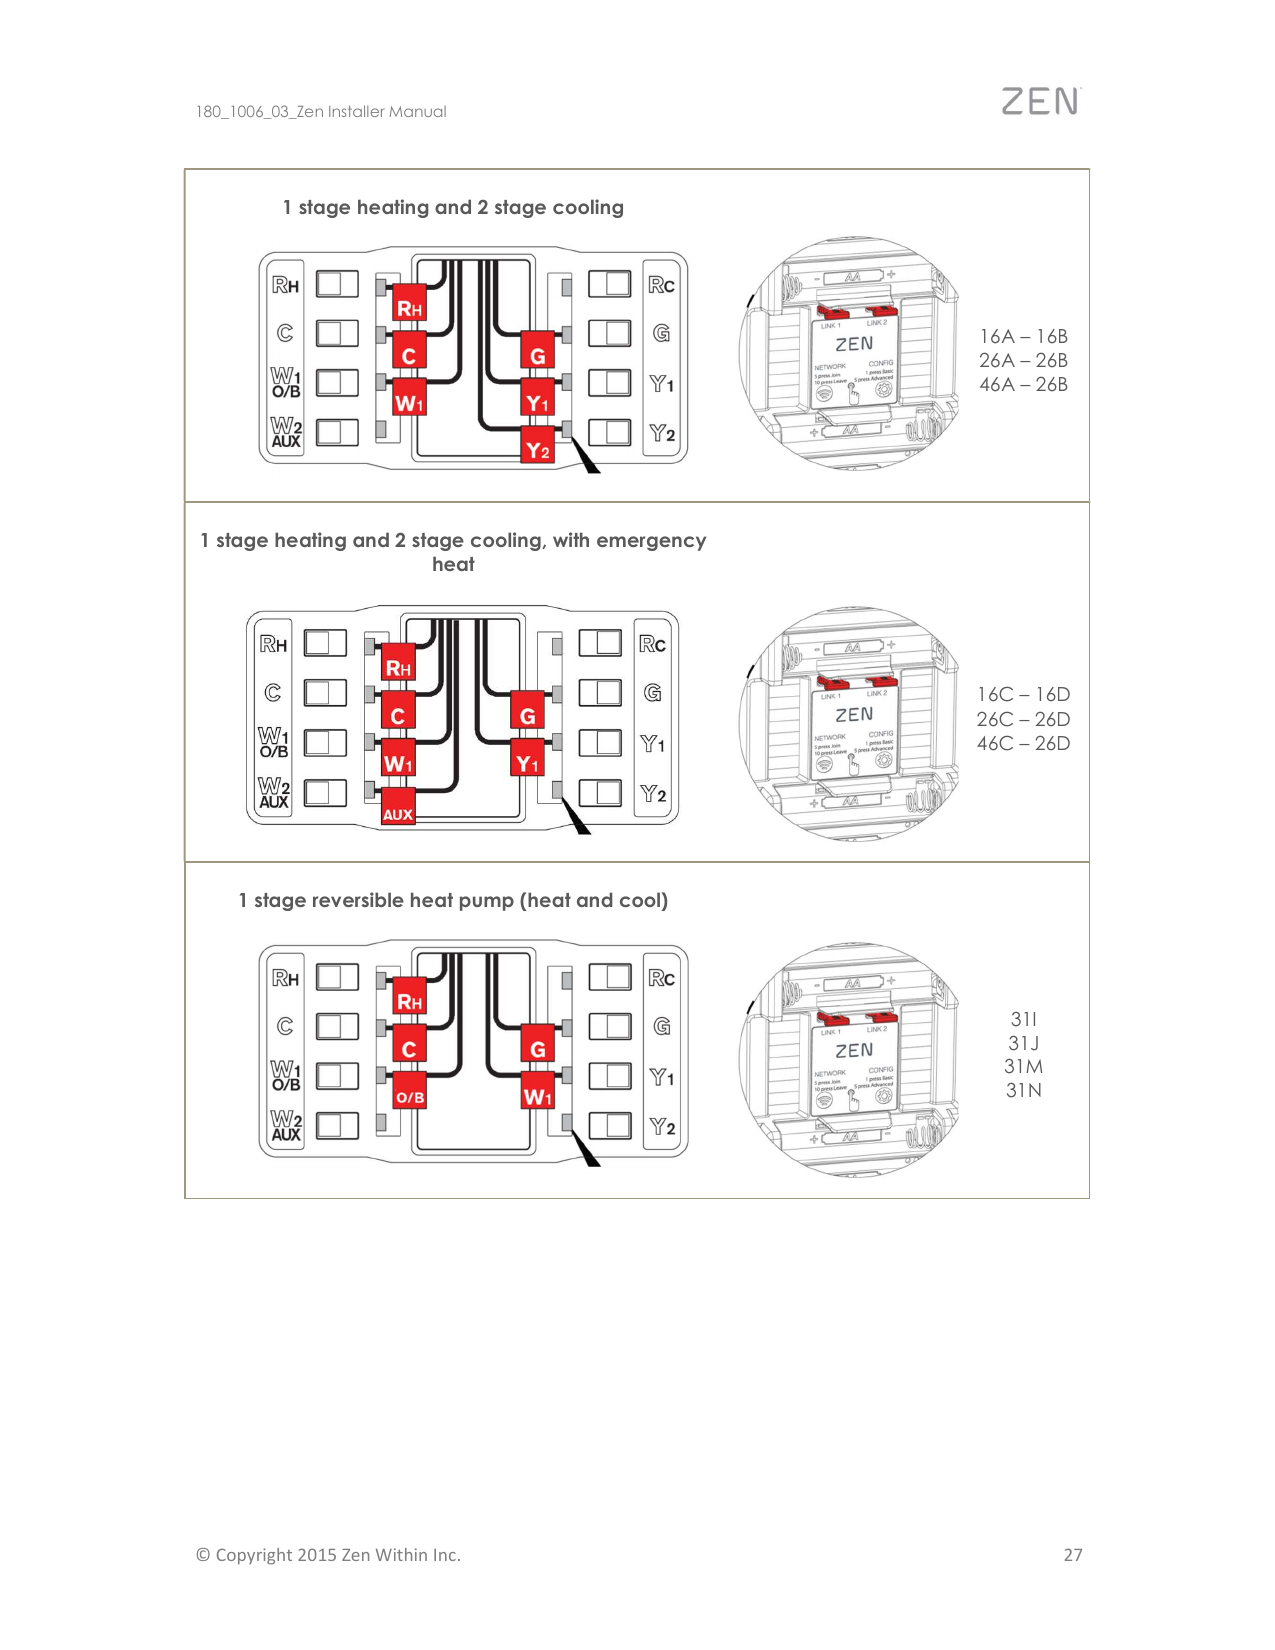
The wiring diagrams below map physical connector wiring to CONFIG codes. Full diagrams for all configurations are in the downloadable PDF; the following covers the most common setups.
Config Code Reference by Configuration
| Configuration | CONFIG Codes |
|---|---|
| 1-stage heating | 10A/10B, 20A/20B, 30A/30B, 40A/40B |
| 1-stage heating + emergency heat | 10C/10D, 20C/20D, 30C/30D, 40C/40D |
| 2-stage heating | 60A/60B, 70A/70B, 80A/80B, 90A/90B |
| 1-stage heating + 1-stage cooling | 11A/11B, 21A/21B, 31A/31B, 41A/41B |
| 1-stage heating + cooling + emergency heat | 11C/11D, 21C/21D, 31C/31D, 41C/41D |
| 2-stage heating + 1-stage cooling | 61A/61B, 71A/71B, 81A/81B, 91A/91B |
| 2-stage heating + 2-stage cooling (separate Rh/Rc) | 66A/66B, 76A/76B, 96A/96B |
| 1-stage heating + 2-stage cooling | 16A/16B, 26A/26B, 46A/46B |
| 1-stage heating + 2-stage cooling + emergency heat | 16C/16D, 26C/26D, 46C/46D |
| 1-stage reversible heat pump (heat & cool) | 31I, 31J, 31M, 31N |
| 1-stage reversible heat pump + emergency heat | 31K, 31L, 31O, 31P |
| 2-stage reversible heat pump (heat & cool) | 86I, 86J, 86M, 86N |
| 2-stage reversible heat pump + emergency heat | 86K, 86L, 86O, 86P |
Network Connectivity
ZEN is ZigBee HA 1.2 compatible and supports standard ZigBee clusters — should work with any ZigBee HA compatible system, though some integration effort may be needed with unlisted platforms. Tested platforms: SwannOne, OpenHome, SmartThings.
Joining a ZigBee Network
- Set your home network to search for a new device.
- Remove the display from the wall mount and press the NETWORK button 5 times (thermostat beeps on each press).
- The wireless icon flashes while pairing; it stops flashing and stays illuminated once connected.
- If joined to the wrong network, press NETWORK 5 times again to search for the next available network.
Leaving a ZigBee Network
Remove the display from the wall mount and press the NETWORK button 10 times (beeps on each press) — the wireless icon disappears once disconnected.
Useful Links
- Website: www.zenthermostat.com
- Support email: info@zenthermostat.com
- Online Installation Guide: www.zenthermostat.com/install
- FAQ: www.zenthermostat.com/faq