
Speco O2MD2 — Mini Dome IP Camera Owner's Manual
Owner's manual for the Speco O2MD2 Full HD mini-dome PoE IP camera — specs, installation, and network setup.
Full text manual (for reference)
Owner's manual for the Speco O2MD2 — a multi-codec (H.264/MJPEG) Full HD (1080p) mini-dome IP network camera in a compact pancake housing, with embedded PoE (IEEE 802.3af) to reduce on-site wiring. Designed for economical, video-only surveillance applications (no audio/sensor/replay). This page covers specs, installation, quick network setup, and troubleshooting; the full downloadable PDF has every detail.
Safety & Handling
- Do not drop or throw the camera; keep out of reach of children.
- Do not disassemble — no after-service support is provided for disassembled units.
- Use only compatible power adapters.
- Keep moisture out of the unit; screw holes and cable/pipe penetrations must stay watertight for the life of the product. Moisture ingress through wiring can cause malfunction or degraded image quality over time.
- FCC Class A digital device — complies with Part 15 of the FCC Rules. Unauthorized modifications could void the user's authority to operate the equipment.
Key Specifications
| Category | Spec |
|---|---|
| Image sensor | Progressive scan 1/2.9" CMOS, 2.0MP |
| Full resolution | 1920 x 1080 (Full HD) |
| Lens | 3.7mm, F2.5 |
| Min. illumination | 0.2 Lux (color, DSS on), 0.00 Lux (IR LED on) |
| Day/Night | Supported (TDN & IR LED, 12 IR LEDs) |
| Video compression | Simultaneous dual codec — H.264 / MJPEG, 1920x1080@30fps, 3 simultaneous profiles |
| Motion detection | 3 configurable regions |
| Network protocols | IPv4/v6, TCP, UDP, RTP, RTSP, HTTP, HTTPS, SMTP, FTP, DHCP, UPnP, DDNS, DNS |
| Security | ID/password protection, IP filtering, HTTPS encryption, Digest Authentication, user access log |
| LAN | 10/100BaseT (auto MDIX), standard PoE (IEEE 802.3af) |
| Power | DC 12V, 0.6A (optional 12V/1.5A adapter) or PoE |
| Alarm events | Video file upload via FTP, still image via email; configurable pre-alarm (5-10 sec) & post-alarm (10-30 sec) buffer |
| Operating temp / humidity | 0-45°C (32-113°F) / 8-80% RH |
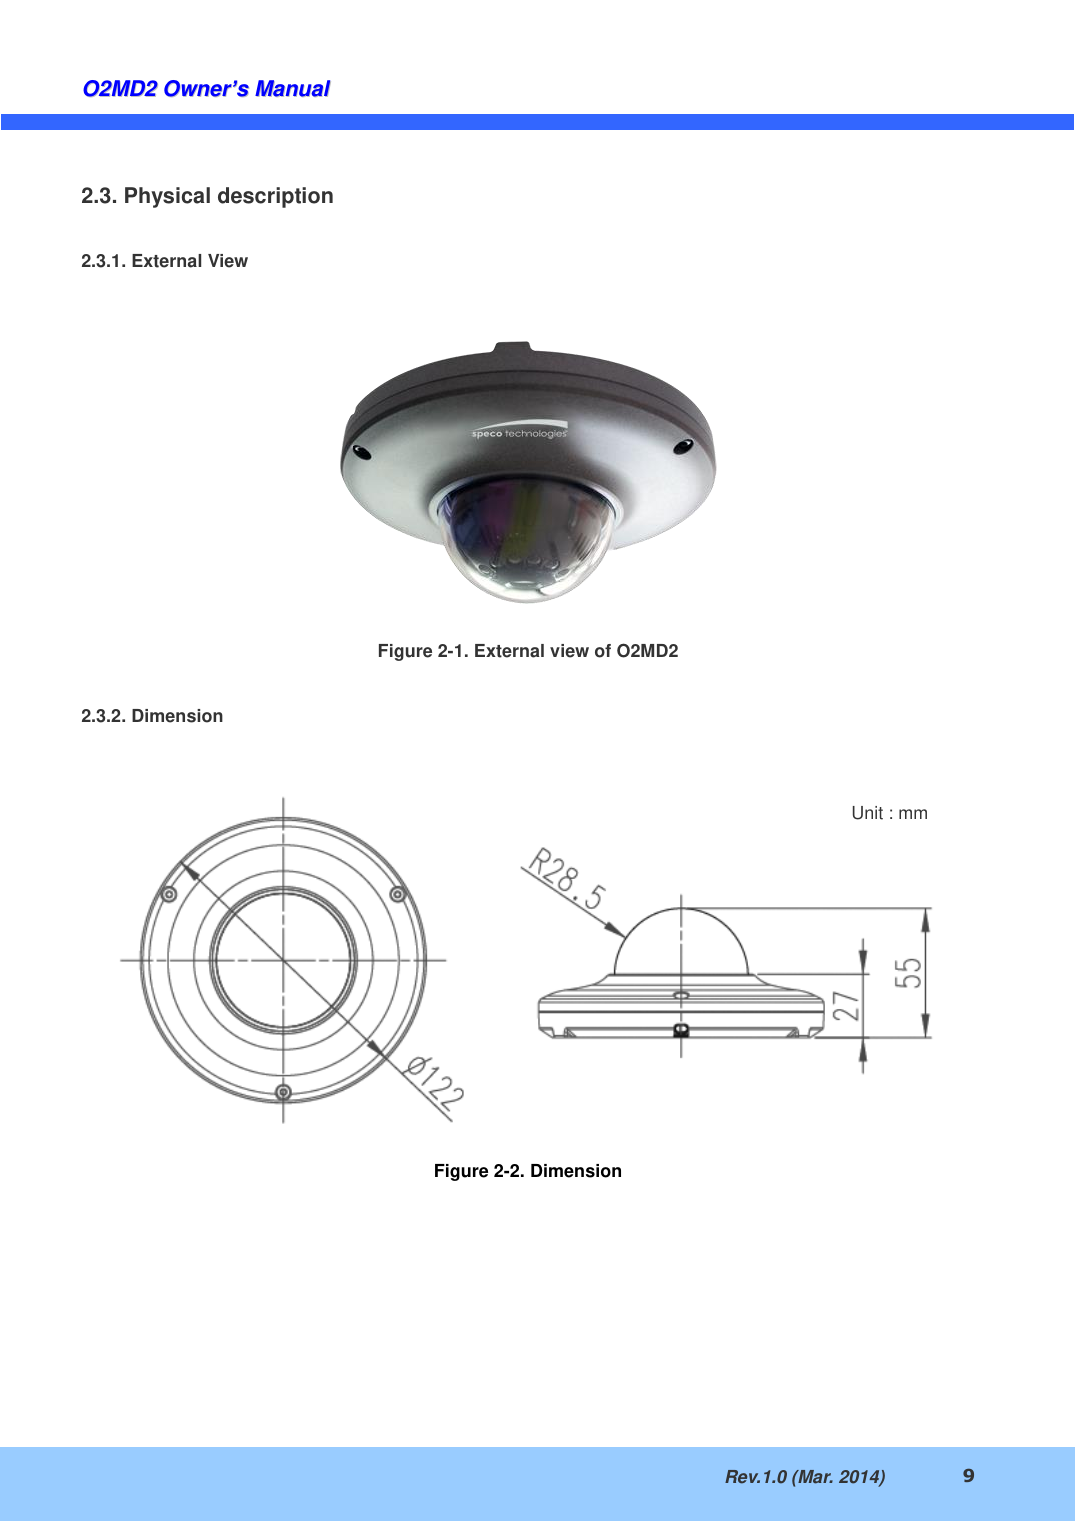
| Dimensions / Weight | Ø122mm x 55mm (4.8" x 2.1") / 0.4kg (0.88lb) |
| Approvals | FCC, CE, KCC, RoHS |
| Client software | Speco NVR (Windows XP/Vista/7, free), Speco ONSIP (Android/iPhone/iPad, free) |
Mounting Dimensions
Box Contents
- O2MD2 IP camera main unit
- Mounting screws (3), anchors (3), L-type wrench
- CD with software & user's guide
- Quick Reference Guide
- Built-in standard PoE module (IEEE 802.3af); 12V DC adapter available as optional item
On-Site Installation
- Remove the top cover.
- Fix the base to the wall or ceiling.
- Adjust the camera's rotational position for the desired field of view.
- Replace the top cover.
Use cables/conduits suitable for the installation environment and ensure moisture cannot penetrate through cable/conduit entry points — damage from improper installation moisture ingress is not covered by warranty.
PC Requirements (for Speco NVR / Web Viewer)
| Item | Minimum | Recommended |
|---|---|---|
| CPU | Intel Core i3 3GHz | Intel Core i7 |
| Memory | 2GB | 4GB |
| OS | Windows XP | Windows 7 (64-bit) |
| Browser | Internet Explorer 8/9 | Internet Explorer 8/9 |
| Network | 10 Base-T | 100 Base-T |
Quick Setup Overview
- Connect the camera and a setup PC to the network. If using PoE, ensure both the camera and LAN switch support standard PoE (802.3af); otherwise power via a separate DC adapter.
- Install Speco-NVR (from the included CD) on the setup PC. Use its ONSIP Installer to discover the camera and assign an IP address — either Static, or ADSL/Auto (DHCP). For ADSL, enter the User Name/Password provided by your ISP. Optionally enable DDNS with a hostname.
- Connect remotely via Web Viewer: enter the camera's IP address (and port, if not 80) into a browser URL bar. The ActiveX module must install first — the easiest way is to install Speco-NVR from the CD.
- Default Admin Page login: admin / 1234. Change this immediately to prevent unauthorized access. Full configuration is available at
http://IP_Address:Port_Number/admin.htm— see the separate Configuration Guide for details. - Alternatively, connect through Speco-NVR itself: use the Camera Assignment button to enter description, address, channel, user ID/password, and port, then Save. Click Live View to see video.
Troubleshooting
| Symptom | Solution |
|---|---|
| No power applied | If using PoE, confirm both the camera and LAN switch support IEEE 802.3af. Otherwise use the supplied DC adapter, matched to the camera's power requirements, on a separate cable from the network connection. |
| Cannot connect to video | Run ping [camera IP] from a command prompt. "Reply from..." means the network connection is fine — retry the video connection. "Request timed out" means a network/cabling/setting problem — check the cable and IP configuration. |
| Recording/snapshot fails on Vista/Windows 7 | Disable/adjust User Account Control (UAC): Control Panel → User Accounts → Change UAC setting → set to "Never notify" (Windows 7) or uncheck "Use UAC" (Vista). Also right-click the NVR desktop icon → Properties → Compatibility tab → enable "Privilege Level" / Run as administrator. |
Technical assistance: Contact your dealer with the model name, MAC address/registration number, purchase date, problem description, and any error message.