
Speco NSL Series NVRs (N4NSL, N8NSL) — Quick Setup Guide
Quick Setup Guide for Speco NSL Series Network Video Recorders — connections, EZ Setup wizards, recording schedules, and remote viewer access.
Full text manual (for reference)
Quick Setup Guide for Speco Technologies NSL Series Network Video Recorders (N4NSL, N8NSL) — covering unboxing, rear-panel connections, initial power-up, EZ Setup/EZ Camera/EZ Network wizards, recording schedules, event notifications, and remote/web viewer access.
Box Contents
- NVR Unit (NSL Series)
- Remote control
- Remote battery, 1.5V (2x AAA)
- Quick Setup Guide
- Quick User Guide
- USB mouse (N4NSL, N8NSL)
- Software & Manual CD
- Power adapter/cable — N4NSL: 48V 1.2A; N8NSL: 48V 2.0A (110V or 220V)
For the latest firmware/software, visit www.specotech.com/software-updates.html.
Rear-Panel Connections
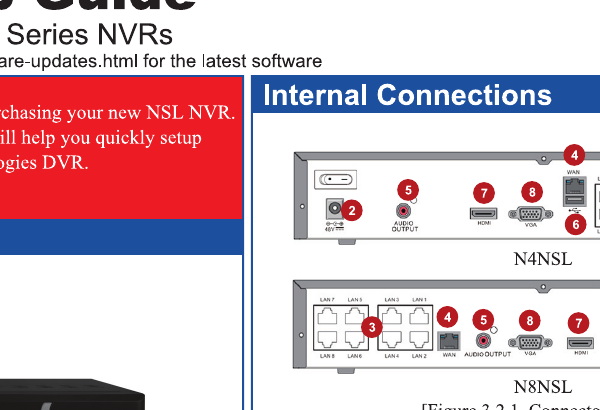
| # | Connector | Description |
|---|---|---|
| 1 | Power Switch | Power on/off |
| 2 | POWER | DC48V input |
| 3 | PoE PORT | N4NSL: 4-port PoE; N8NSL: 8-port PoE |
| 4 | WAN PORT | Network port for Internet connection |
| 5 | AUDIO OUTPUT | 1 connector for audio output |
| 6 | USB PORT | Connector for USB mouse or USB flash memory |
| 7 | HDMI OUT | HDMI output to monitor (1280x720 or 1920x1080) |
| 8 | VGA OUT | Main video output to VGA monitor |
Powering On the NVR
- Follow proper power-on procedure to avoid damaging the unit.
- Connect all necessary components (monitor, cameras) before powering on.
- Confirm the power source type (110V/220V) matches the NVR's rated input.
- Connect power adapters to the unit before turning it on.
EZ Setup
- Right-click the mouse and select ADVANCED MENU.
- Log in with the default username/password: admin / 1111.
- Change the default password immediately to prevent unauthorized access.
EZ Camera Setup
- Select EZ CAMERA from the setup menu.
- Choose the channel and camera protocol (SPECO or ONVIF).
- Scan the network for available cameras.
- Select the camera from the discovered list, register it, then preview and finish setup.
EZ Network Setup
- Select EZ Network Setup.
- The NVR automatically tests/detects the network environment.
- Set up a DDNS hostname.
- Edit the hostname if needed.
- Results display once setup completes.
Recording Schedule Setup
- Go to RECORD → SCHEDULE to set up the recording schedule.
- Per-channel recording modes: NONE, CONTINUOUS, SENSOR, MOTION.
- Use COPY SCHEDULE to copy one channel's schedule to other channels.
Event Notification Setup
Under SYSTEM → System Event Notification, configure alerts (email/beep/alarm output) for:
- Health Check (off/on; daily/weekly/monthly)
- System restart / shutdown / panic record events
- Motion detection
- No connection / network loss
- HDD temperature
- HDD bad sectors
- HDD almost full
- HDD full
- HDD failure
IP Camera Setup (Details)
- Go to the IP Camera tab.
- CHANNEL — enable/disable on-screen display per channel.
- PROTOCOL — SPECO or ONVIF.
- SCAN — auto-search for IP cameras on the network.
- IP / PORT / WEB PORT — camera IP address, camera port (default 554), web port (default 80).
- ID / PASSWORD — camera login credentials.
- SETUP — video settings: resolution, frame rate, bitrate.
- Use ADD to enter site information, then choose live view/playback and press START.
Network Setup (Details)
- Go to the NETWORK tab.
- DHCP — automatically obtains IP address, subnet mask, gateway, and DNS.
- Static — manually enter IP address, subnet mask, gateway, and DNS.
- Client Access must be turned ON to allow remote access.
- Enable/disable DDNS to use Speco's free DDNS name server.
Connecting via Web-Browser Viewer
Requirements: a PC connected to the Internet, and the DVR/NVR already configured via the Network Setup steps above.
Internet Explorer Settings
- Go to Tools → Internet Options → Security tab.
- Add the NVR's site as a Trusted Site.
- Uncheck "Require server verification (https)" for the trusted sites zone.
- Add the NVR's IP address to the trusted sites list.
- Open Custom Level security settings and enable ActiveX controls and plug-ins.
- Click OK to save.
Getting the NVR's Network Info
- Go to System Information to find the NVR's current IP address.
- Enable CLIENT ACCESS under the SYSTEM tab.
- Enable the appropriate NETWORK PORT settings under the NETWORK tab.
Once configured, enter the NVR's IP address in a web browser to access the live/playback web viewer.