
Skylink MR-318 ON/OFF Control — Installation Manual
Installation manual for the SkylinkHome ON/OFF Control, Model MR-318 — wirelessly control hardwired lights or appliances up to 600W with SkylinkHome transmitters.
Full text manual (for reference)
Installation manual for the SkylinkHome™ ON/OFF Control, Model MR-318 — a hardwired receiver module that lets a wall switch's connected lights or appliances be turned on and off wirelessly by SkylinkHome™ transmitters.
Overview
The MR-318 ON/OFF Control can communicate with up to 8 transmitters — additional remote controls, motion sensors, etc. can be added to the same receiver. All wireless communication within the SkylinkHome™ system uses rolling-code technology for security. Maximum load rating is 600W at 120VAC; minimum load 10W.
Package Contents
- ON/OFF Control (MR-318)
- Screws and mounting accessories
- User's Instructions
Wiring & Installation Diagram
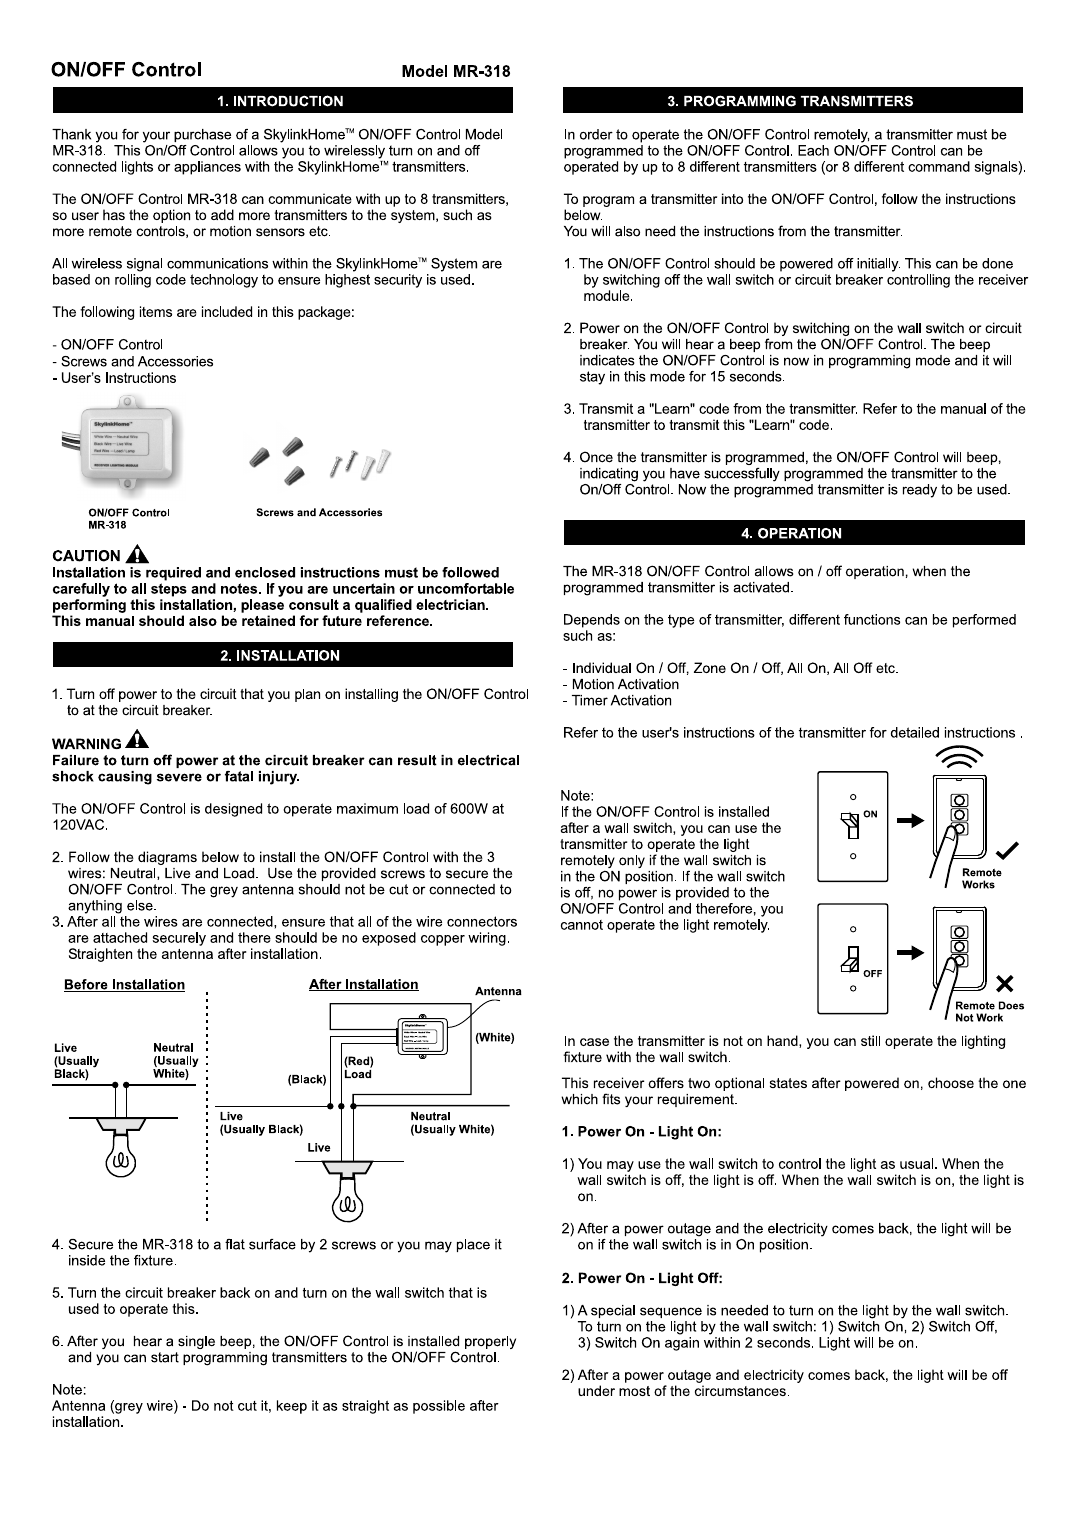
Installation Steps
- Turn off power to the circuit at the circuit breaker before installing.
- Connect the 3 wires — Neutral (white), Live/black, and Load (red) — following the wiring diagram above. Secure the ON/OFF Control with the provided screws. The grey antenna should not be cut or connected to anything else.
- Ensure all wire connectors are secure with no exposed copper. Straighten the antenna after installation.
- Secure the MR-318 to a flat surface with 2 screws, or place it inside the fixture.
- Turn the circuit breaker back on and switch on the wall switch that operates the fixture.
- Listen for a single beep — this confirms the ON/OFF Control is installed properly and ready for transmitter programming.
Warning: Failure to turn off power at the circuit breaker before installation can result in electrical shock causing severe or fatal injury.
Note: The grey antenna should not be cut — keep it as straight as possible after installation.
Programming Transmitters
Up to 8 transmitters (or 8 different command signals) can be programmed to one MR-318.
- Power off the ON/OFF Control (switch off the wall switch or breaker).
- Power the unit back on — it will beep, entering programming mode for 15 seconds.
- Transmit a "Learn" code from the transmitter within that window (see the transmitter's own manual for its Learn code procedure).
- The ON/OFF Control beeps again once programming succeeds — the transmitter is now ready to use.
Operation
Depending on the transmitter type, functions can include individual On/Off, Zone On/Off, All On/All Off, motion activation, or timer activation.
Important: If the ON/OFF Control is installed downstream of a wall switch, the remote transmitter only works when the wall switch is in the ON position — if the wall switch is off, no power reaches the receiver and the remote cannot operate the light.
Power-On Behavior (choose one)
- Power On – Light On: The wall switch controls the light normally; after a power outage, the light returns on if the wall switch is in the On position.
- Power On – Light Off: A special sequence is required to turn the light on via the wall switch: Switch On → Switch Off → Switch On again within 2 seconds. After a power outage, the light typically stays off.
To toggle between these two states, re-program an already-programmed transmitter to the receiver twice consecutively (repeat the Programming Transmitters steps twice in a row).
Note: When used with the optional Motion Sensor ID-318, this ON/OFF Control can operate under countdown timer mode. The two Power-On states apply to loads other than lights as well.
Erasing Transmitters
You cannot erase a single transmitter individually — erasing clears all programmed transmitters, then you re-program the ones you want to keep.
- Power off the receiver (switch off the wall switch).
- Transmit an "Erase" code from the transmitter continuously.
- Power the ON/OFF Control back on — you'll hear a beep.
- Stop transmitting the Erase code — a final beep confirms all devices have been erased.
Specifications
| Input voltage | 120VAC, 60Hz |
| Standby current | 3mA |
| Minimum load | 10W |
| Maximum load | 600W at 120VAC |
| Operating frequency | 318MHz |
| Operating temperature | -4°F to 140°F (-20°C to 60°C) |
| Humidity | 5%~95% |
| Range | Up to 500 feet in open area |
Compatible Accessories
The SkylinkHome™ system includes remotes, motion sensors, ON/OFF wall switches, wall dimmers, plug-in dimmers (with/without repeater), plug-in ON/OFF controls (indoor/outdoor), screw-in dimmers, ON/OFF/dimming controls, and the Smart Button™ garage door control. Visit skylinkhome.com for the full lineup.
Warranty
One (1) year limited warranty from date of purchase against defective workmanship or materials (excluding batteries) — repaired or replaced free of charge with proof of purchase and a Return Authorization.
©2010 SKYLINK GROUP. Customer Service: 17 Sheard Avenue, Brampton, Ontario, Canada L6Y 1J3. support@skylinkhome.com | 1-800-304-1187 (Mon–Fri, 9am–5pm EST) | www.skylinkhome.com