
SANUS SA405 Soundbar Speaker Mount — Installation Manual
Instruction manual for the SANUS SA405 soundbar mount, which attaches a soundbar to an existing TV wall mount.
Full text manual (for reference)
Instruction manual for the SANUS SA405 soundbar mount, which attaches a soundbar to an existing TV wall mount so it moves and hangs together with the TV.
Before You Begin
- Confirm your TV and any accessories do not exceed the specified weight limit of your TV wall mount.
- Read and understand the full directions before starting.
- Refer to the documentation that came with your soundbar and TV wall mount for additional guidance.
- Have the necessary tools on hand (Phillips screwdriver, level).
Weight Limit
15 lb (6.8 kg) — DO NOT EXCEED. Verify that the combined weight of the TV, soundbar mount, soundbar, and any accessories is lower than the maximum weight rating of the TV wall mount.
Safety Warnings
- This soundbar mount is only designed to be used with TV wall mounts that meet third-party safety certifications.
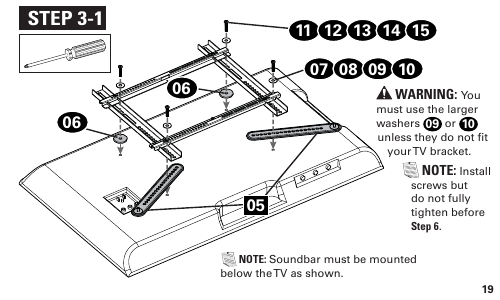
- Only designed to mount a soundbar BELOW the television.
- If the TV wall mount does not include TV interface spacers, do not use the spacers included with this soundbar mount.
- Do not use this product if the TV wall mount has built-in or integrated spacers.
- Only install into TV interface bracket slots or holes less than 11 mm (0.43 in.) wide; do not over-tighten the washer.
- The wall must be capable of supporting five times the combined weight of the TV, mount, and soundbar.
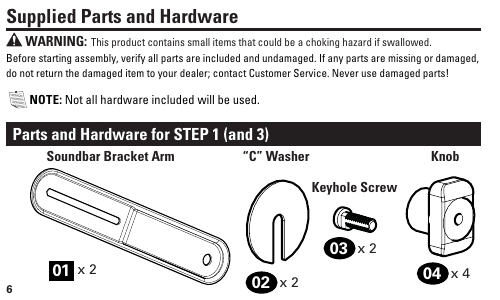
- Contains small items that could be a choking hazard if swallowed — keep away from children during assembly.
Installation Overview
- Mount Bracket Arms to Soundbar — attach the soundbar bracket arms to your soundbar (or to a manufacturer-supplied hanger) using the supplied knobs and screws. Do not fully tighten yet. Make sure the soundbar's control buttons will remain accessible.
- Prepare TV — if the TV is already mounted, remove any cables, remove the TV/bracket assembly from the wall mount (this is heavy — you may need assistance), and remove the TV bracket from the TV. Save your original TV hardware since this product's hardware must be used instead.
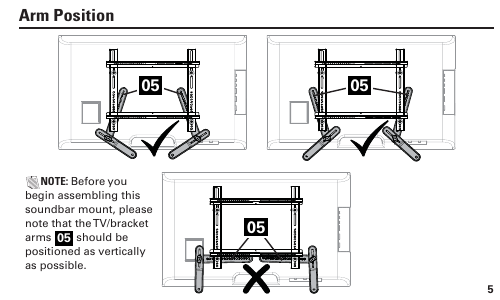
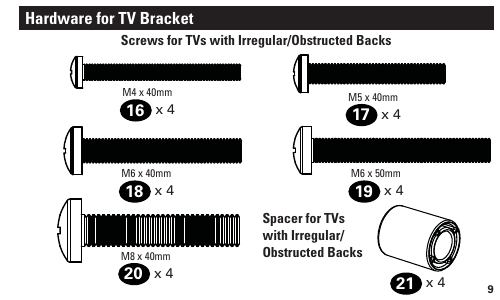
- Install TV Bracket with the TV/Bracket Arms — determine the correct bolt diameter (M4, M5, M6, or M8) for your TV. Use Step 3-1 for TVs with a flat/unobstructed back, or Step 3-2 (with spacers) for TVs with an irregular or obstructed back. Verify adequate thread engagement — too short won't hold the TV, too long will damage it.
- Attach Soundbar Assembly to TV — connect the soundbar/bracket arm assembly to the TV/bracket arms using knobs, without fully tightening yet. Some trial and error may be needed to get the right configuration.
- Adjust Arms — adjust both sets of arms until the soundbar or hanger sits in the desired position. The final soundbar position must be within 51 mm (2 in.) of the TV.
- Tighten Connections — once positioned correctly, tighten all connections. Do not over-tighten the washers, which can cause them to deform.
- Hang Assembly — follow your TV wall mount's installation manual to re-hang the completed TV/soundbar assembly.
Manufacturer: SANUS (a division of Milestone AV Technologies), 6436 City West Parkway, Eden Prairie, MN 55344, USA · Customer Service 1-800-359-5520 · info@sanus.com