
NuBryte Smart Switch Series & Link — User Guide
Complete user guide for the NuBryte Smart Switch Series (Sense|Dim, Dim) and NuBryte Link — installation, multiway wiring, specifications, and app setup for whole-home smart lighting control.
Full text manual (for reference)
User guide for the NuBryte Smart Switch Series (Sense|Dim, Dim) and NuBryte Link — smart dimmer switches with motion, temperature, humidity, and energy sensing, plus whole-home lighting control via the NuBryte mobile app. This page covers hardware installation, wiring for multiway (3-way/4-way) circuits, specifications, app setup, and care.
Safety Warning
- Use only with permanently-installed lighting fixtures. Do not use to control power outlets (including switch-controlled lamps), fluorescent lighting fixtures, motor-driven appliances (e.g. ceiling fans with lights), or transformer-supplied appliances — risk of overheating and equipment damage.
- Installations must follow all national and local electrical codes. NuBryte Smart Switch Series products require a neutral wire and cannot be installed without one.
- If unsure, or if you notice loose wires, exposed cabling, burn marks, or damaged insulation, STOP and consult a licensed electrician.
- Choose the dimming option during setup only when using incandescent, halogen, or dimmable CFL/LED bulbs.
Installation Requirements
- Wireless (WiFi) router supporting 802.11 b/g/n
- Neutral wire in the existing light switch box(es)
- One or more NuBryte Smart Switch Series products
- One NuBryte Link (only one per home needed/supported)
- At least one NuBryte Touchpoint recommended for full functionality (sold separately)
- An existing grounded 120V outlet for the Link to plug into
- Copper wiring — consult a licensed electrician if your home has aluminum wiring
- Sufficient electrical box depth (recommended minimum ~2.5", possibly as little as 2"; new construction: 18 in³ for single gang, 25 in³ for double gang per NEC 314.16)
- NuBryte app version > 1.2.0.133 (Android) or > 1.2.0.114 (iOS)
A Note About "Gangs"
A light switch wall box is called a "Gang." A single switch controlling one fixture is in a "single gang" box; two switches in one box form a "double gang" (or "2 gang") box, and so on. When multiple switches control a single light source, this is a Multiway switch (3-Way or 4-Way).
Ensure you've purchased the correct wallplate size for multi-gang installs — each switch ships with a single 1-switch wall plate; 2/3/4-switch wall plates are optional accessories.
Selecting Light Bulbs
| Bulb Type | Max Rating (per light fixture) |
|---|---|
| Dimmable LED | ≤150W |
| Dimmable CFL | ≤150W |
| Incandescent | ≤300W |
| Halogen | ≤300W |
Do not exceed max ratings, and avoid mixing bulb types/brands on the same fixture — this can affect dimming consistency.
Replacing an Existing 2-Way Switch (Single Gang)
- Turn OFF power at the circuit breaker or fuse for the switch being replaced.
- Remove the switch plate and unscrew the old switch from the box.
- Wrap the provided wire labels around the wires before detaching (take a photo for reference). Wire colors: Ground — green/green-yellow or bare copper (optional, cap if absent); Hot/Live and Load — black (may be red), required; Neutral (N) — white, required for NuBryte (STOP and call an electrician if not present).
- Detach old wires and use the included orange wire connectors to attach the corresponding wires from the NuBryte base panel. Strip ~½" of insulation, hold stripped ends parallel, twist the connector clockwise until secure (optionally tape for extra security).
- The live wire and load wire must be connected as shown in the wiring diagram — if reversed, no equipment harm occurs but the switch won't power on or function. Orient the switch so "UP" is at the top when inserted into the wall box.
- Tuck wires back into the box, screw the NuBryte base unit into the wall box, and snap on the appropriately sized wall plate.
- Turn the power back ON and press the mechanical on/off and dimming buttons to confirm correct wiring.
Multiway (3-Way / 4-Way) Wiring
Multiway means more than one switch controls a single light — e.g. a switch at the top and bottom of a stairwell. NuBryte supports converting existing 3-way and 4-way manual switch circuits using one Primary device (physically/electrically connected to the load) and up to 3 Secondary devices (logically linked via ZigBee/WiFi, Load wire capped with a wire nut). Up to 4 switches total are supported per Multiway group.
- A Touchpoint single, Touchpoint dual, or NuBryte Sense|Dim/Dim can each be Primary or Secondary — but a Sense|Dim/Dim Primary requires all Secondaries to also be Sense|Dim/Dim products (cannot mix with Touchpoint as Secondary).
- A multiway group needs at least one Primary and one Secondary NuBryte switch. Do not mix NuBryte switches with manual switches or other smart switch brands in the same multiway circuit.
- Switch A and Switch B on a Touchpoint dual cannot be part of the same Multiway group (each can join a separate group).
Multiway Wiring Reference Diagrams
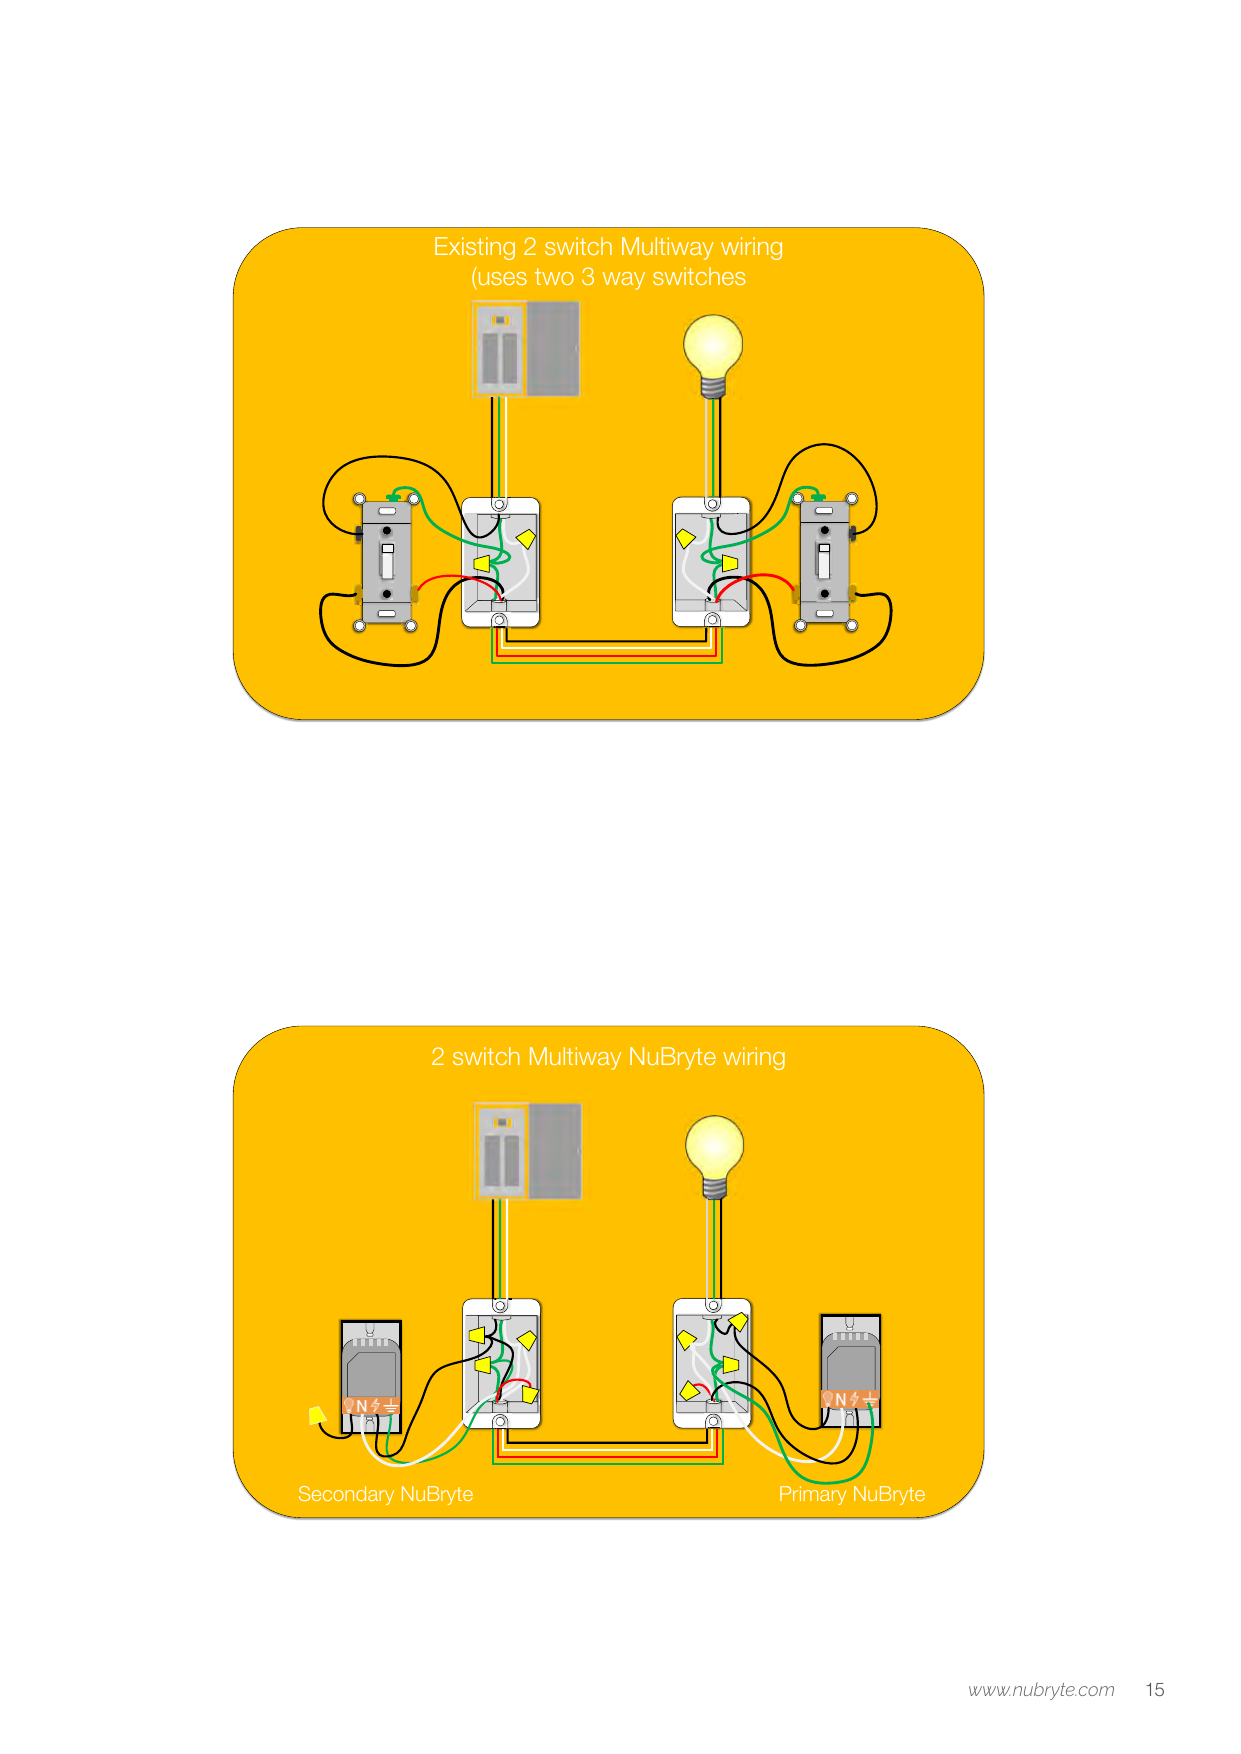
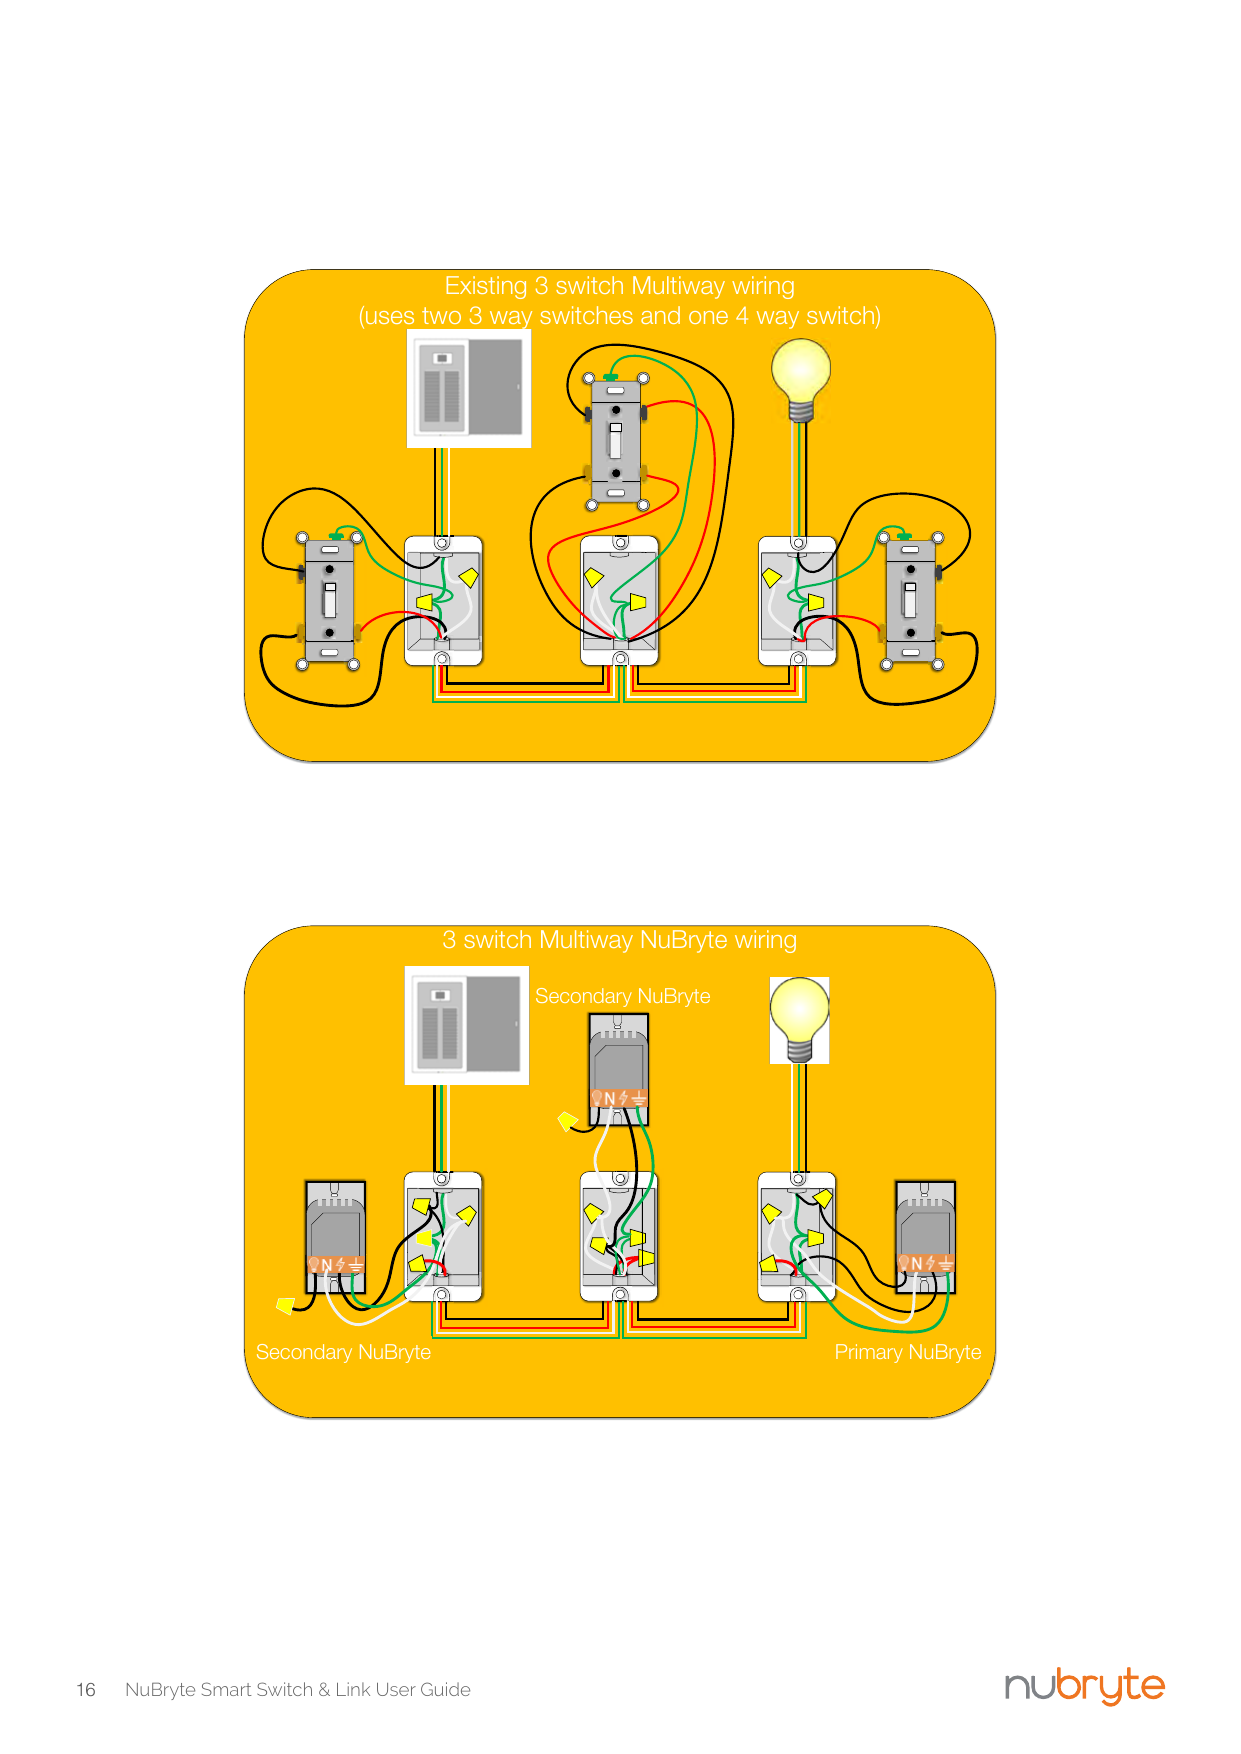
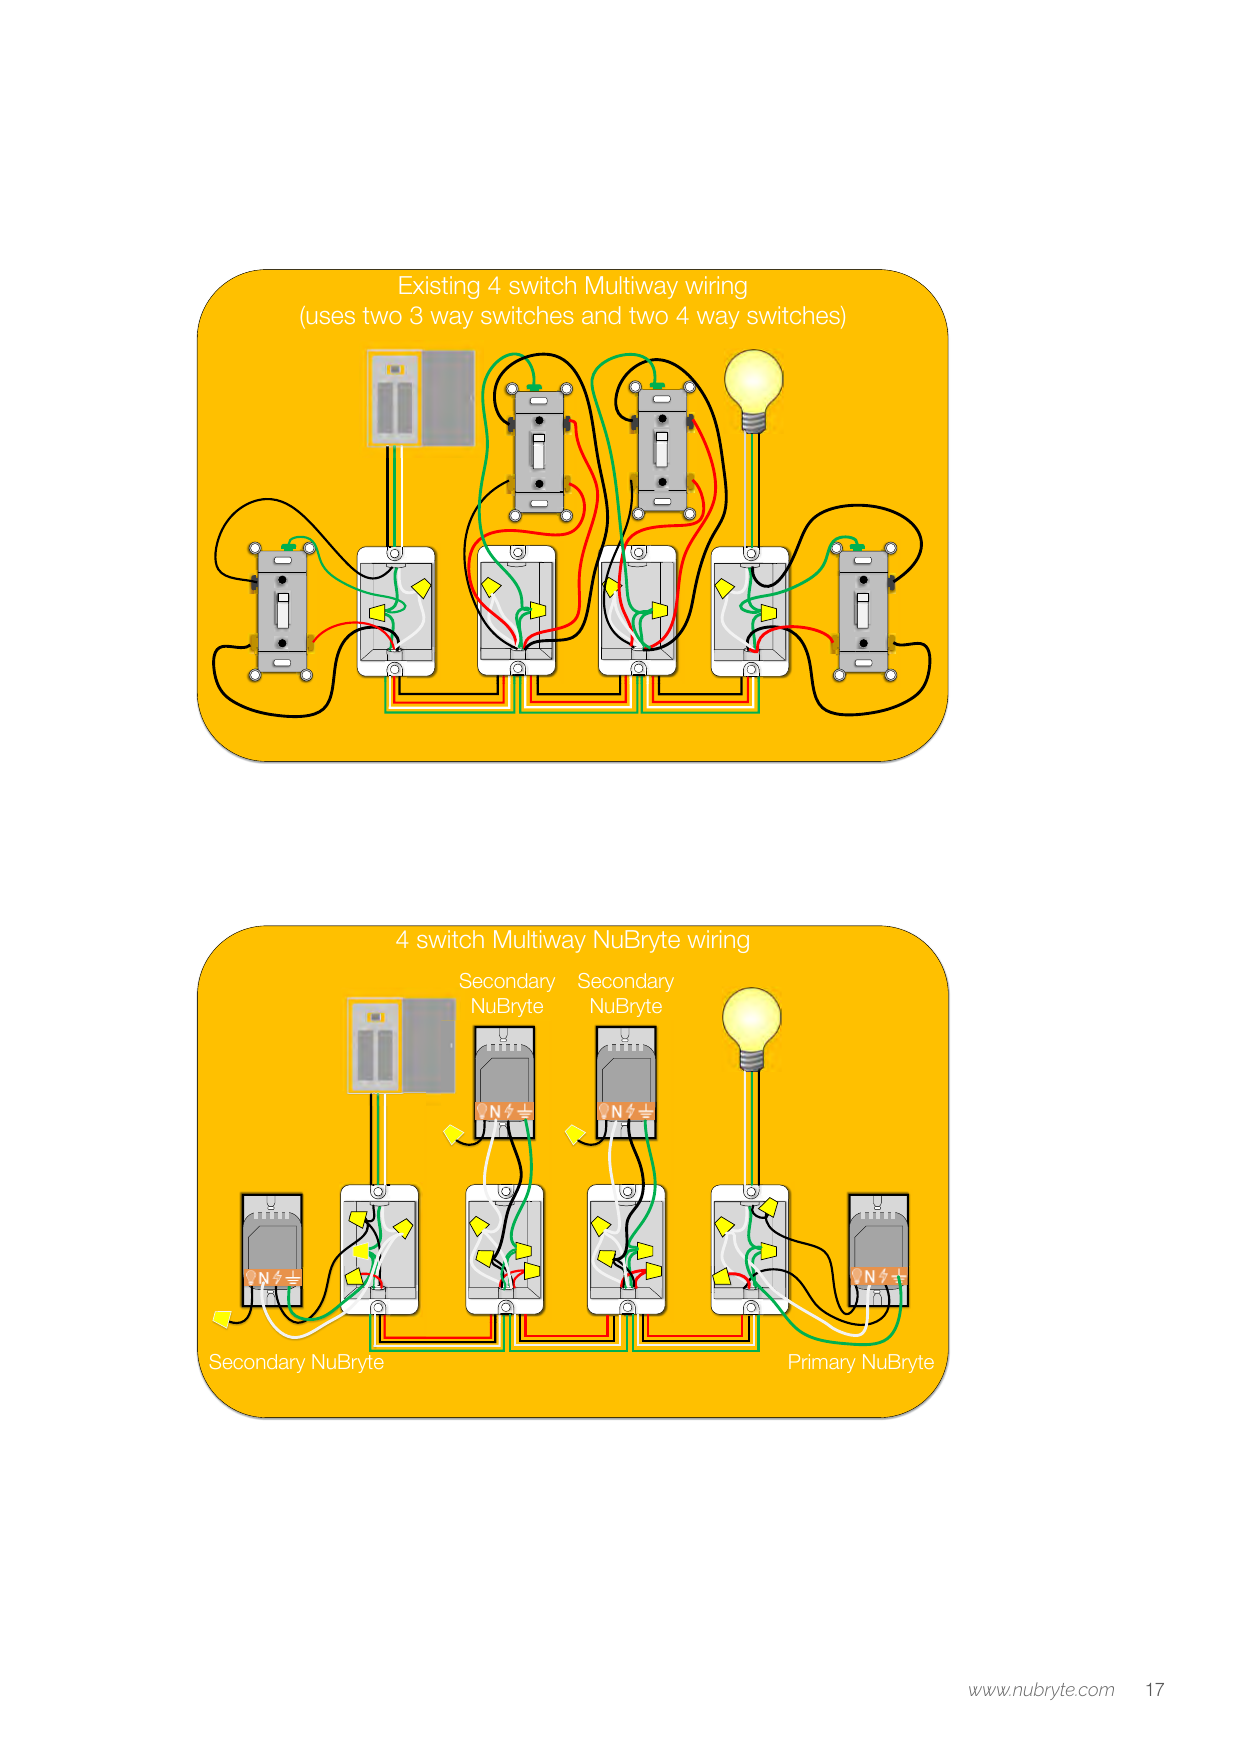
After wiring, install each switch, snap on wall plates, then repeat for every switch in the Multiway group. Turn power back ON and press the Primary switch's on/off button to confirm wiring — remember only the Primary is physically/electrically connected to the fixture; Secondaries only control the light after the app pairing/setup steps below are completed.
Smart Switch Series Overview
- Touchpoint: All-in-one smart console; single or dual light switch. WiFi + ZigBee, touchscreen, motion/occupancy, temp/humidity, energy monitoring, microphone, speaker, multiway, alarm siren. 5.20 x 4.72 x 1.73".
- Link: Required bridge between Touchpoint and Flex series (1 per household). Plugs into a grounded outlet. WiFi + ZigBee, speaker (amplifies the Touchpoint security siren). 2.36 x 3.35 x 1.18".
- Smart Switch Sense|Dim (Flex Sensor): Integrated TRIAC dimmer with motion, temperature/humidity, and energy sensors. Mix/match up to 4 Smart Switch Series switches per wall box. 300W incandescent/halogen, 150W dimmable LED/CFL. ZigBee only. 4.60 x 4.72 x 1.73".
- Smart Switch Dim (Flex Dimmer): TRIAC dimmer without added sensors; pair with Sense|Dim for multi-gang boxes or where sensors aren't needed. Same ratings as Sense|Dim. 4.60 x 4.72 x 1.73".
Up to 25 Smart Switch Series products are supported per home (1 Link required and supported per home). Max Link-to-Smart-Switch line-of-sight distance is ~200 feet — place the Link centrally in the home, oriented perpendicular to the floor, away from bookshelves and large metallic/fluid-filled objects (e.g. aquariums).
Internet Connectivity & Network Setup
All NuBryte devices should be on the same WiFi network (or same AP/sub-net if using a more complex router setup) for features like Intercom Mode to work. Your smartphone must also be on the same network to add devices during Account Setup. The number of Touchpoints supported is limited by your router's capacity; max 1 Link and max 25 Smart Switch Series devices per home.
Troubleshooting: Link Cannot Find or Join WiFi
- Confirm good WiFi signal at the install location. The Link uses 802.11 b/g/n on the 2.4GHz band only.
- If the password screen won't proceed, double-check the password is correct.
- Still failing? Unplug the Link, power-cycle the router (unplug 10 sec, wait 30+ sec after restart), then re-plug the Link.
- Advanced: MAC filtering on your router can block the Link. Temporarily disable it to test, or add the Link's MAC address (network name appears as "lwip" in DHCP assignments) to the router's MAC allow table — can take up to 5 minutes to reconnect after re-enabling filtering.
Troubleshooting: Lost Connection to an Installed Device
- Confirm your phone and all NuBryte devices are on the same WiFi network.
- Fully close and reopen the NuBryte app, then go to Menu > Settings > Device List and Refresh.
- Devices should show as Paired (orange icon) or Unpaired (grey icon) — select an unpaired device to pair it.
- If devices still don't appear, power-cycle the breaker/fuse for the NuBryte devices and the router.
NuBryte Account & App Setup
Download the NuBryte app (iOS App Store or Google Play), sign up for a free account (or log in if you already have one), and accept the Terms of Service. The first person to link the account to a device becomes the Account Manager, who can invite other household members by email from App > Settings > Manage Members. NuBryte updates itself automatically over the internet; check your firmware version at Menu > Settings > Information.
Link Setup
- Plug the NuBryte Link into a grounded 3-prong outlet.
- Press the left icon on the Link for 5 seconds — it will flash orange.
- In the app, go to Settings > Smartlink, select your home WiFi network (SSID), enter the password, and press Connect.
- The Link's light changes from flashing orange → flashing green → steady green (usually ~40 seconds, occasionally 1-2 minutes).
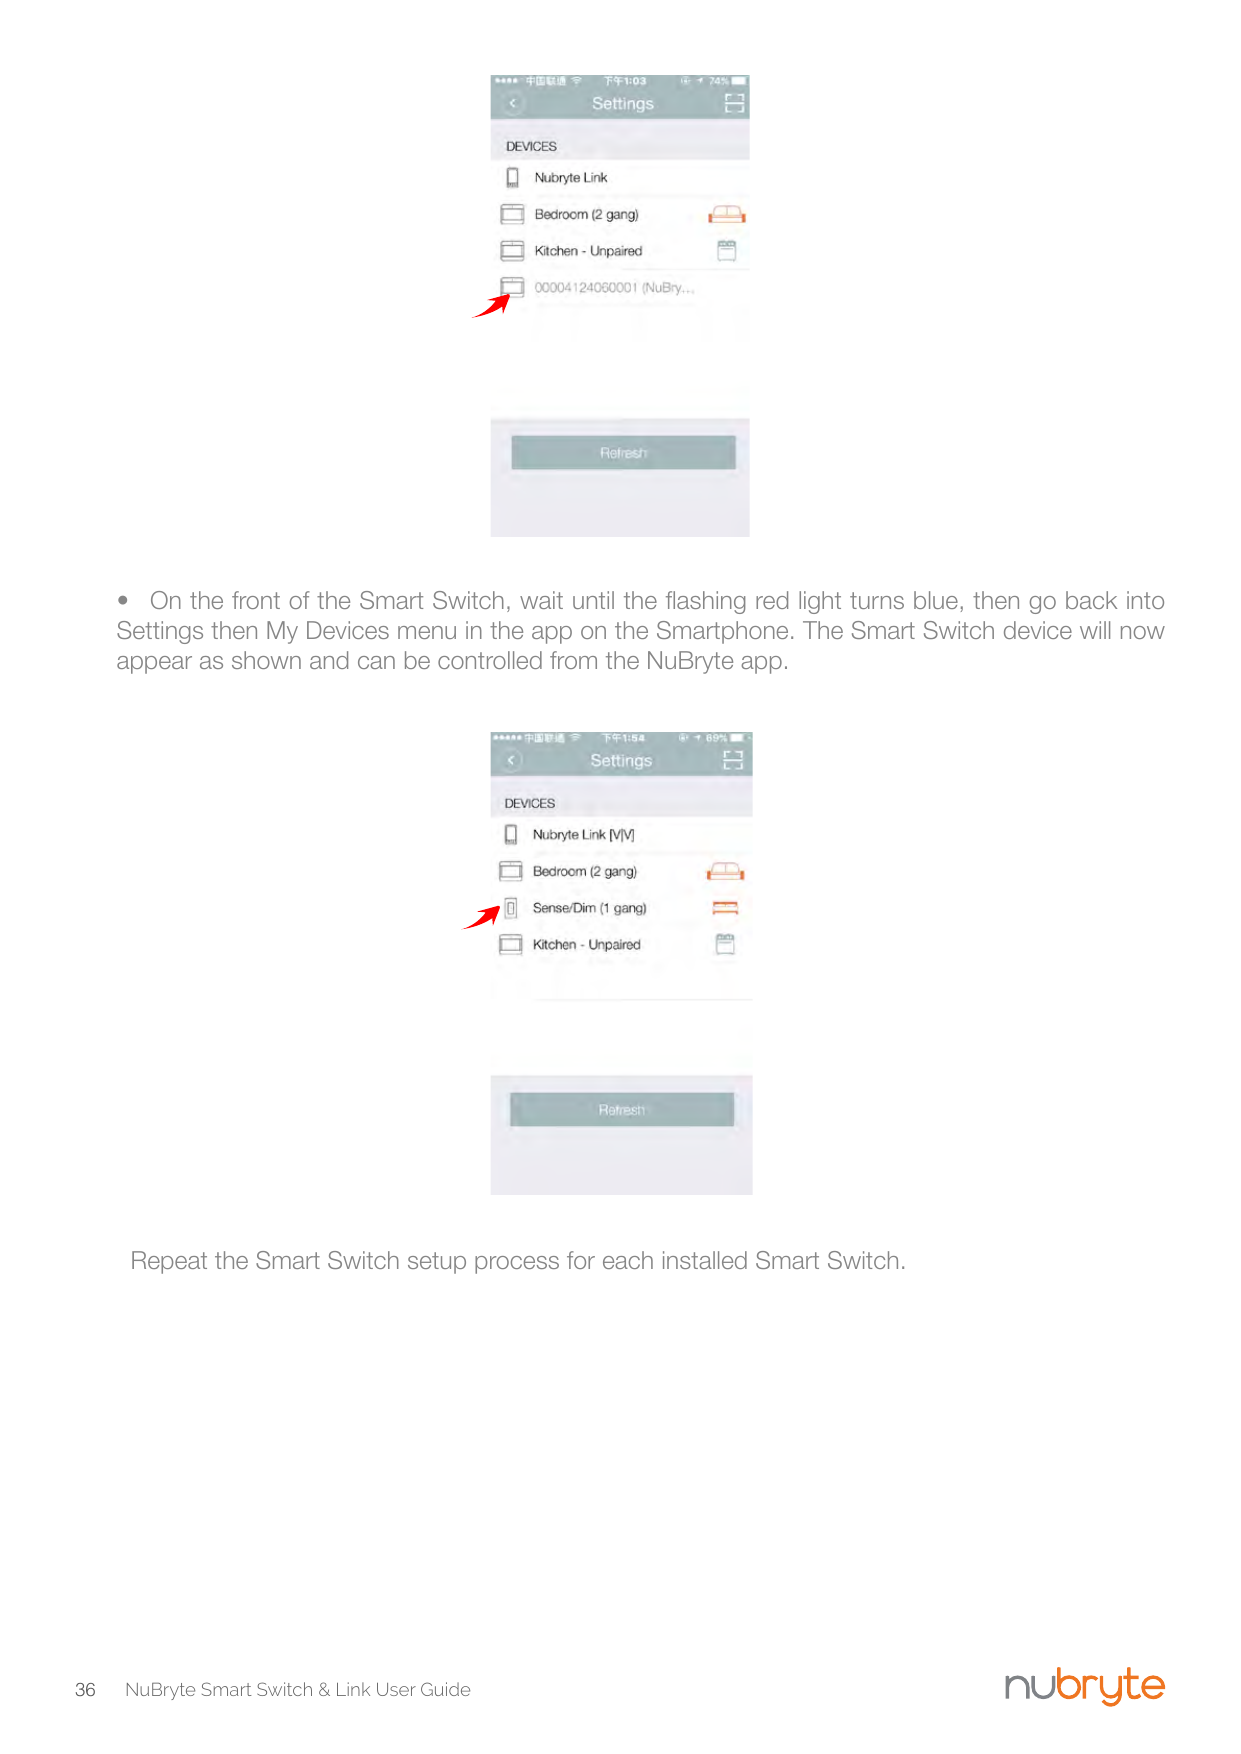
- Back in Settings > My Devices, tap Refresh — the Link will appear as "unpaired" (or already "Paired," in which case skip ahead).
- Tap the Link entry, then choose Save and Finish on the Edit Device page. The "unpaired" label will clear once complete. Only one Link is needed/supported per home.
Smart Switch Setup
- In Settings > My Devices, tap the QR code icon (top right) to enter camera mode.
- Temporarily unsnap the wall plate to expose the QR-type barcode on the front of the Smart Switch. Caution: do not insert fingers or objects between the switch and the wall box.
- Aim the camera at the barcode and photograph it — try slightly different distances/angles if the pairing popup doesn't appear.
- Snap the wall plate back on. On the Edit Devices page, choose a location and name, then Save and Finish.
- Wait until the flashing red light on the switch turns blue, then refresh My Devices — the switch will now appear and be controllable from the app.
- Repeat for each installed Smart Switch.
Using the NuBryte App
- On/Off: Select the switch icon, press the On/Off button at center of screen.
- Dimming: Pinch the dimming controls to change brightness.
- Multi-Control: Select multiple switches (or "All Rooms") to control together; swipe left if more than 4 switches are installed.
Advanced Lighting Modes
- Vacation Mode: Set start/end dates; NuBryte turns lights on/off during that window (Random option available).
- Morning Wake Up Mode: Brightens lights 0-100% over the 5 minutes before your set wakeup time.
- Bedtime Mode: Gently dims lights to 0% over the 30 minutes before your set bedtime.
- Night Light Mode: Brightens to 30% on large movement (e.g. getting out of bed) during set hours. Not available with Smart Switch Dim.
- Motion Mode: Turns lights on/off based on sensed motion, with configurable start/end times and on-duration. Not available with Smart Switch Dim.
Overlapping mode schedules are resolved by a fixed priority order; both your phone and the NuBryte device need an active internet connection for advanced lighting modes to work.
Third-Party Integration
NuBryte Touchpoint products support Amazon® Alexa integration for lighting control via the "NuBryte" Alexa skill. See www.nubryte.com for the latest details.
Caring for Your NuBryte Products
- Keep liquids away from the Touchpoint and Smart Switches. Avoid dropping or applying excessive force.
- Clean with a soft, lint-free cloth. Avoid paper towels, abrasive cloths, window/household cleaners, compressed air, solvents, ammonia, abrasives, hydrogen-peroxide cleaners, or aerosol sprays. Do not spray cleaners directly onto the unit.
- If liquid gets inside a NuBryte product, contact NuBryte support immediately — liquid damage is not covered under warranty.
Regulatory
FCC Class B compliant. Link FCC ID: 2AEONGATEWAY | Smart Switch FCC ID: 2AEONFLEX. Changes or modifications not expressly approved by Lucis Technologies can void the user's authority to operate the equipment.
Support
Online: www.nubryte.com/support | Email: hello@nubryte.com | Phone: 1-855-884-3890 (toll free)
Lucis Technologies, 1159 Sonora Court, Suite 320, Sunnyvale, CA 94086 — www.lucis-tech.com