
Linear DXS-73 Wireless Photoelectric Smoke Alarm — Installation Instructions
Installation instructions, alarm placement guidance, and fire safety tips for the Linear DXS-73 wireless photoelectric smoke alarm with built-in transmitter.
Full text manual (for reference)
Installation instructions for the Linear DXS-73 Wireless Photoelectric Smoke Alarm — a smoke detector with a built-in transmitter for Linear's DXS and DX Format receivers.
Product Description
The DXS-73 is a photoelectric smoke alarm with a built-in transmitter designed for use with Linear's DXS and DX Format receivers. When smoke is detected, the alarm sounds a loud local alarm. Twenty seconds after the local alarm sounds, the built-in transmitter sends a digitally coded wireless signal to its companion receiver, repeating every 20 seconds as long as smoke is present.
The digital DXS code format features over a million possible codes. DXS transmitters are precoded at the factory to unique codes, so no field coding is required. The DXS-73 can send three different codes: alarm, test, and low battery status. Any transmitter can be programmed into any receiver channel — receivers must be programmed to the transmitter's code before system testing and operation (refer to the receiver's instructions).
The unit is powered by a 3-volt lithium battery (supplied), rated for up to five years. Every hour, the DXS-73 sends a status transmission to the receiver, updating the receiver on the transmitter's condition — including low battery status if voltage drops below a preset level (some receivers can report low battery status, others cannot).
Installation Steps
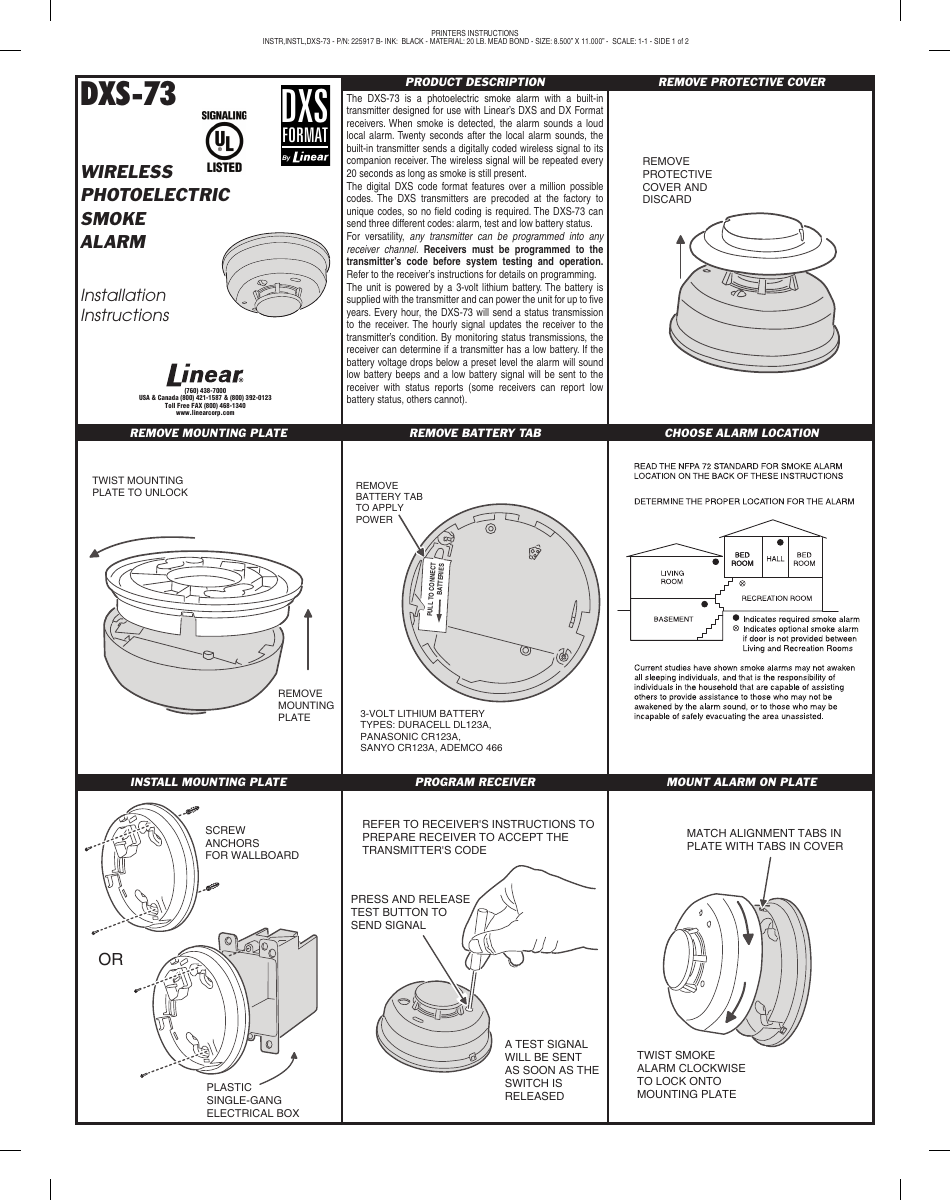
- Remove the protective cover and discard it.
- Twist the mounting plate to unlock and remove it from the unit.
- Remove the battery tab to apply power — pull to connect the batteries (3-volt lithium battery: Duracell DL123A, Panasonic CR123A, Sanyo CR123A, or Ademco 466).
- Choose the alarm location (see placement guidance below).
- Install the mounting plate using screw anchors for wallboard, or a plastic single-gang electrical box.
- Program the receiver: refer to the receiver's instructions to prepare it to accept the transmitter's code. Press and release the test switch to send a signal — a test signal is sent as soon as the switch is released.
- Mount the alarm on the plate: match the alignment tabs in the plate with the tabs in the cover, then twist the smoke alarm clockwise to lock it onto the mounting plate.
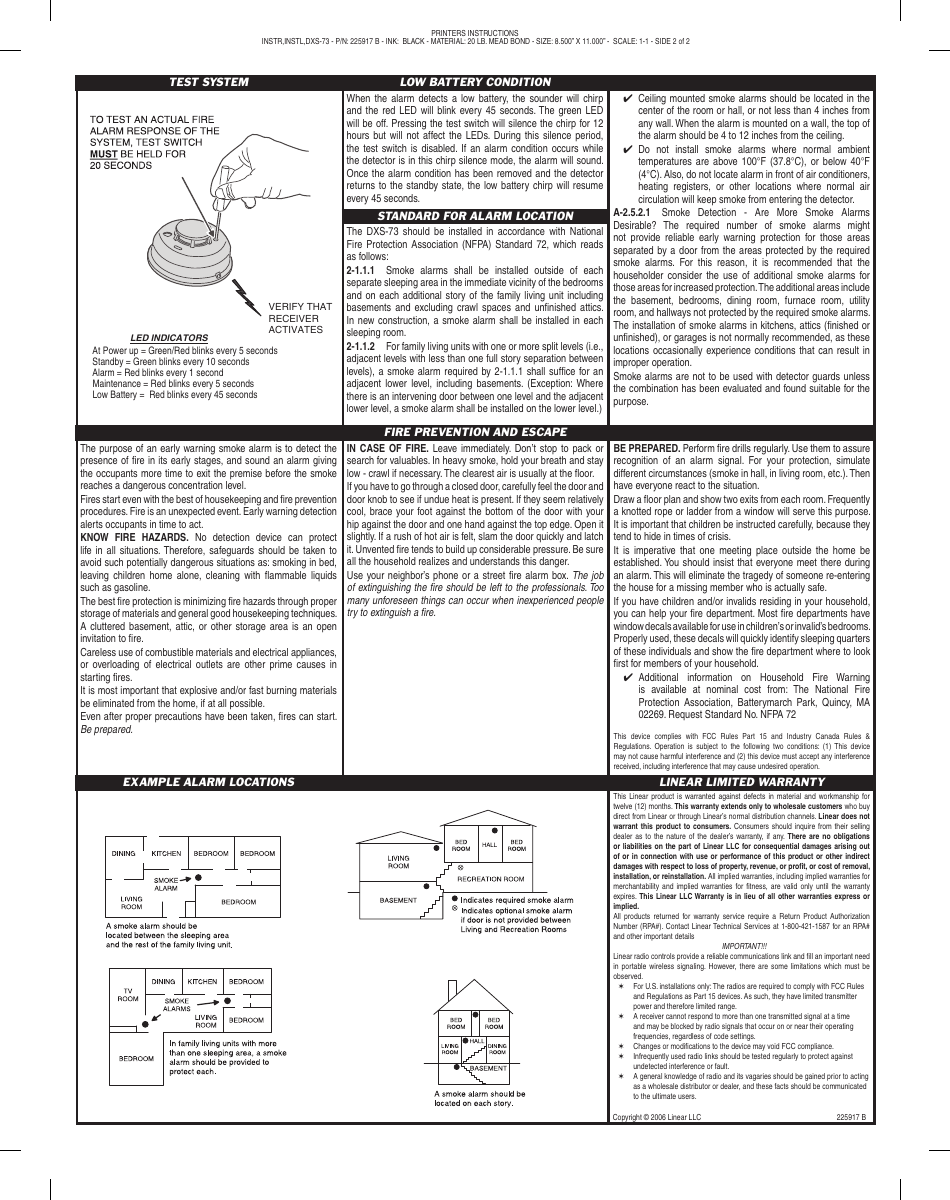
LED Indicators
- At Power Up: Green/Red blinks every 5 seconds
- Standby: Green blinks every 10 seconds
- Alarm: Red blinks every 1 second
- Maintenance: Red blinks every 5 seconds
- Low Battery: Red blinks every 45 seconds
Low Battery Condition
When the alarm detects a low battery, the sounder will chirp and the red LED will blink every 45 seconds (green LED off). Pressing the test switch silences the chirp for 12 hours but does not affect the LEDs; the test switch is disabled during this period. If an alarm condition occurs during chirp-silence mode, the alarm will still sound. Once the alarm condition clears and the detector returns to standby, the low-battery chirp resumes every 45 seconds.
Alarm Placement Guidance (NFPA 72)
- Smoke alarms shall be installed outside of each separate sleeping area, in the immediate vicinity of bedrooms, and on each additional story of the family living unit, including basements (excluding crawl spaces and unfinished attics). In new construction, a smoke alarm shall be installed in each sleeping room.
- For family living units with split levels (adjacent levels with less than one full story separation), one smoke alarm can suffice for an adjacent lower level, including basements — unless there's an intervening door between levels, in which case a smoke alarm is required on the lower level too.
- Ceiling-mounted smoke alarms should be located in the center of a room or hall, or not less than 4 inches from any wall. Wall-mounted alarms should have their top 4 to 12 inches from the ceiling.
- Do not install where ambient temperatures exceed 100°F (37.8°C) or fall below 40°F (4°C). Avoid locations near air conditioners, heating registers, or areas where air circulation would keep smoke from reaching the detector.
- Additional smoke alarms are recommended for areas separated by a door from areas covered by required alarms — e.g., basements, extra bedrooms, dining rooms, furnace rooms, utility rooms, and hallways.
- Installing smoke alarms in kitchens, attics, or garages is not normally recommended, as these locations can experience conditions leading to improper operation. Do not use with detector guards unless the combination has been evaluated as suitable.
Fire Prevention & Escape Tips
- The purpose of an early warning smoke alarm is to detect fire in its early stages, giving occupants more time to exit before smoke reaches dangerous concentrations.
- No detection device can protect life in all situations — avoid hazards like smoking in bed, leaving children home alone, or cleaning with flammable liquids such as gasoline.
- In case of fire: leave immediately, don't stop to pack or search for valuables. In heavy smoke, hold your breath and stay low — crawl if necessary. Before opening a closed door, feel the door and knob for heat; if a rush of hot air is felt when opening slightly, slam the door and latch it.
- Use a neighbor's phone or a street fire alarm box — leave extinguishing the fire to professionals.
- Perform fire drills regularly. Draw a floor plan showing two exits from each room. Establish one meeting place outside the home.
- Fire departments often provide window decals to identify children's or invalids' bedrooms for faster rescue.
- More information available from the National Fire Protection Association, Batterymarch Park, Quincy, MA 02269 (request Standard No. NFPA 72).
Regulatory Information
This device complies with FCC Rules Part 15 and Industry Canada Rules & Regulations. Operation is subject to the condition that this device may not cause harmful interference and must accept any interference received, including interference that may cause undesired operation.
Important: Linear radio controls provide a reliable communications link but have limitations. U.S. installations must comply with FCC Part 15, which limits transmitter power and range. A receiver cannot respond to more than one transmitted signal at a time and may be blocked by nearby radio signals regardless of code settings. Changes or modifications to the device may void FCC compliance. Infrequently used radio links should be tested regularly to protect against undetected interference or fault.
Limited Warranty
This Linear product is warranted against defects in material and workmanship for twelve (12) months. This warranty extends only to wholesale customers who buy direct from Linear or through Linear's normal distribution channels — not a consumer warranty. Consumers should inquire with their selling dealer. All returns require a Return Product Authorization Number (RPA#) — contact Linear Technical Services at 1-800-421-1587.
Manufacturer: Linear LLC · www.linearcorp.com · USA & Canada: 800-421-1587 & 800-392-0123 · (760) 438-7000