
Leviton 47605 Structured Media Center — Installation Instructions
Installation instructions for Leviton's Structured Media Centers (Cat. No. 47605) — the central low-voltage distribution enclosure for home networking, telephone, and video/coax wiring, including cover, grounding, and optional lock installation.
Full text manual (for reference)
Installation instructions for Leviton's Structured Media™ Centers (SMC) — Cat. No. 47605 — the central distribution enclosure for networking, telephone, security camera, coaxial/satellite video, and other in-home structured wiring.
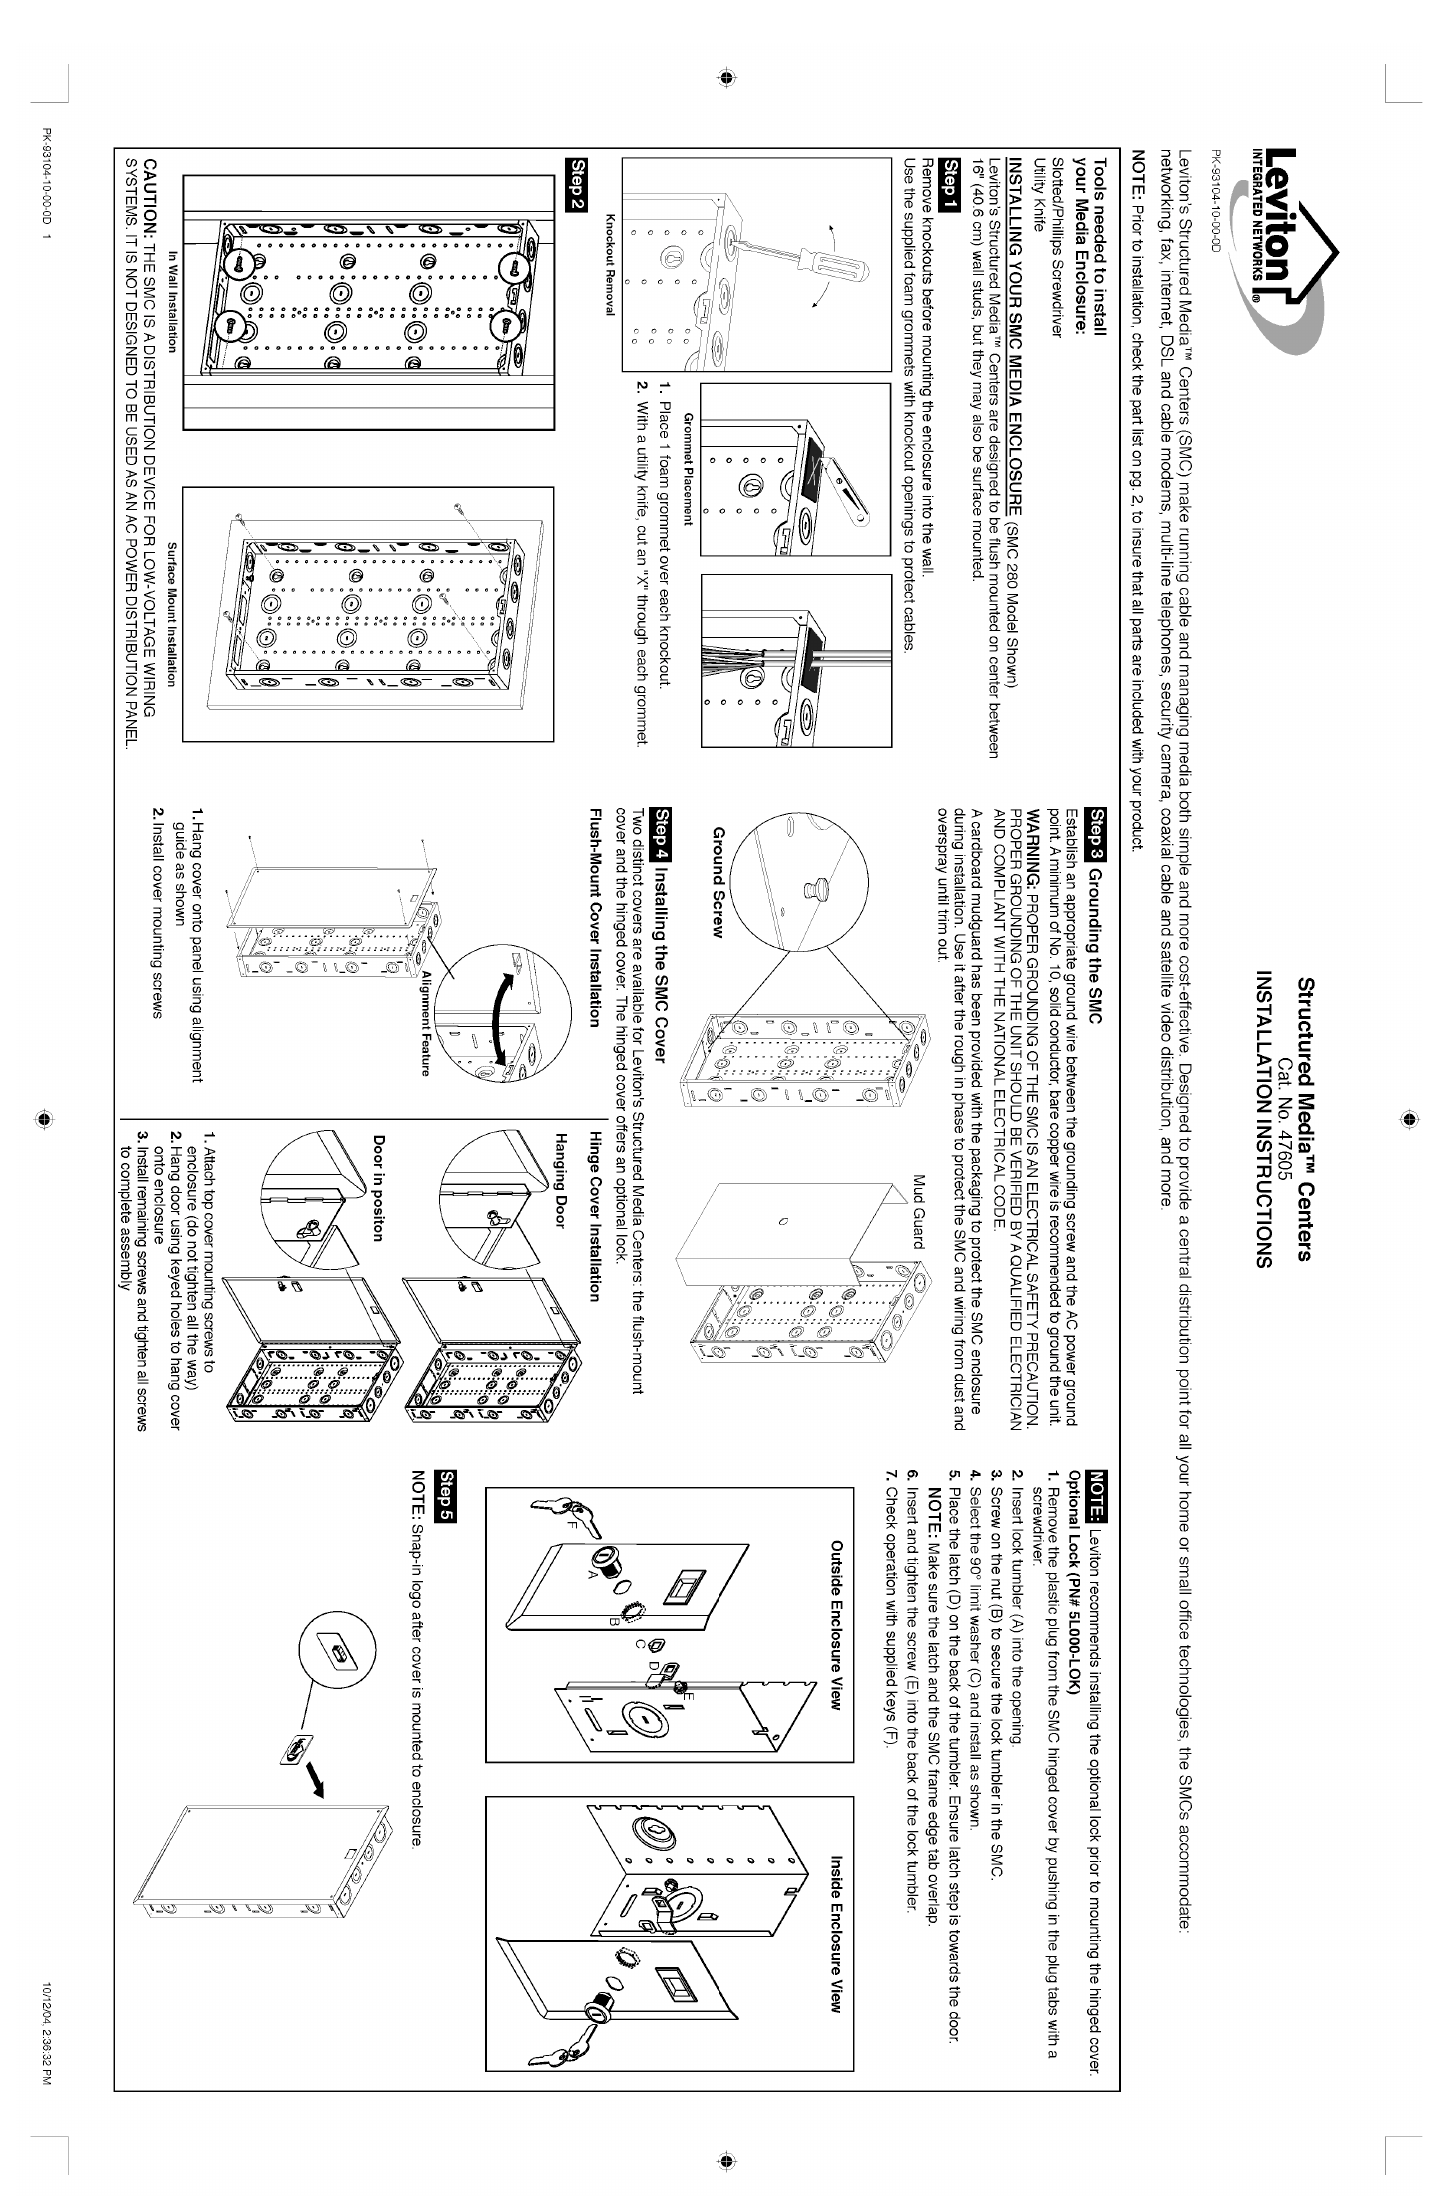
CAUTION: THE SMC IS A DISTRIBUTION DEVICE FOR LOW-VOLTAGE WIRING SYSTEMS. IT IS NOT DESIGNED TO BE USED AS AN AC POWER DISTRIBUTION PANEL.
Tools Needed
- Slotted/Phillips screwdriver
- Utility knife
Installation Steps
Step 1 — Knockout Removal
Remove knockouts before mounting the enclosure into the wall. Use the supplied foam grommets with knockout openings to protect cables:
- Place 1 foam grommet over each knockout.
- With a utility knife, cut an "X" through each grommet.
Step 2 — Mount the Enclosure
Leviton's Structured Media Centers are designed to be flush mounted on center between 16" (40.6 cm) wall studs, but they may also be surface mounted. Both in-wall and surface mount installation options are supported.
Step 3 — Grounding the SMC
Establish an appropriate ground wire between the grounding screw and the AC power ground point. A minimum of No. 10, solid conductor, bare copper wire is recommended to ground the unit.
WARNING: PROPER GROUNDING OF THE SMC IS AN ELECTRICAL SAFETY PRECAUTION. PROPER GROUNDING OF THE UNIT SHOULD BE VERIFIED BY A QUALIFIED ELECTRICIAN AND COMPLIANT WITH THE NATIONAL ELECTRICAL CODE.
A cardboard mud guard is provided with the packaging to protect the SMC enclosure during installation. Use it after the rough-in phase to protect the SMC and wiring from dust and overspray until trim out.
Step 4 — Installing the SMC Cover
Two distinct covers are available: the flush-mount cover and the hinged cover. The hinged cover offers an optional lock.
Flush-Mount Cover Installation:
- Hang cover onto panel using the alignment guide.
- Install cover mounting screws.
Hinged Cover Installation:
- Attach top cover mounting screws to enclosure (do not fully tighten).
- Hang door using keyed holes onto the enclosure.
- Install remaining screws and tighten all screws to complete assembly.
Note: Leviton recommends installing the optional lock (PN# 5L000-LOK) prior to mounting the hinged cover:
- Remove the plastic plug from the SMC hinged cover by pushing in the plug tabs with a screwdriver.
- Screw on the nut (B) to secure the lock tumbler in the SMC.
- Insert the 90° limit washer (C) and install as shown.
- Select the latch (D) on the back of the tumbler, ensuring the latch step faces the door. Make sure the screw and SMC frame edge tab overlap.
- Insert and tighten the latch (E) into the back of the SMC.
- Check operation with supplied keys (F).
Step 5 — Finishing
Snap the Leviton logo onto the cover after it's mounted to the enclosure.
Installation Reference Diagrams
Parts Lists by Model
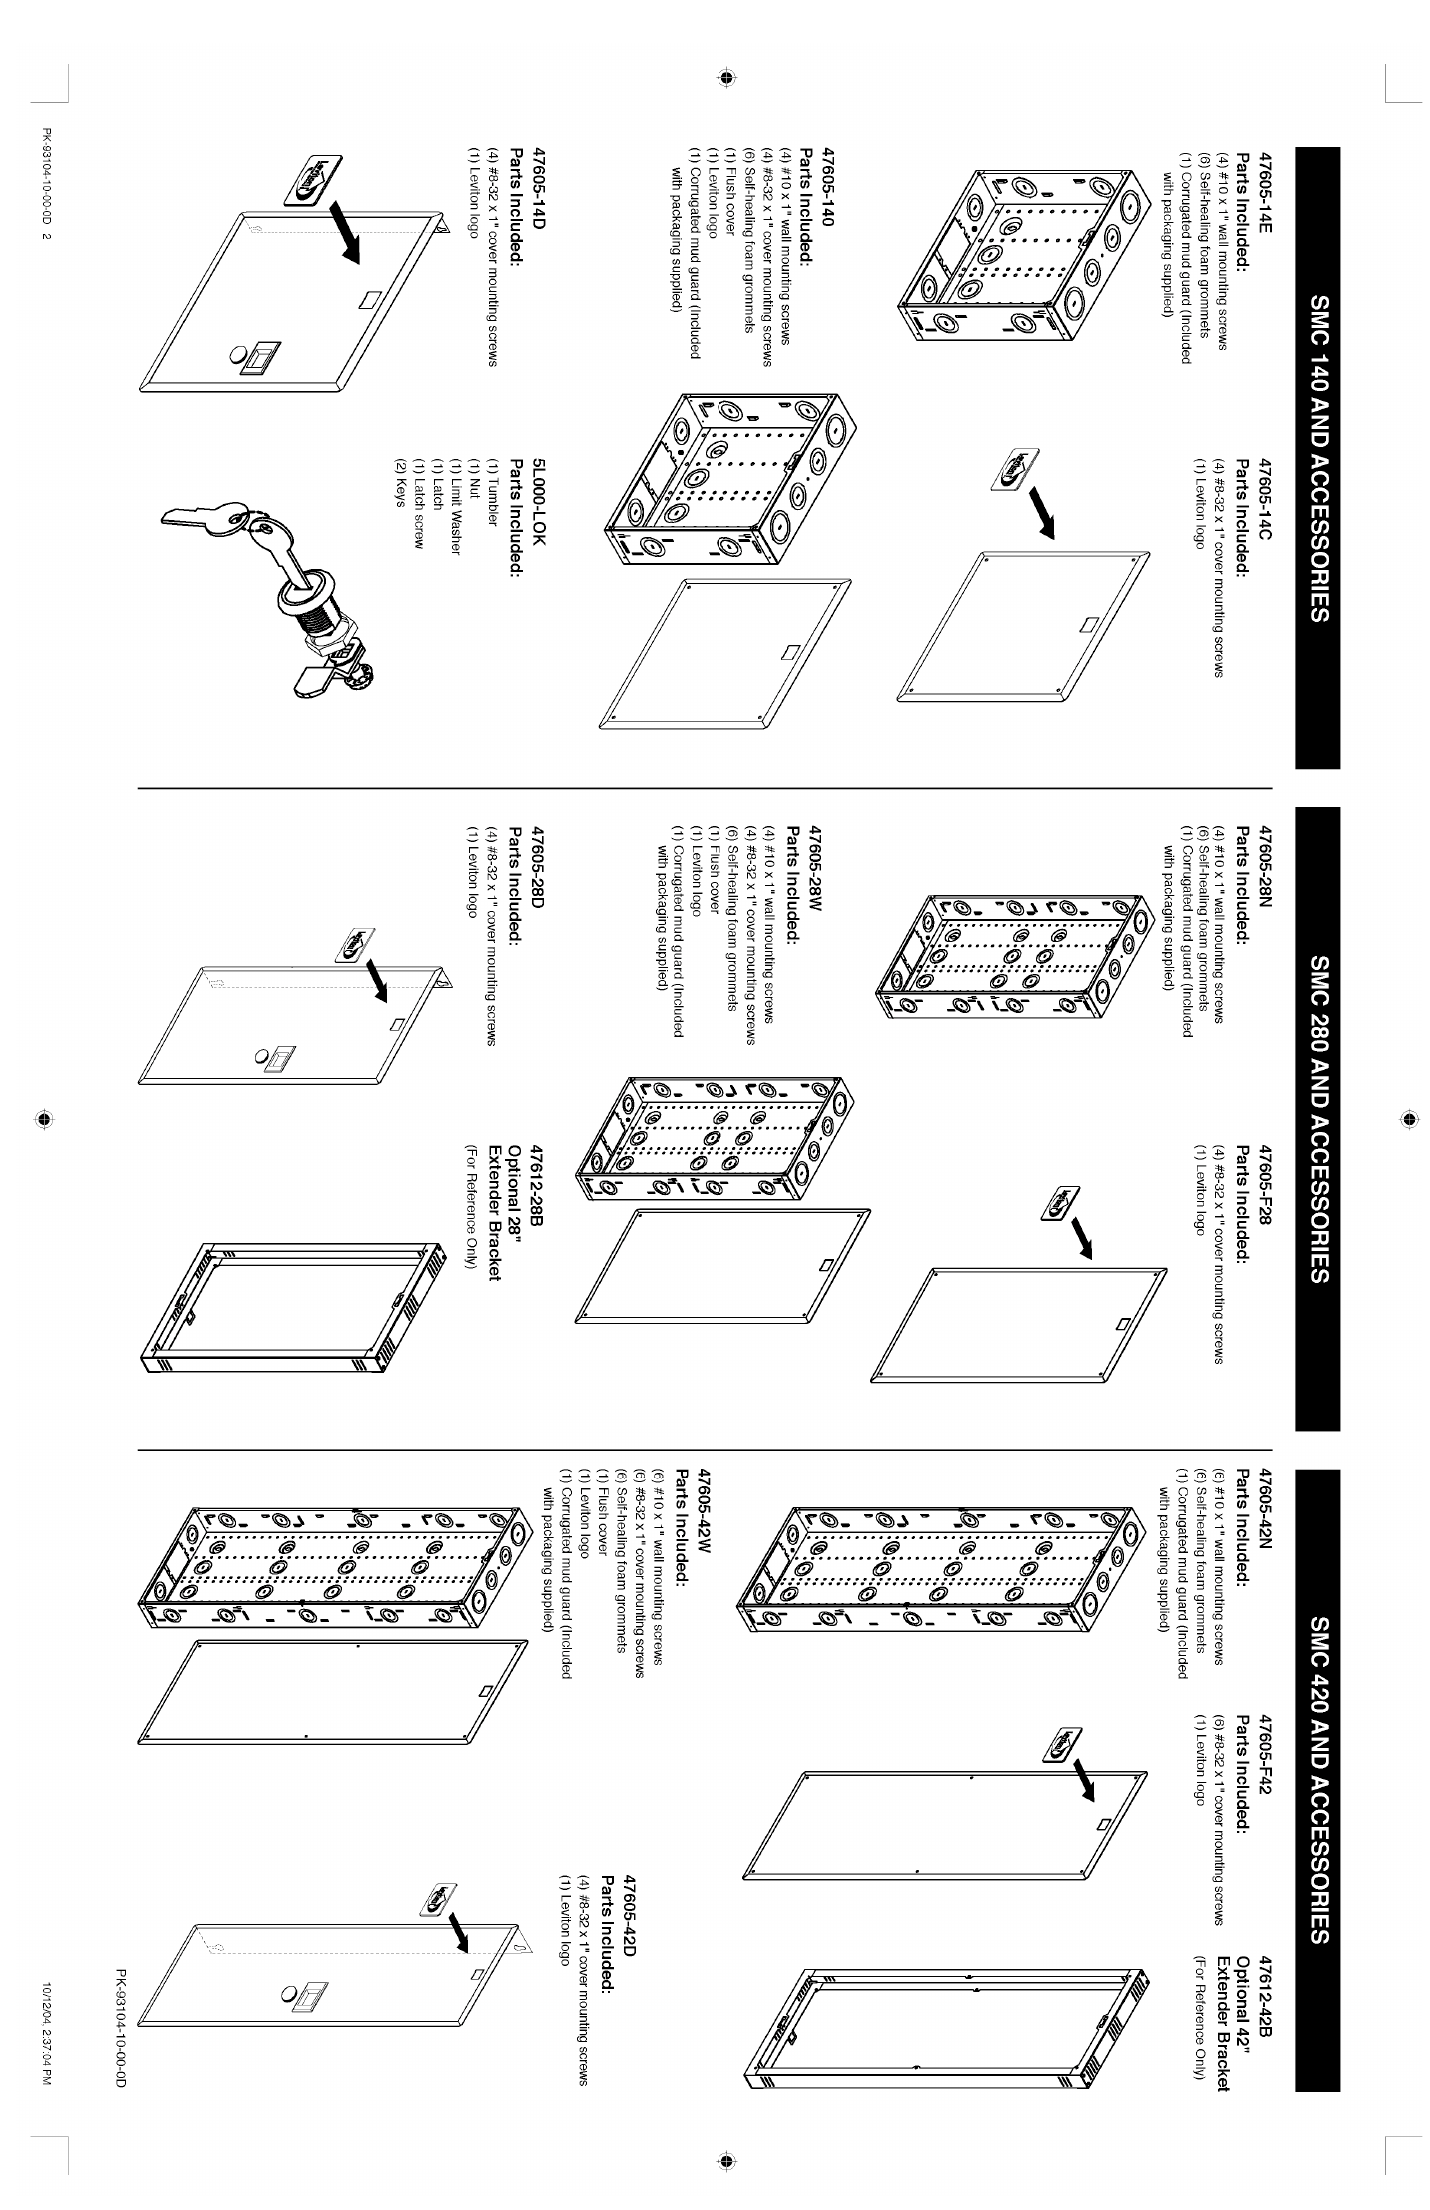
SMC 140 and Accessories
| Cat. No. | Parts Included |
|---|---|
| 47605-140 | (4) #10 x 1" wall mounting screws, (4) #8-32 x 1" cover mounting screws, (6) self-healing foam grommets, (1) flush cover, (1) Leviton logo, (1) corrugated mud guard |
| 47605-14C | (4) #8-32 x 1" cover mounting screws, (1) Leviton logo |
| 47605-14D | (4) #8-32 x 1" cover mounting screws, (1) Leviton logo |
| 47605-14E | (4) #10 x 1" wall mounting screws, (6) self-healing foam grommets, (1) corrugated mud guard |
| 5L000-LOK (optional lock) | (1) tumbler, (1) nut, (1) limit washer, (1) latch, (1) latch screw, (2) keys |
SMC 280 and Accessories
| Cat. No. | Parts Included |
|---|---|
| 47605-F28 | (4) #8-32 x 1" cover mounting screws, (1) Leviton logo |
| 47605-28N | (4) #10 x 1" wall mounting screws, (6) self-healing foam grommets, (1) corrugated mud guard |
| 47605-28W | (4) #10 x 1" wall mounting screws, (4) #8-32 x 1" cover mounting screws, (6) self-healing foam grommets, (1) flush cover, (1) Leviton logo, (1) corrugated mud guard |
| 47605-28D | (4) #8-32 x 1" cover mounting screws, (1) Leviton logo |
| 47612-28B | Optional 28" extender bracket (for reference only) |
SMC 420 and Accessories
| Cat. No. | Parts Included |
|---|---|
| 47605-F42 | (6) #8-32 x 1" cover mounting screws, (1) Leviton logo |
| 47605-42N | (6) #10 x 1" wall mounting screws, (6) self-healing foam grommets, (1) corrugated mud guard |
| 47605-42W | (6) #10 x 1" wall mounting screws, (6) #8-32 x 1" cover mounting screws, (6) self-healing foam grommets, (1) flush cover, (1) Leviton logo, (1) corrugated mud guard |
| 47605-42D | (4) #8-32 x 1" cover mounting screws, (1) Leviton logo |
| 47612-42B | Optional 42" extender bracket (for reference only) |
For Technical Assistance Call: 1-800-824-3005 (U.S.A. Only) · www.leviton.com