
HAVEN Lockdown — Quick Start Guide
Quick start guide for the HAVEN Lockdown commercial smart lock, covering safety, warranty, door configurations, mobile app setup, and key fob pairing.
Full text manual (for reference)
HAVEN® Lockdown™ — Quick Start Guide
High-strength, Bluetooth®-enabled smart lock for commercial applications, designed to prevent a closed door from being forced open by blunt force near the outside door handle.
Important Safety Instructions
Warning: HAVEN will not prevent someone from accessing a home, business, or commercial facility via other means, and will not prevent entry if special tools are used. HAVEN is designed specifically to prevent a closed door from being forced open when blunt force is used against the middle section of the door near the outside handle. Any other entry attempt falls outside the defined use of the product. If a breach attempt occurs with HAVEN installed, replace your unit.
- Do not attempt to disassemble the unit or remove components not explicitly covered in the installation manual.
- Do not press the hand pedal and locking gate at the same time.
- Owner is responsible for providing alternative building access during fire, smoke, carbon dioxide, or other emergencies.
- Owner is responsible for proper fit and correct installation, and for the safety of themselves and others.
Caution:
- Use caution when installing HAVEN on a doorway; wear appropriate protective items during installation.
- Do not install near live electrical cords; ensure the installation area is free of wires, cables, pipes, and other hazards.
- Use only the tools referenced in the installation guide.
- Install HAVEN Lockdown on solid-core, commercial doors only — installation on hollow-core doors severely degrades lock capability and voids the warranty.
- Owner is responsible for keeping the unit clean, ensuring alternate building access, and maintaining control/accountability of any key fob or credentialed device shared with the lock.
- The unit is a deterrent and supplementary security measure, intended for use alongside existing lock hardware — not a replacement for it.
Notice: Do not place fingers near the center locking gate or bracketing hardware while in use — severe finger injury could result from getting caught between the locking gate and bracket. Indoor use only; do not expose to weather. Do not simulate a breach, as this may damage the unit and affect later functionality.
Regulatory Information
| Component | Model | FCC ID | IC |
|---|---|---|---|
| HAVEN Lockdown | HL1-CNT-001-LD | 2ARFQHL1CNT001 | 24389-HL1CNT001 |
| HAVEN Lock Fob | HL2-FOB-001 | 2ARFQHL2FOB001 | 24389-HL2FOB001 |
This device complies with Part 15 of the FCC Rules. Operation is subject to the following two conditions: (1) this device may not cause harmful interference, and (2) this device must accept any interference received, including interference that may cause undesired operation. Changes or modifications not expressly approved by HavenLock Inc. could void the user's authority to operate the equipment.
Warranty Information
HavenLock Inc. provides a one-year limited warranty covering manufacturer's defects in the mechanical and electronic components of HAVEN Lockdown, for the original purchaser only, under private use. Improper installation, misuse, or alteration voids the warranty. Damage from misuse, neglect, or battery malfunction is not covered.
What HAVEN Will Do: Upon return of the defective product, HAVEN's sole obligation, at its option, is to repair or replace the product, or refund the original purchase price in exchange for the product.
Not Covered: Labor costs (including removal/reinstallation), shipping/freight expenses, and incidental/consequential/indirect/special/punitive damages. Also excluded: products used outside their intended purpose, subjected to alteration/abuse/misuse/negligence/accident, improperly stored/installed/maintained/operated, or used in violation of written instructions. Scratches, abrasions, or deterioration from paints/solvents/chemicals are not covered.
Claims must be brought within one year of the cause of action. Contact HAVEN Customer Service for warranty assistance, repair, replacement, or refund.
Battery Information & Disposal
Do not dispose of this product with household waste, per the WEEE Directive (2012/19/EU) and applicable national law — take it to a licensed e-waste recycling collection center.
Caution: Risk of explosion if the battery is replaced with an incorrect type. Dispose of used batteries according to the instructions.
Door Configuration Diagrams
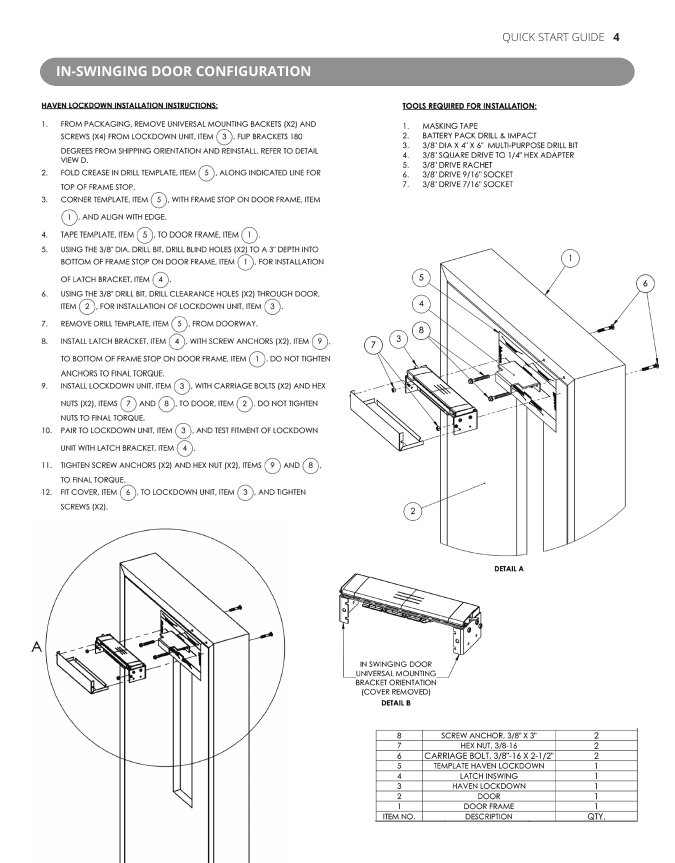
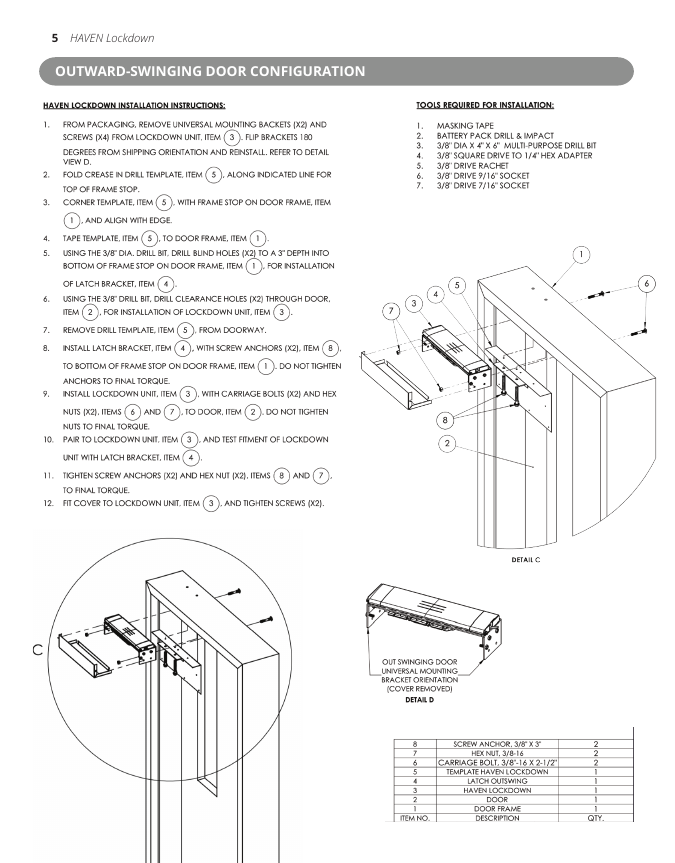
Setting Up the Mobile App
- Get prepped — Download the HAVEN Lock App from the App Store or Google Play Store. Set up an account within the app and make sure Bluetooth® is activated on your device. Android: havenlock.com/android. Apple: havenlock.com/apple.
- Launch app and set up account — Follow the on-screen steps and confirm via the email you receive (check spam if not received within 5-10 minutes).
- Prepare to pair your device — Log in, tap the "+" icon, select "Pair A Device," and follow on-screen instructions.
- Make your HAVEN discoverable — Open the control panel and press and release (do not hold) the admin button. Once the LED begins to flash, touch your phone to the lock to complete pairing.
- Name your lock — Once paired, name your lock (e.g., "Lobby Entrance") and tap "Complete Setup."
Troubleshooting help: havenlock.com/faq.
Key Fob Pairing (purchased separately)
- Touch the key fob against the HAVEN Connect Status Indicator LED and press and hold the key fob unlock button until the Key Fob LED Status Indicator illuminates and blinks white. Continue holding the button.
- While still holding the key fob unlock button, press and release the HAVEN Admin Button; when it starts blinking white, release the unlock button on the key fob.
- Both lights should blink together and you'll hear a beep signifying successful pairing.
- If you don't hear the beep and the key fob flashes red or doesn't function, hold the HAVEN Admin Button for about 10 seconds to reset (LED flashes green), then restart the process. Note: a manual reset also disconnects any synced phone applications, which will need to be re-keyed via the mobile app.
Key Fob Reset
- Hold the enrolled key fob's unlock button for approximately 5 seconds.
- Wait for a short series of flashes, which will momentarily stop and then reappear.
- The fob will automatically restart; an alternating series of green, red, blue, and white flashes indicates it is powered on.
- The key fob has been successfully reset and its previous enrollment cleared, ready for new enrollment.