
Ezlo Protect Full Dealer Manual
Complete dealer manual for Ezlo Protect: hardware specs, Security Partner Portal, installer app flow, resident app/panel, and Resident Portal automation.
Full text manual (for reference)
The Ezlo Protect Full Dealer Manual is the complete reference for security dealers and installers: hardware specs and LED troubleshooting for the Ezlo Secure hub and Android touch panel, the full Security Partner Portal walkthrough (branding, customer management, monitoring), the Ezlo Installer app flow for adding controllers and pairing devices, the Ezlo Protect Resident App/Panel for end users, and the Resident Portal (MeshBots, virtual devices, plugins, integrations) for advanced automation.
Hardware
Android Touch Panel Specifications
| Spec | Detail |
|---|---|
| LCD Display | 10.1", 1280x800 resolution |
| Touch Panel | Capacitive 10-point touchscreen |
| CPU | RK3566 Quad Core Cortex A55 |
| OS | Android 11 |
| RAM / ROM | 4GB / 16GB |
| Camera | 5MP front |
| Wi-Fi | 802.11 b/g/n/ac |
| Ethernet | 100M/1000M RJ45 |
| I/O Ports | 1 Micro USB OTG, 1 USB 2.0 host, 1 USB 3.0 host, 1 USB serial port, 1 HDMI output |
| Bluetooth | 5.0 |
| Power Supply | Adapter, 12V/1.5A |
| Battery | 5000mAh / 3.7V |
Ezlo Secure Hub — LED & Button Troubleshooting Guide
| Reset Button Action | LED Indication | Result |
|---|---|---|
| 1 short (0.05–0.5s) press within 1.5s | None | Send broadcast message to cloud server |
| 2 short presses within 1.5s | Two blinks | Reset client Wi-Fi connection settings |
| 3 short presses within 1.5s | Fast yellow blinking | Perform hub power-off action |
| One long (2–5s) press | Fast blue blinking (2x/sec) | Reboot controller |
| One long (5–10s) press | Fast white blinking (2x/sec) | Soft reset |
| One long (10–20s) press | Slow white blinking (1x/sec) | Factory reset |
| Holding more than 20s | None | Cancel factory reset start |
| — | Solid blue | Unit is connected to cloud |
| — | Blinking amber | Unit is not connected to cloud |
| — | Slow purple blinking (1x/sec) | Firmware update in progress |
| — | Solid green for 2 sec | Firmware update finished successfully |
| — | Solid red for 2 sec | Firmware update failed |
| — | Slow waving blue/purple (1x/sec) | Adding a new smart device |
| — | Fast waving blue/purple (2x/sec) | Removing a smart device |
| — | Slow waving light blue (5s repeat) | Ezlo Secure running on battery power |
| — | Slow waving yellow/light blue (5s repeat) | Battery level 25% or less (battery power only) |
| — | Slow waving red/light blue (5s repeat) | Battery level 10% or less (battery power only) |
| — | Fast blinking red (2x/sec) | Booting / critical battery level, charging required |
Security Partner Portal
Log in at security.mios.com. The Partner Dashboard lets you set up company branding and manage all customer accounts.
- Branding — Settings → Customization → Branding: upload your logo, choose a font color.
- Resident Portal (Ezlogic) customization — Settings → Customization → Ezlogic: choose which menu items show in the Resident Portal, upload a separate logo for that portal, set the color theme (primary, nav text, trigger/action background, primary button colors), and choose which node/controllable types appear in MeshBot triggers and actions.
- Contact Info — Settings → Contact Info: your support phone, email, and website, shown to customers.
- Branch — set up regional branches and manager contact details.
- Site Checklist — build a custom checklist of items to verify at each installation.
- Users (Installers) — create technician accounts via Users → Create User, Role = Installer. A verification email with credentials is sent automatically.
Customer Management
Create customer (resident) accounts from Customer → New Account, or Dashboard → Create Customer. Three stages: (1) basic account details — contact/address info, Installation Address, assign the responsible installer; (2) select customer type and service package (CMS setup if the customer has Security service); (3) additional details and finalization. On save, a default Security Panel PIN code of 1234 is created automatically — strongly recommend changing it after first login. A welcome email with account credentials is sent to the customer.
Manage Existing Customers
- Customer Info — edit name, phone, company, email, installation/billing/mailing address; change installer; modify installation/contract dates; view plan activation status.
- System Info — hub firmware details and list of paired devices.
- Monitoring — view/manage Central Monitoring Service details, enable/disable Test Mode, view service package and subscription start date, edit emergency contacts.
- Packages — change the account plan (EZ Smart Home, EZ Smart Security, EZ Smart Security+). Downgrading from EZ Smart Security to EZ Smart Home disables the CMS account with the monitoring provider.
- Site Checklist — per-customer verification checklist.
- Ezlogic — jump into the customer's Resident Portal view.
- Tickets — view/create support tickets: New Ticket → select user → category → priority → describe issue → Create.
- History — Alert History, Account History, System Access History.
- Permissions — create custom user types with limited portal access.
Knowledge Base holds the available user manuals and Resident Portal help docs. Service Packages shows the current Ezlo Protect Kit package offerings.
Installation (Ezlo Installer App)
- Log into the Ezlo Protect Installer app with the credentials sent to your email.
- Under "Begin new installation," find the customer assigned to your account, tap the arrow next to their name, confirm the correct customer, then tap "Proceed with Installation."
- Tap "+ Add a new controller." Choose Ezlo Secure or Ezlo Plus, then a setup method: Scan Barcode, Wired Setup, or Wireless Setup.
Scan Barcode
Confirm the controller is powered, on the network via LAN cable, and its LED is blue. Scan the barcode on the back of the hub with your camera. If scanning fails, tap "Add Manually" to enter the serial number and MAC address, then "Add Controller."
Wired Setup
Confirm power, LAN connection, blue LED, and that your mobile device shares the controller's network, then tap "Connect." If it fails, retry or fall back to Scan Barcode.
Wireless Setup
- Ensure the controller is powered.
- In your device's Wi-Fi settings, connect to the controller's own network (named by serial number, e.g. "wifi_92002819").
- Enter the password printed on the bottom of the controller.
- Return to the Ezlo app, select the target network, enter its password, tap "Connect."
- A confirmation screen appears on success.
Pair Devices
Connect to the controller, tap "Start" on the confirmation screen (or reconnect), select a device category, then a specific model (e.g. Cameras → VistaCam 1103), and follow the pairing wizard.
Verify the Installation
Tap Security → Check System. Correctly paired devices show a purple "OK"; failed devices show a red "Failed." For troubleshooting, go to Settings → Help to contact support directly, or check the support website / video tutorials.
Configure Security Modes
Security → Configure Security Modes. Select a mode with one touch:
- Disarmed — disarms all sensors.
- Armed (Stay) — arms all except motion sensors (used when home); does not disarm smoke, flood, CO, or glass-break sensors.
- Armed — arms all sensors, for when the house is vacant.
Settings under the mode buttons configure detailed armed-sensor behavior.
Central Monitoring Station (CMS)
Security → Activate Professional Monitoring: complete the customer info form, tap "Proceed," then add the emergency contacts who'll be called if the alarm triggers (they must know the resident's PIN code for verbal verification). Tap "Activate Monitoring" once contacts are added.
Enable Test Mode
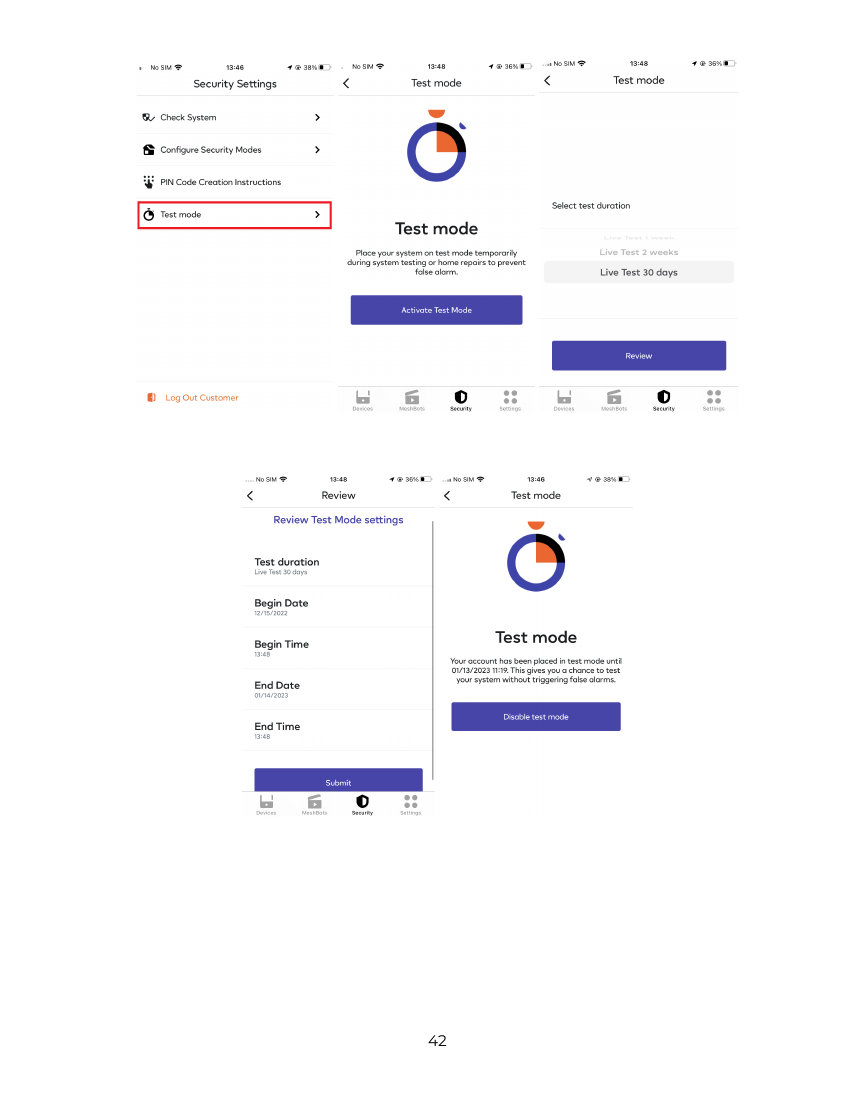
Security → Test Mode → Activate Test Mode → select duration → review → Submit. Disabling returns the account to live status with monitoring dispatch active.
Complete & Log Out
Tap "Complete Installation" in the Security area; a confirmation screen appears on success. Completed installations are reachable later via "Access existing installation" (search by controller serial number or resident name) — but only once the resident has granted access from their mobile app. Once accessed, devices can still be added via the "+" button. To log out of a customer account, go to Security → Log Out Customer, which returns you to the Access Installations screen.
Ezlo Protect Resident App / Security Panel
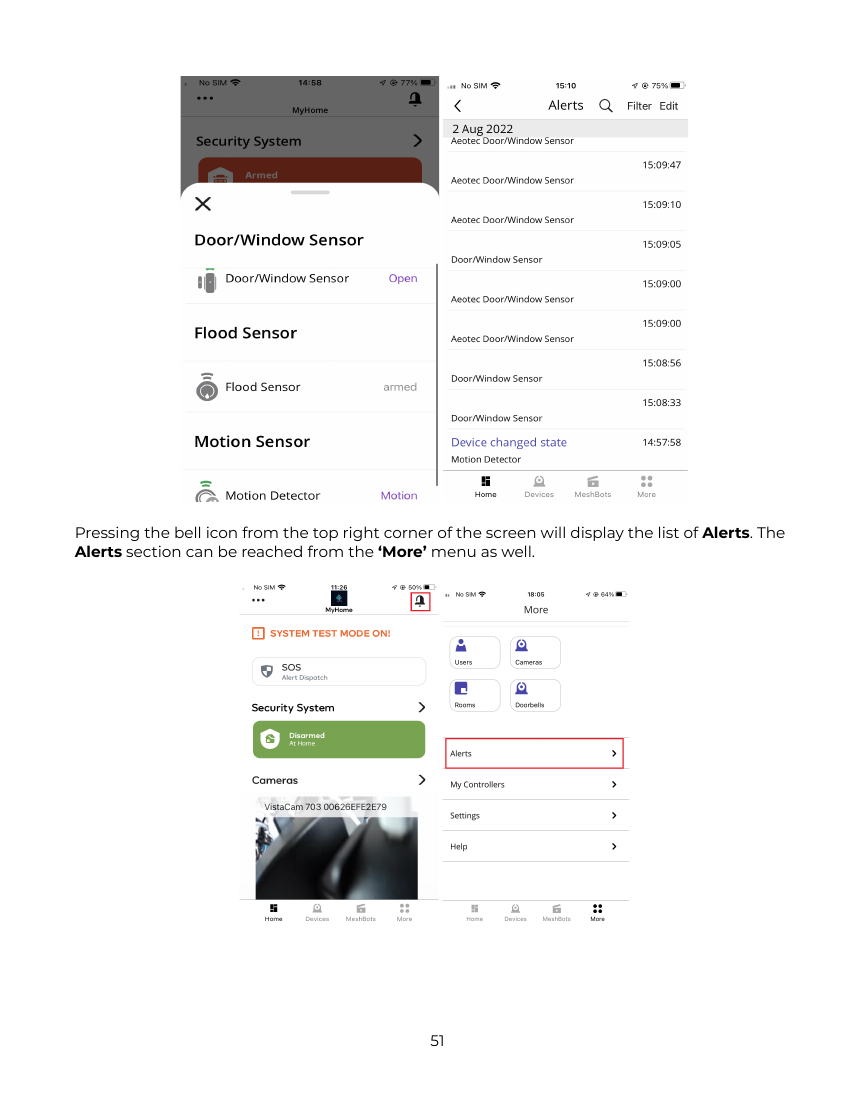
Logging into the resident app shows the Security Dashboard: paired devices and security mode controls (Disarmed / Arm Stay / Arm Away). Each mode has an entry delay (time to disarm before the alarm sounds) and an exit delay (time to leave before arming); the exit delay can be changed under More → Settings → Entry & Exit Delay Settings (UI differs slightly between iOS and Android). Tapping the arrow next to "Security System" shows the status of all sensors; the bell icon (or More menu) opens the Alerts list.
Changing Security Modes
If a sensor is tripped, arming attempts return "System not ready to arm!" — either clear the sensor or use the "Bypass Sensor" button; you'll then see "Ready to Arm!" Arming shows a countdown that can be cancelled via the Cancel button on mobile, or on the Security Panel by pressing Cancel and entering a PIN code. To disarm on mobile, press Arm → Disarm; on the Security Panel, press the Arm icon (top left) and enter a PIN code. A confirmation appears once disarmed.
Cameras, Alerts, Devices, Meshbots, SOS
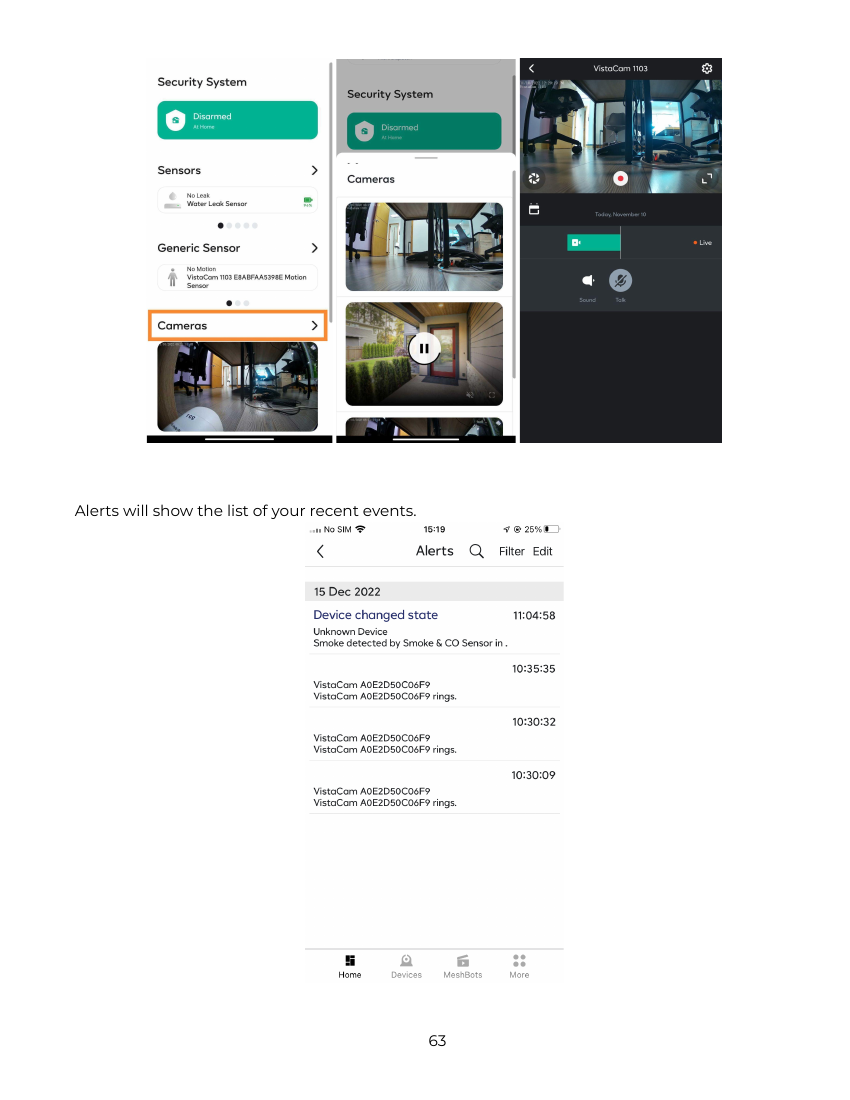
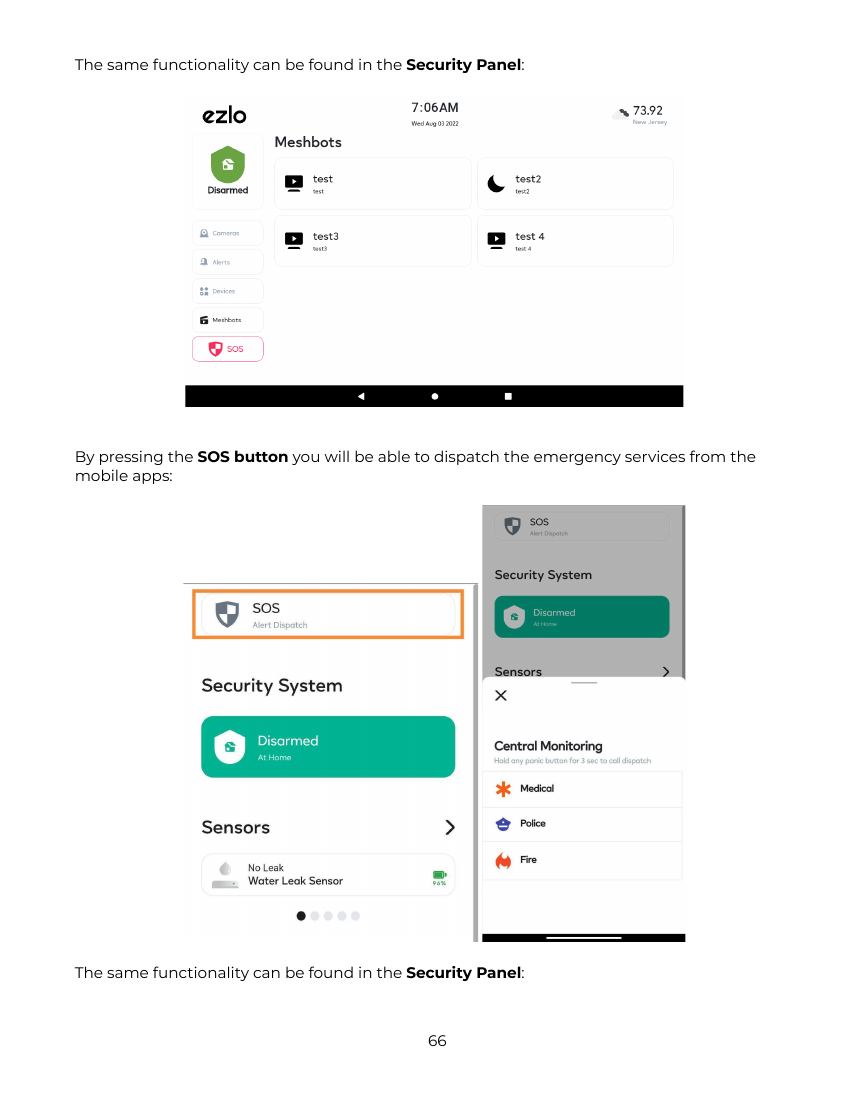
The Cameras option shows paired cameras; tap the Play button under Devices to view a live stream. Alerts lists recent events (both on mobile and the Security Panel). Devices lists everything on the controller and lets you control it directly (e.g. lock/unlock a smart deadbolt, toggle a light). MeshBots lists the automations/scenes on the unit and lets you run them manually (available on both mobile and the Security Panel). The SOS button dispatches emergency services directly from the mobile app or Security Panel.
Help & Support
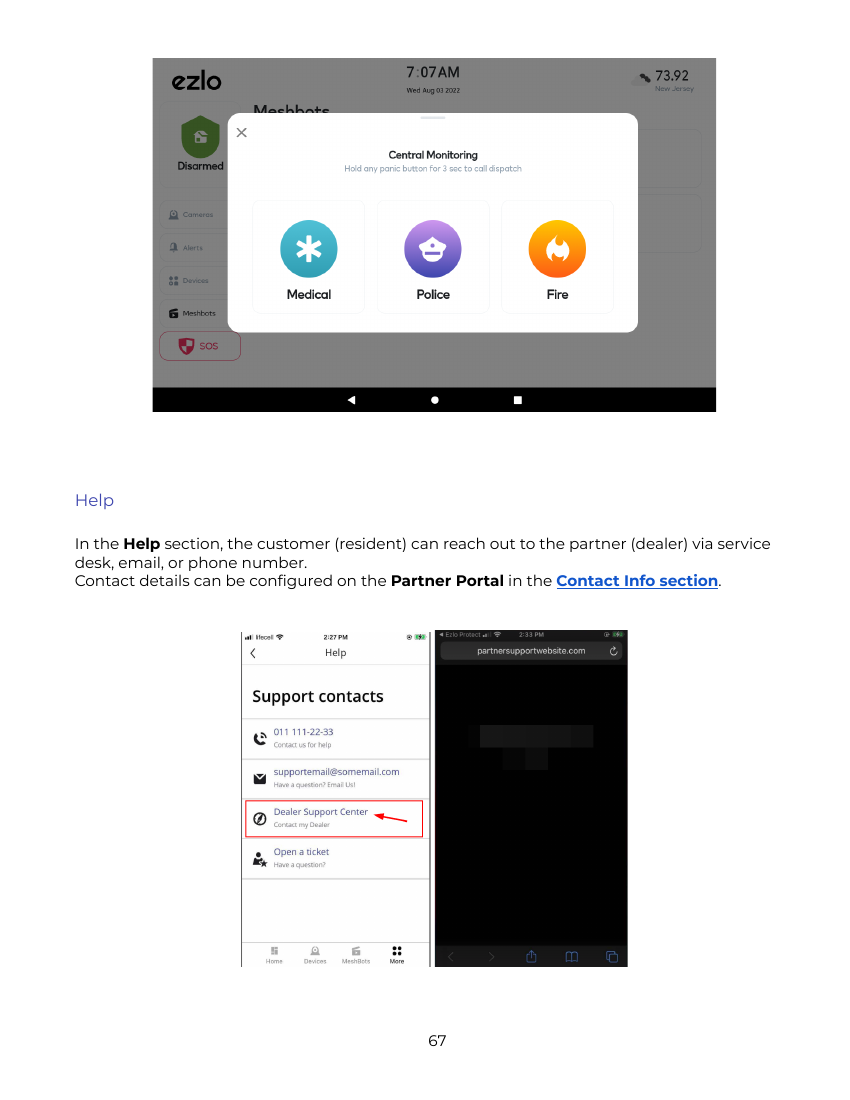
The Help section lets residents reach the dealer via service desk, email, or phone — contact details are configured in the Partner Portal's Contact Info section.
Granting Installer Access
Installers see an error at "Proceed with installation" on a completed install if the resident hasn't granted them access. Residents enable this in their app under More → Users, using the slide toggle for installer access.
Ezlo Protect Resident Portal (Ezlogic)
The Resident Portal Security Dashboard previews and controls all devices on the controller.
MeshBot Automation
- Automation MeshBot — connects any app/device/service via configurable triggers and actions. Local automations link devices within one controller; Cloud automations link devices across all of a customer's controllers.
- Notification MeshBot — tracks apps/devices/services from your automation MeshBots and notifies you (email, push, or both) about trigger/action activity.
Advanced Scripting
Variables hold a specific piece of data for use in MeshBot triggers (on devices with capabilities spanning a range of levels) or actions. An Expression is a snippet of code that reads a device capability's current value (e.g. a switch's on/off state or a thermostat's current temperature) to help decide whether a trigger should run. More detail: support.ezlo.com Scripting docs.
Integrations
Cloud Integrations (NuCAL) connect cloud-enabled services/devices to the Ezlo platform via third-party APIs. IP Devices let you create virtual devices that send HTTP commands to any Wi-Fi device or HTTP-capable service — fast integration without third-party plugins. To install the IP Devices plugin: Plugins → Edge Plugins → Marketplace → find "IP Device Generator Plugin" → "Copy to my Ezlo" → go to "My Private Plugins" → "Manage Installations" → install onto the chosen controller.
Virtual Devices & Virtual Container
Virtual Devices behave exactly like physical smart devices and act as a universal translator for unsupported hardware — view/control them under Devices or the dashboard, map them to physical devices via MeshBot, and use them in triggers/actions (e.g. a virtual switch controlling other devices and MeshBots). The Virtual Container area lets you build a virtual device and define its states/commands, mapped to real device or cloud service commands.
Plugins
Plugins are small apps that extend the hub's functionality, letting users complete tasks without writing code. Ezlo's open platform and APIs are designed for developers to build their own plugins.
Full details for every section above (Ezlogic customization, Z-Wave Associations, Backups, User Management, PIN Codes, and more) are available in the original PDF linked below.