
DoorBell Fon DP68 iDoorBell Fon — Quick Installation Guide
Quick installation guide for the DoorBell Fon DP68 iDoorBell Fon door station, including panel diagram, Yoosee app setup, and indoor chime pairing.
Full text manual (for reference)
Quick Installation Guide for the DoorBell Fon DP68 iDoorBell Fon Door Station — a WiFi video doorbell with the Yoosee mobile app, indoor 433MHz chime module, and door lock relay output.
Safety Warnings & Overview
For the best camera angle, position the doorbell camera around eye level. The unit mounts directly to a wall with 4 screws, or secures to a rain cover with a single screw for protected outdoor installations.
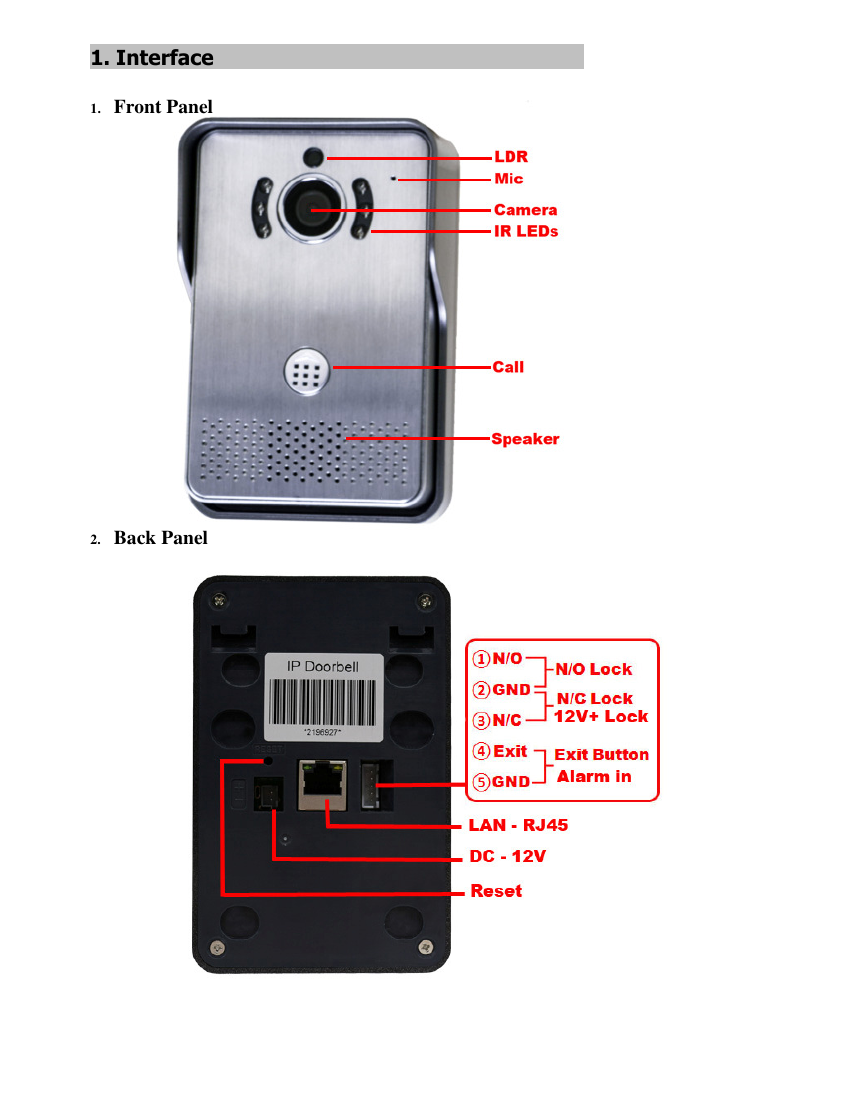
Back Panel Terminal Reference
| Terminal | Function |
|---|---|
| ① N/O | N/O Lock |
| ② GND | N/C Lock / 12V+ Lock |
| ③ N/C | N/C Lock |
| ④ Exit | Exit Button |
| ⑤ GND | Alarm In |
| LAN | RJ45 network port |
| DC | 12V power input |
Mobile App Setup (Yoosee)
- Install the Yoosee App: Scan the included QR code, or search "Yoosee" on the iTunes App Store / Google Play, or visit yoosee.co.
- Register / Log In: Open the app and tap "Register." Choose to register by mobile phone or email, and select your country to receive a verification code.
-
Network Configuration (Wireless — Smartlink):
- Enable Smartlink within 5 minutes of powering on the doorbell.
- In the app, tap "+" in the top right and choose "Smartlink."
- Follow the on-screen instructions and tap "Next."
- Enter your WiFi password (must be the same network your doorbell will join) and tap "Next."
- Wait for the WiFi connection to complete.
- Set a password for the doorbell and tap "Save."
- The device list appears — tap your device to view live video.
- Remote Add (Manual Add): Tap "+" and choose "Manual Add," then enter the device ID, name, and password, and tap "OK."
- LAN Add: Tap "Discover 1 new device," tap "+," then enter a device name and password and tap "Save."
Incoming Call Controls
- Press the right button to answer.
- Press the left button to disable push notification.
- Press the "X" button to ignore the call.
During a call, on-screen controls allow: mute/unmute speaker, unlock door, landscape mode, enable/disable protection mode, mute/unmute microphone, and take a snapshot. Press the back or home button on your phone to end the call.
Security & Alarm Settings
- Receive alarm message: On by default — disabling stops all message/alarm push notifications.
- Alarm push ID: Defaults to the registration phone number; supports up to five accounts.
- Alarm push Email: Set an email address to receive call and snapshot alerts.
- Motion Detection: Disabled by default.
- Buzzer: Closed by default — opens an audible alarm when triggered.
- PIR (Human Infrared Detection): Not available on this model.
- Unlock Protection Mode: Mobile phone will no longer receive alarms.
- Protection Mode: Mobile phone will receive alarms.
Other App Settings
- Device Info: Displays current firmware version.
- Date and Time: Set device time.
- Media Settings: Set video format (N/PAL) and image reversal.
- Security Settings: Modify admin password.
- Network Settings: Switch between LAN and WiFi.
- Record Settings: Set recording mode (requires SD card).
- Storage Setting: Check SD card information.
- Device Update: Check for firmware updates.
Indoor Chime (433MHz)
The wireless indoor chime uses 433MHz learning-code pairing, has a range of 30–80m, and offers 52 different chime tones.
Pairing Instructions
- Cycle through and select your preferred chime tone before pairing by pressing the music switch.
- Press the volume button and music button on the chime at the same time to activate pairing.
- Press the call button on the DoorBell within 5 seconds.
- The selected chime plays if pairing was successful.
- Repeat for additional chime modules.
To reset and clear the pairing, hold the music button for 5 seconds.
Specifications
| Spec | Value |
|---|---|
| Chipset | Hi 3518E |
| WiFi | One-Key WiFi Connection |
| Indoor Bell | 433MHz, Learning Code, Distance: 80m |
| Storage | Supports up to 64GB TF Card |
| Resolution | 1.0MP – 720P (1280×720), VGA (640×480), QVGA (320×240) |
| Audio | Full-duplex audio, G.711A |
| Alarm Motion Detection | PIR (human body infrared sensor detection) |
| Visual Angle | 2.1mm lens, 145° super wide angle |
| Night Vision | 6× LED lights, IR range 3m, IR-Cut, no color change |
| Support Protocol | TCP/IP, UDP, SMTP, DHCP, UPnP, P2P, ONVIF |
| Item Size (L×W×H) | 134 × 87 × 29mm |
| Certificate | ISO, CE, FCC, RoHS |