
Chief CMTS218SU (TS218SU) — THINSTALL Dual Swing-Arm Wall Mount Installation Guide
Installation instructions for the Chief TS218SU / CMTS218SU medium THINSTALL dual swing-arm wall mount — a full-motion display mount supporting 26-47" screens with 18" extension.
Full text manual (for reference)
Installation instructions for the Chief TS218SU full-motion swing-arm TV wall mount — a single illustrated instruction sheet (Chief / Milestone AV Technologies, document 8800-002100 REV 00) covering the complete 4-step assembly process for mounting a flat-panel display on an articulating wall arm.
Overview
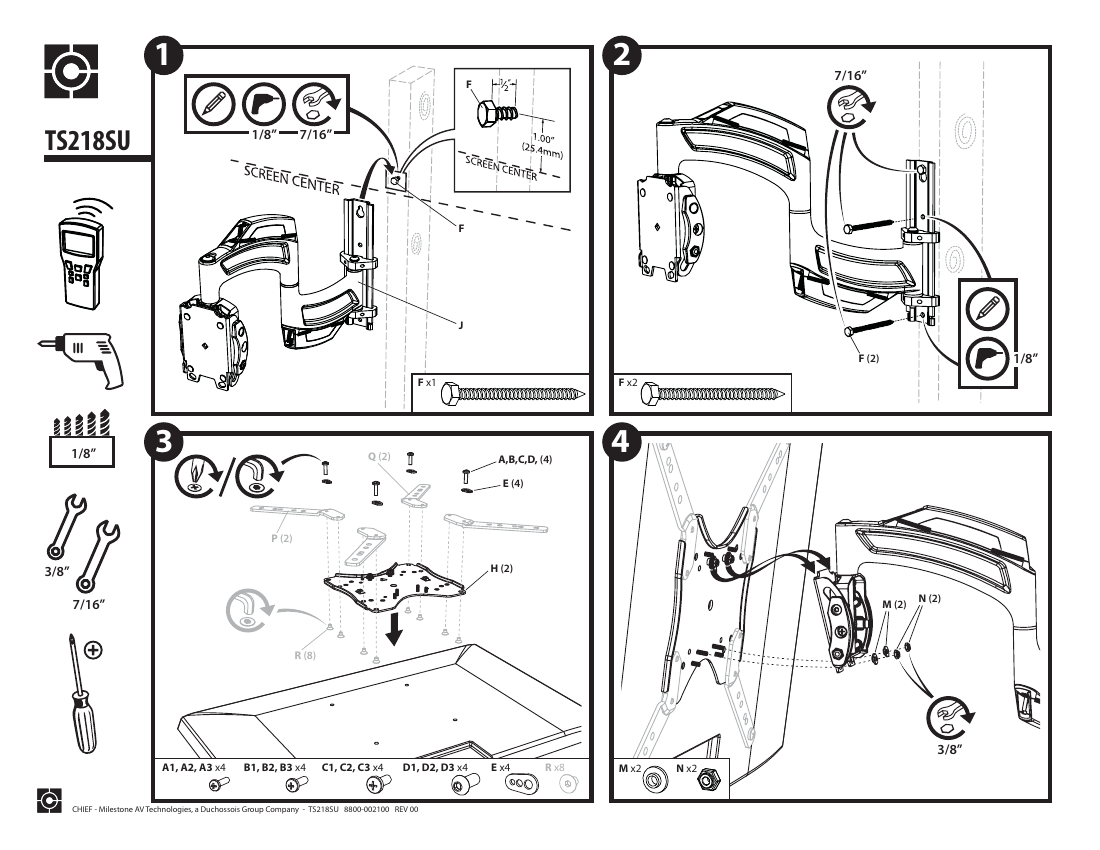
The TS218SU is a full-motion (articulating) wall mount that lets a flat-panel TV extend, retract, and swivel away from the wall. The instructions consist entirely of exploded-view assembly diagrams with lettered hardware callouts — there is no separate prose text, so the diagram below is the primary reference for installation.
Tools Required
- Stud finder / level
- Pencil (for marking hole locations)
- Power drill with 1/8" drill bit
- 3/8" wrench or socket
- 7/16" wrench or socket
- Phillips screwdriver
Assembly Steps
- Mount the wall bracket: Center the wall plate on the desired screen location, mark with a pencil, drill 1/8" pilot holes, and secure using hardware F (1/2" diameter head, 1.00"/25.4mm length) with a 7/16" wrench/socket.
- Attach the swing-arm assembly: Install the swing arm onto the wall plate using two additional F screws, secured with a 7/16" socket. Mark and drill (1/8" bit) as needed for any additional anchor points.
- Attach mounting rails to the TV: Fasten mounting rails/brackets P, H, and Q to the back of the display using hardware sets A1–A3, B1–B3, C1–C3, D1–D3 (4 each), spacers E (4), and washers R (8). Use a screwdriver plus 3/8" and 7/16" wrenches depending on hardware set.
- Connect the TV bracket to the wall arm: Join the assembled TV bracket to the wall-mounted swing arm using bolts M (x2) and nuts N (x2), tightened with a 3/8" wrench.
Assembly Diagram
Hardware Reference
| Label | Quantity | Used In Step |
|---|---|---|
| F | x1 (Step 1), x2 (Step 2) | Wall bracket + swing arm mounting |
| A1, A2, A3 | 4 each | TV bracket rails |
| B1, B2, B3 | 4 each | TV bracket rails |
| C1, C2, C3 | 4 each | TV bracket rails |
| D1, D2, D3 | 4 each | TV bracket rails |
| E | 4 | Spacers |
| R | 8 | Washers |
| M | 2 | Bolts (bracket-to-arm) |
| N | 2 | Nuts (bracket-to-arm) |
Manufacturer
CHIEF — Milestone AV Technologies, a Duchossois Group Company. Document TS218SU 8800-002100 REV 00.