
2GIG Vario LCD Keypad — Installation & User Guide
Installation and user guide for the 2GIG Vario LCD Keypad and LCD Proximity Keypad, the primary user interface for the 2GIG Vario System.
Full text manual (for reference)
Installation and user guide for the 2GIG Vario LCD Keypad and LCD Proximity Keypad (2GIG-VAR-LCD1 / 2GIG-VAR-LCDPROX) — the primary user interface for the 2GIG Vario System.
Introduction
The user-friendly 2GIG Vario LCD/LCD Proximity keypad enables simple operation and programming of the 2GIG Vario system. The following covers a brief overview of keypad operation — for detailed programming, refer to the 2GIG Vario System Installation and User manuals.
Keypad Indicators
| Indicator | State | Meaning |
|---|---|---|
| Power | On | System operating properly from AC power, battery good, no troubles. |
| Off | No power. | |
| Slow Flash | System is in programming mode. | |
| Rapid Flash | System trouble (fault). | |
| Ready | On | System is ready to be armed. |
| Off | System is not ready to be armed. | |
| Slow Flash | Ready to arm while exit/entry zone is open. | |
| Arm (Set) | On | Armed in Full Arm or Stay Arm mode. |
| Off | Disarmed (unset). | |
| Slow Flash | System is in Exit Delay. | |
| Rapid Flash | Alarm condition. | |
| Stay/Bypass (Part Set/Omit) | On | Stay Arm or Zone Bypass (Omit) mode. |
| Off | No bypass zones in system. | |
| Tamper | On | Zone/keypad/external module has been tampered. |
| Off | All zones operating normally. | |
| Fire | On | Fire alarm. |
| Off | Normal operation. | |
| Flashing | Fire circuit problem. |
The red LED behaves the same way as the Arm/Alarm indicator.
Keys
Control Keys
- Away Arm key — Normal mode: arm away. In User Functions menu: change data.
- Stay Arm key — Normal mode: arm stay. In User Functions menu: change data.
- Disarm key — Normal mode: disarm the system after entering a user code. In User Functions menu: terminate commands and confirm data to be stored. Equivalent to the corresponding key on the 2GIG Vario Elegant Keypads.
- Up arrow — Scroll up a list or move the cursor left.
- Status key — Provides system status.
- Down arrow — Scroll down a list or move the cursor right.
- Menu key — Normal mode: enter the User Functions menu. In User Functions menu: move back one step.
Function Keys
- Fire Alarm: Press both fire keys simultaneously for at least 2 seconds.
- Emergency Alarm: Press both emergency keys simultaneously for at least 2 seconds.
- Police (Panic) Alarm: Press both panic keys simultaneously for at least 2 seconds.
- Group Arm / Macro: Used to arm groups of zones by default, or activate a prerecorded macro. Press for 2 seconds to activate.
Numeric Keys
Used to input numbers when required.
Keypad Settings
Note: The following settings must be defined individually for each keypad connected to the system.
- Press the Menu key for 2 seconds until the Keypad Settings menu appears.
- Select the relevant icon (Brightness, Contrast, Keypad Buzzer Volume, Language, Panel) using the arrow keys, then press Confirm to select an option. The language option can also be accessed by simultaneously pressing the two arrow keys.
- Adjust settings with the arrow keys. Press Confirm to lock in adjusted settings.
- Press Save to save the adjusted settings.
- Press Exit to leave the keypad settings menu.
Using the Proximity Tag
The proximity tag, used with the proximity LCD keypad (2GIG-VAR-LCDPROX), is read correctly by holding it within about 4 cm of the front-bottom of the keypad. This feature is only available on certain keypads — check with your security provider.
Automatic Upgrade Resulting from Panel Manual Upgrade
Upon initiation of a 2GIG Vario system panel remote upgrade (see the 2GIG Vario Installer Manual, Appendix I), the LCD keypad may also be automatically upgraded. During this approximately three-minute process, an upgrade icon and the power icon are displayed and the LED flashes — do not disconnect during this period. Available only on certain keypads.
Technical Specifications
| Current Consumption (2GIG-VAR-LCD1) | 13.8V ± 10%, 48 mA typical / 52 mA max. |
| Current Consumption (2GIG-VAR-LCDPROX) | 13.8V ± 10%, 62 mA typical / 130 mA max. |
| Main Panel Connection | 4-wire BUS, up to 300 m (1000 ft) from main panel |
| Dimensions | 153 x 84 x 28 mm (6.02 x 3.3 x 1.1 in) |
| Operating Temperature | –10 to 55°C (14°F to 131°F) |
| Storage Temperature | –20 to 60°C (–4°F to 140°F) |
| Prox. RF Frequency | 13.56 MHz |
Ordering Information
- 2GIG-VAR-LCD1 — 2GIG Vario LCD Keypad
- 2GIG-VAR-LCDPROX — 2GIG Vario Prox Keypad, includes 2 keytags
Installation & Wiring
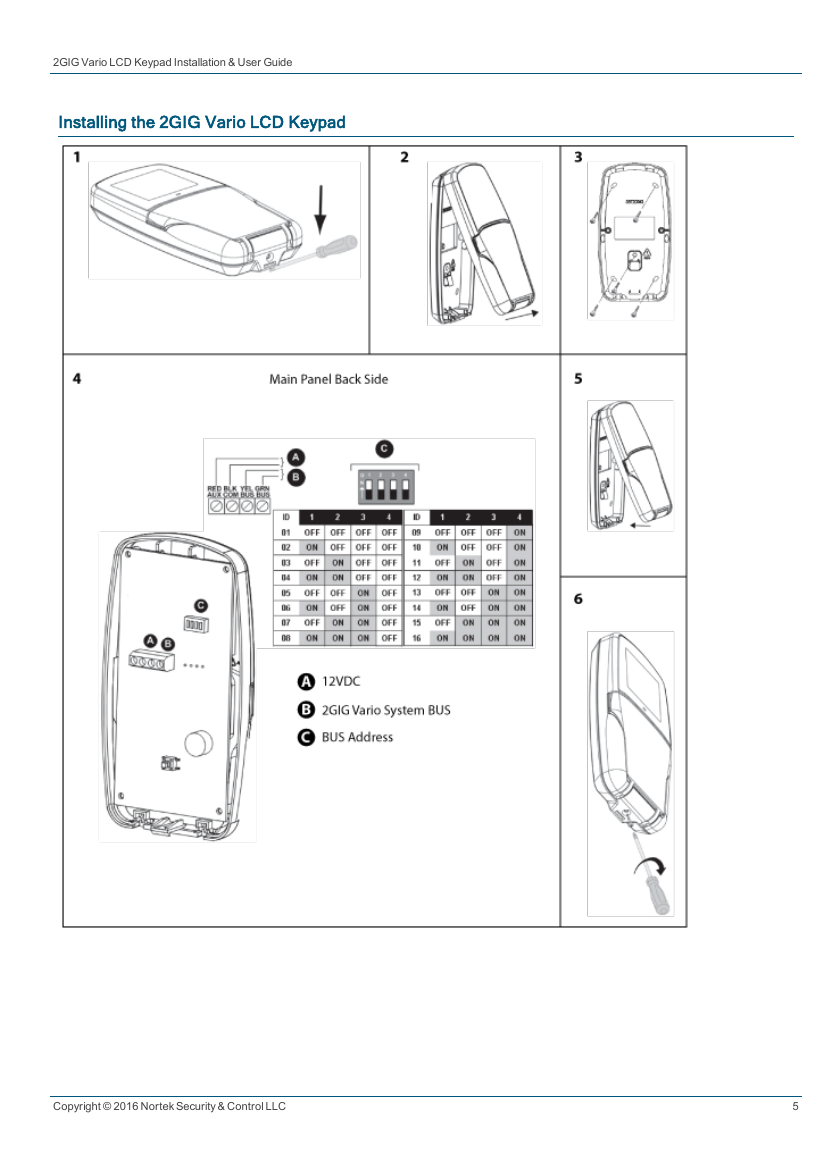
Installation involves removing the mounting screw, separating the front cover from the back plate, mounting the back plate to a wall or standard box, wiring the main panel BUS terminals (AUX/RED, COM/BLK, BUS/YEL, BUS/GRN), setting a unique BUS address via the onboard DIP switches (16 addresses via a 4-position switch), and reassembling the keypad onto the mount.
Regulatory Information
FCC Notice
This device complies with Part 15 of the FCC's Rules. This equipment has been tested and found to comply with the limits for a Class B digital device, providing reasonable protection against harmful interference in a residential installation. Complies with FCC radiation exposure limits for an uncontrolled environment — avoid operating within 20 cm of the user.
Industry Canada (IC) Compliance
This device complies with Industry Canada license-exempt RSS standard(s). Operation is subject to the condition that the device may not cause interference and must accept any interference received.
Limited Warranty
This Nortek Security & Control product is warranted against defects in material and workmanship for two (2) years — extending only to wholesale customers who buy direct from Nortek Security & Control LLC or through its normal distribution channels, not a consumer warranty. All returns require a Return Authorization Number (RA#) — contact Returns at 1-855-546-3351.
Inquiries: Nortek Security & Control, 1950 Camino Vida Roble, Suite 150, Carlsbad, CA 92008-6517, USA · 800-421-1587