
Speco N4NSL / N8NSL Network Video Recorder — User Guide
Full user guide for the Speco N4NSL (4-channel) and N8NSL (8-channel) PoE Network Video Recorders, covering setup, camera configuration, recording, and backup.
Full text manual (for reference)
User guide for the Speco N4NSL / N8NSL Network Video Recorders — 4- and 8-channel PoE NVRs for IP camera-based surveillance systems.
Overview
The N4NSL and N8NSL are desktop NVRs supporting 4 or 8 IP camera channels respectively, each with built-in PoE ports for direct camera power and network connection. Both support recording at up to 1920x1080 per channel, live viewing, search/playback, backup, and remote access via mobile apps and PC client software.
Specifications
| Spec | N4NSL | N8NSL |
|---|---|---|
| Description | 4ch NVR with 4-PoE | 8ch NVR with 8-PoE |
| IP Camera Throughput | 4 | 8 |
| Max Resolution (input) | 1920x1080 | |
| Main Monitor Output | VGA and HDMI (max 1920x1080) | |
| Audio Output | 1x RCA, G.711 codec | |
| PoE Ports | 802.3af x 4 | 802.3af x 8 |
| LAN (Remote Access) | 10/100 Base-TX | 10/100/1000 Base-TX |
| Network Protocols | TCP/IP, UDP, DHCP, HTTP, NTP, SMTP, RTP, RTSP, ONVIF | |
| Live/Recording Frame Rate | 120fps | 240fps |
| Recording Modes | Smart / Continuous / Motion / Sensor / Schedule / Manual | |
| Pre / Post Recording | Pre: up to 20 min · Post: up to 60 sec | |
| Search Options | Smart Search, EZ Search, Date/Time, Event, Archive, Log | |
| Playback Speed | x0.25 to x64 | |
| Backup Media | USB drive, external HDD, network — BMP/AVI/proprietary formats | |
| Storage | 1 internal HDD, up to 3TB capacity per drive | |
| Network Access | Free DDNS, mobile apps (iOS/Android), web viewer, PC client (single/multi-client + CMS up to 64 channels) | |
| Power Supply | DC 48V 1.2A (57.6W) | DC 48V 2.0A (96W) |
| Operating Temp | 41°F–104°F (5°C–40°C), 20–80% humidity, non-condensing | |
| Dimensions | 11.8" x 8.9" x 2.0" (300 x 227 x 53mm) | |
Safety Warnings
- Do not expose to rain or moisture — risk of fire or electric shock.
- Do not use if the unit emits smoke; do not disassemble the unit.
- Turn off power before connecting cameras or audio cables.
- Do not place heavy or sharp objects on the unit, or block/restrict airflow around it.
- For PoE models, insert the 48V connector to the PoE switch before attaching the AC cable to the adapter.
- Only qualified, experienced personnel should install or service the unit.
- Changes/modifications not approved by the manufacturer void the warranty.
Initial Setup — EZ Setup Wizard
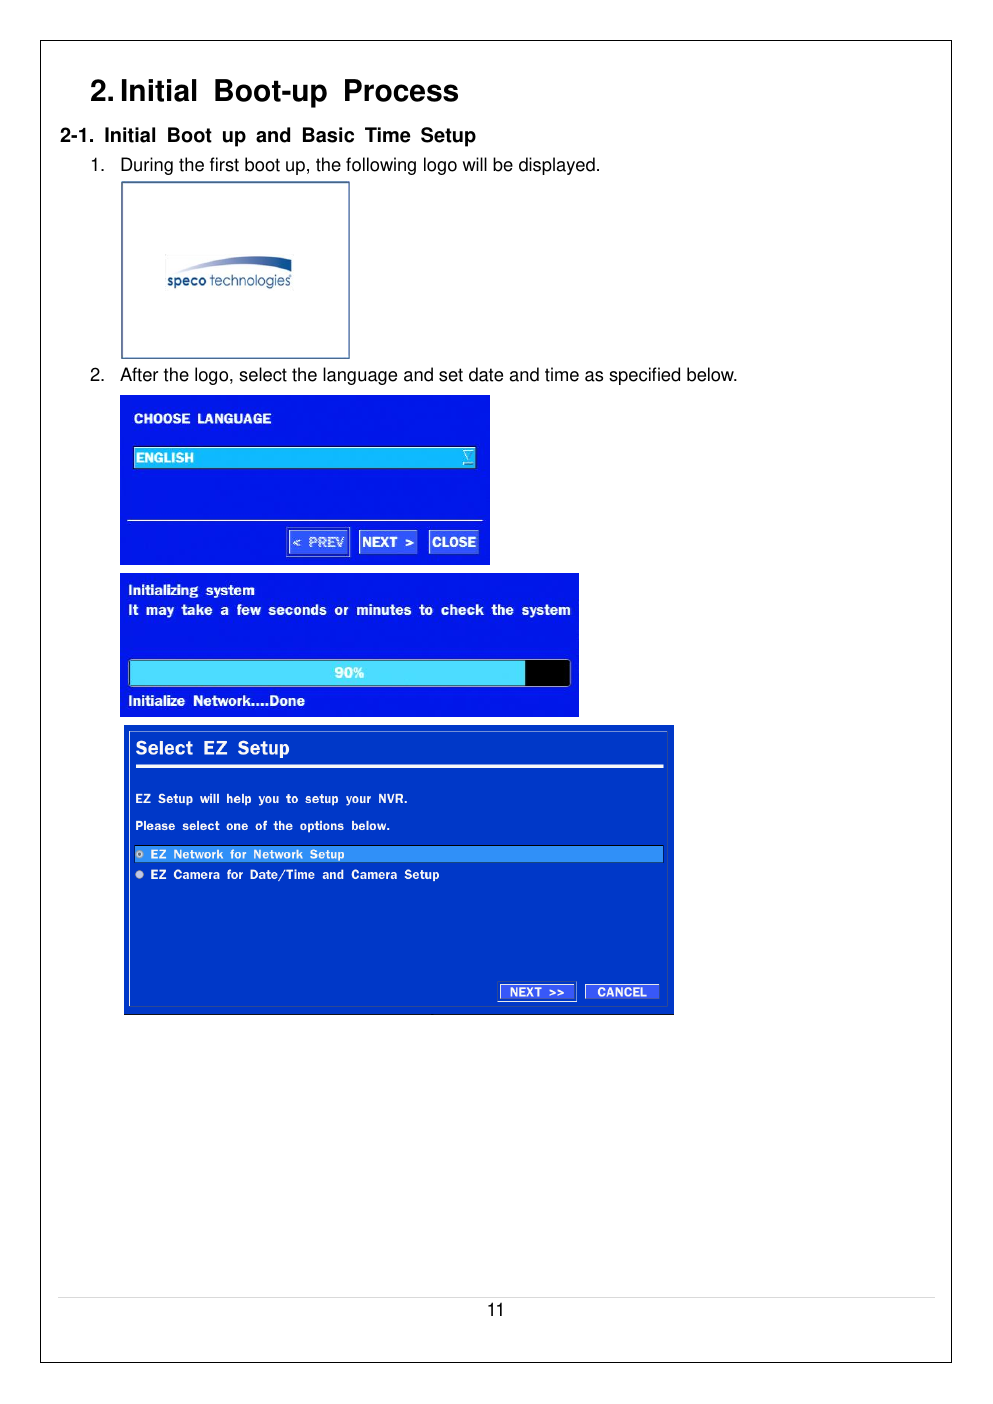
On first boot, select a display language, wait for system initialization, then choose EZ Network or EZ Camera setup from the wizard menu.
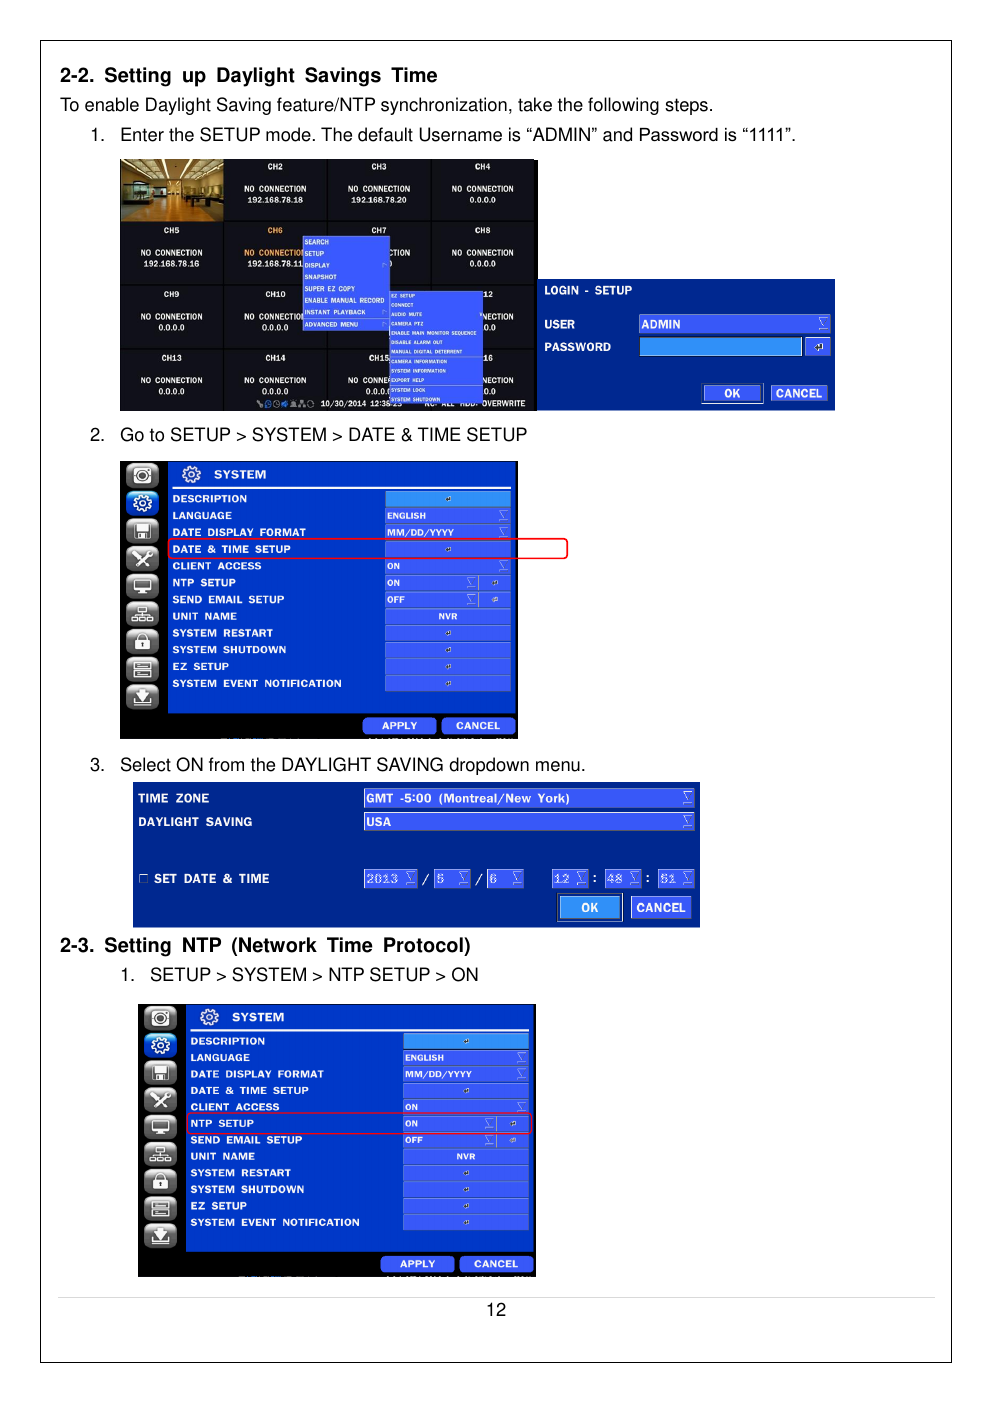
System Time / Date Setup
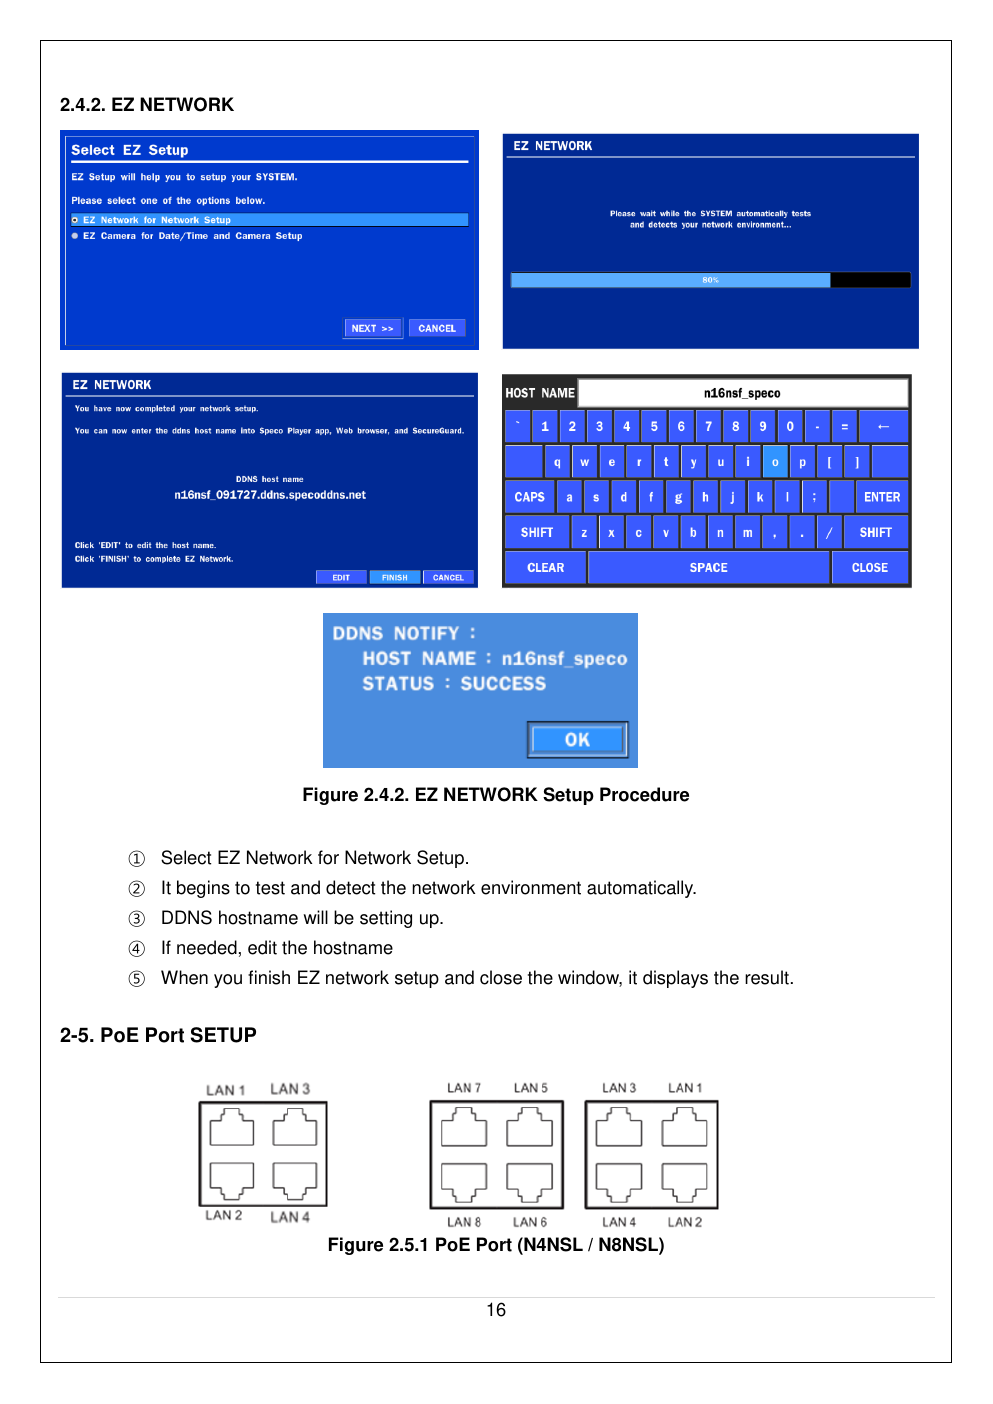
EZ Network Setup & PoE Ports
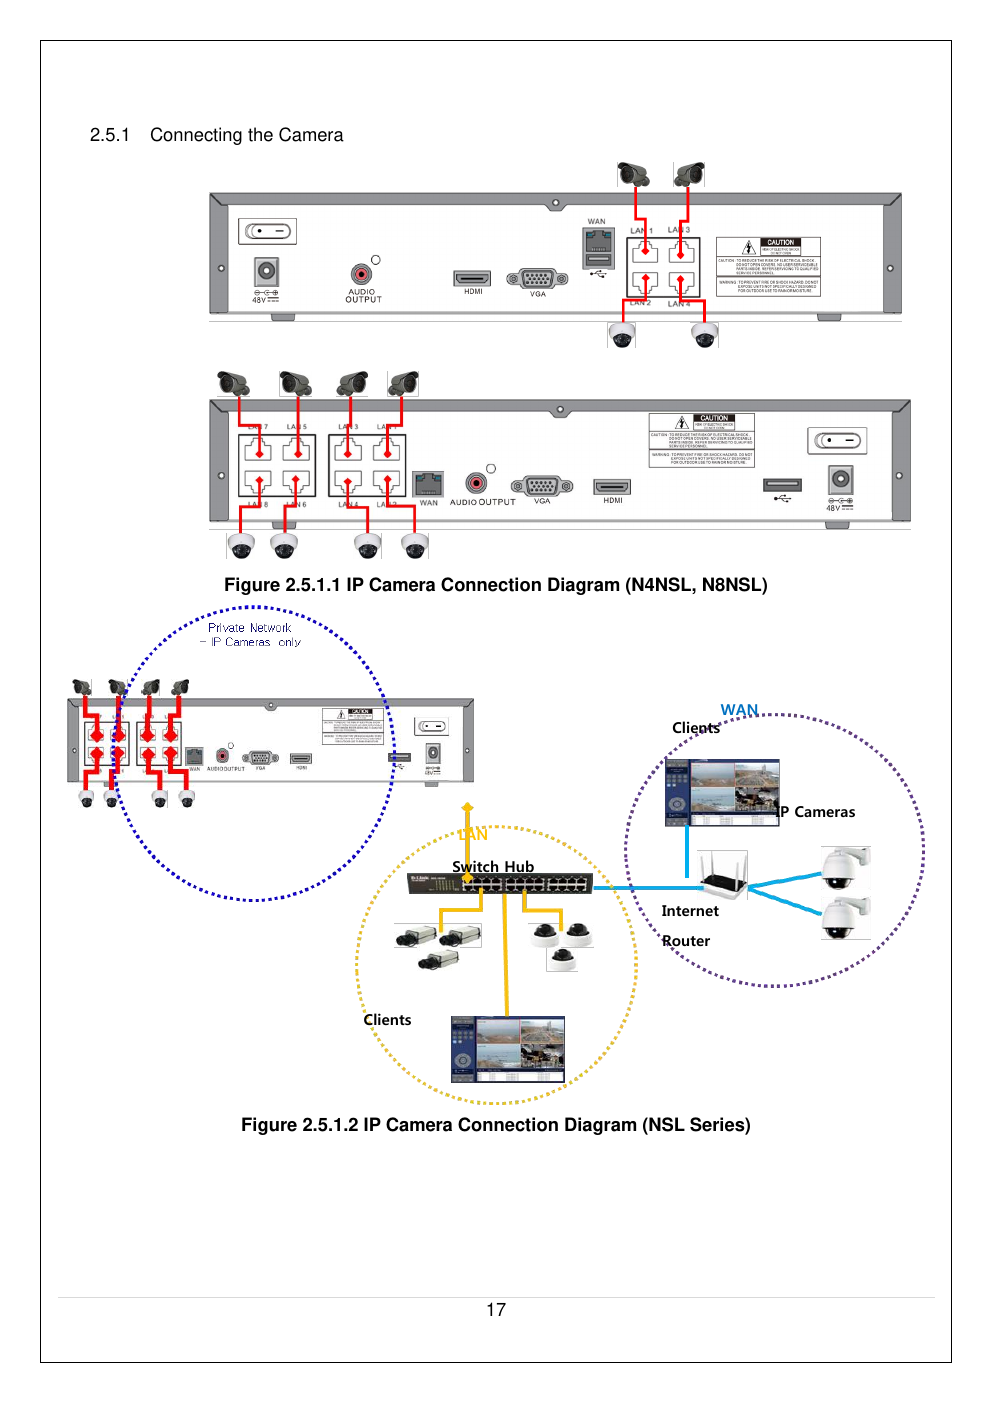
Camera Wiring Diagrams
IP Camera Setup
Press SETUP, enter the password (factory default ADMIN password: 1111 — change this immediately), then open the IP CAMERA menu.
- SCAN — double-click to search for IP cameras on the local network (ONVIF or Speco protocol).
- IP / PORT / WEB PORT — manually enter the camera's address, RTSP port (default 554), and web port (default 80).
- ID / PASSWORD — camera login credentials.
- ONVIF cameras require ID, Password, and Profile selection; Speco-protocol cameras only need ID and Password.
- Under ONVIF Setup, you can view/change the camera's Video, Network, and System settings directly from the NVR (availability depends on the camera's ONVIF version).
Recording Setup
- Recording Mode per channel: Continuous, Motion, Schedule, or Disable.
- Sensor Recording — works with alarm contacts on the IP camera.
- Pre-Record — up to 20 minutes; Post-Event Record — 10–30 seconds.
- Audio Recording — enable/disable per channel (requires audio contacts on the camera).
- Schedule — set NONE / CONTINUOUS / MOTION / SENSOR per time block, per channel, with copy-to-channel support.
Device / Motion Setup
- Digital Deterrent — import up to 8 audio files via USB, trigger playback on motion or sensor events, with its own schedule.
- Motion Zone — Full Zone or Partial Zone detection per channel.
- Motion Sensitivity — 1 (lowest) to 9 (highest) per channel.
- Beep Duration — 5–60 seconds or infinite; Key Tone on/off for front panel.
Storage Setup
- Overwrite — when enabled, the NVR overwrites the oldest recordings once the drive is full; when disabled, recording stops when full.
- Recording Limit — optionally limit stored data to the most recent 1–90 days.
- Disk Format / Disk Info — format the internal HDD (archive needed data first) and view drive health info.
Configuration Backup & Firmware Upgrade
- Export/Import Config — save or load NVR configuration via USB flash drive (useful for cloning settings across multiple units).
- Load Default / Load Factory Default — reset settings (Load Default preserves network, security, and HDD settings; Load Factory Default resets everything).
-
Firmware Upgrade: create an "upgrade" folder on a USB drive, with a model-specific subfolder (
main_n4nsl_speco_*.*.*ormain_n8nsl_speco_*.*.*) containing the firmware file. Plug the drive into the rear USB port, go to CONFIG > SOFTWARE UPGRADE, and click SEARCH.
Backup
- Still image backup to USB flash drive from the live or playback screen.
- Video backup to USB flash drive during playback, including the EZCopy quick-backup feature.
- Transfer still images or video from the Archive List.
- Backup video plays back in AVI format or the proprietary NSF format.
Remote / Multi-Site Access
The NVR supports remote viewing via free DDNS, mobile apps (iPad/iPhone/Android), a web viewer (IE, Chrome, Firefox, Safari on Windows), and PC client software supporting single or multi-client viewing plus CMS (Central Management Software) aggregation of up to 64 channels across multiple NVRs.