
Menu
-
-
Home Automation
- Home Automation Controllers
- Lighting & Appliance Controls
- Home Automation Sensors
-
Ventilation, Temperature & Flood Controls
- Ecovent Ventilation Controls
- Keen Home Ventilation Controls
- La Crosse Weather Reporting System
- Sensaphone Temperature/Flood
- Winland Temperature/Flood Reporting
- Ezlo Water/Flood Detection
- WaterBug Water/Flood Detection
- WaterCop Water/Flood Detection
- Specialty Water/Flood Detection
- Temperature & Heat Sensors
- Smart Irrigation Controllers
- Smart Thermostats & Ventilation Controls
- Drapery & Blind Opener Systems
- Window Opener Systems
- Door & Gate Opener Systems
- Garage Remotes & Controllers
- Smart Door Locks
-
Security
-
Home Intercom Systems
-
Specials
-
Audio/Video
-
Independent Living
-
Structured Wiring
-
More...
-
Our Brands
- 2GIG
- A&D Medical
- ABB
- Adorne
- Advanced Dynamics
- Aeotec
- Alfred
- American Hunter
- Applied Digital (ADI)
- AprilAire
- Aria Audio Technology
- Arlington Industries
- Applied Digital (ADI)
- AprilAire
- BackBoxx™
- Bellman & Symfon
- BlueSpray
- Cabletronix
- Caregiver Smart Home Automation
- Chamberlain
- Chief Manufacturing
- Cool Components
- Dakota Alert
- Danalock
- DataComm
- Data-Tronix
- D+H
- Displine
- DoorBell Fon
- DynaQuip Controls - Watercop
- Ecovent
- Elk Products
- Enbrighten
- Evolve Technologies
- Ezlo
- FirstAlert
- Flipper
- Flic
- GE
- GoControl
- Go Simply Connect
- Greenfield Direct
- Hamilton CapTel
- Home Controls In-House Exclusives
- HomeSeer
- Honeywell Home
- ION Digital
- Inovonics Wireless
- Interstate Batteries
- Intrasonic Technology (IST)
- Jasco
- KBSound
- Keen Home
- Kwikset
- La Crosse Alerts
- Letzgo Products
- Leviton
- Linear
- Linxura
- Lithe Audio
- Luxul
- Mail Chime
- MedReady
- myTouchSmart
- Napco Security Systems
- NETIO
- Nice North America
- NuTone
- OEM Systems Co.
- Presence Speakers
- On-Q By Legrand
- Open Sesame
- Optex
- Platinum Tools
- Powerline Control Systems
- Qolsys
- Resideo
- Risco Group
- Russound
- RYSE
- STI
- Sanus
- Satco
- Seco-Larm
- Security Door Controls (SDC)
- Sensaphone
- Sensative
- Serene Innovations
- Shelly
- Simply Automated, Inc. (SAI)
- Skylink
- Somfy Systems
- Sonic Alert
- Speco Technologies
- Stelpro
- Street Smart Security
- Structured Cable Products (SCP)
- TekTone
- Tripp Lite
- Truth Hardware
- U-Tec
- UCS
- USP
- Vera
- Versa
- VMP - Video Mount Products
- VSSL
- WeBoost
- Winland Electronics
- X10
- Yale
- ZTECH
- Shop By Compatibility
- Home Essentials
- Central Vac
-
Our Brands
-
- Orders
- Profile
- 1-858-693-8887
- Login
-
United States (USD $)
Add description, images, menus and links to your mega menu
A column with no settings can be used as a spacer
Link to your collections, sales and even external links
Add up to five columns
Add description, images, menus and links to your mega menu
A column with no settings can be used as a spacer
Link to your collections, sales and even external links
Add up to five columns
Sensaphone FGD-0250 — Ethernet-to-WiFi Adapter Setup Instructions
September 08, 2026 2 min read
Step-by-step setup instructions for the Sensaphone FGD-0250 Ethernet-to-WiFi Adapter.
Full text manual (for reference)
Installation instructions for the Sensaphone FGD-0250 Ethernet-to-WiFi Adapter, using an EnGenius wireless bridge to give a hardwired Sensaphone Ethernet connection over WiFi.
Overview
This walks through configuring the EnGenius WiFi Locator software and antenna to operate in Client Bridge mode, connecting it to your wireless network so it can pass an Ethernet connection to a Sensaphone unit over WiFi.
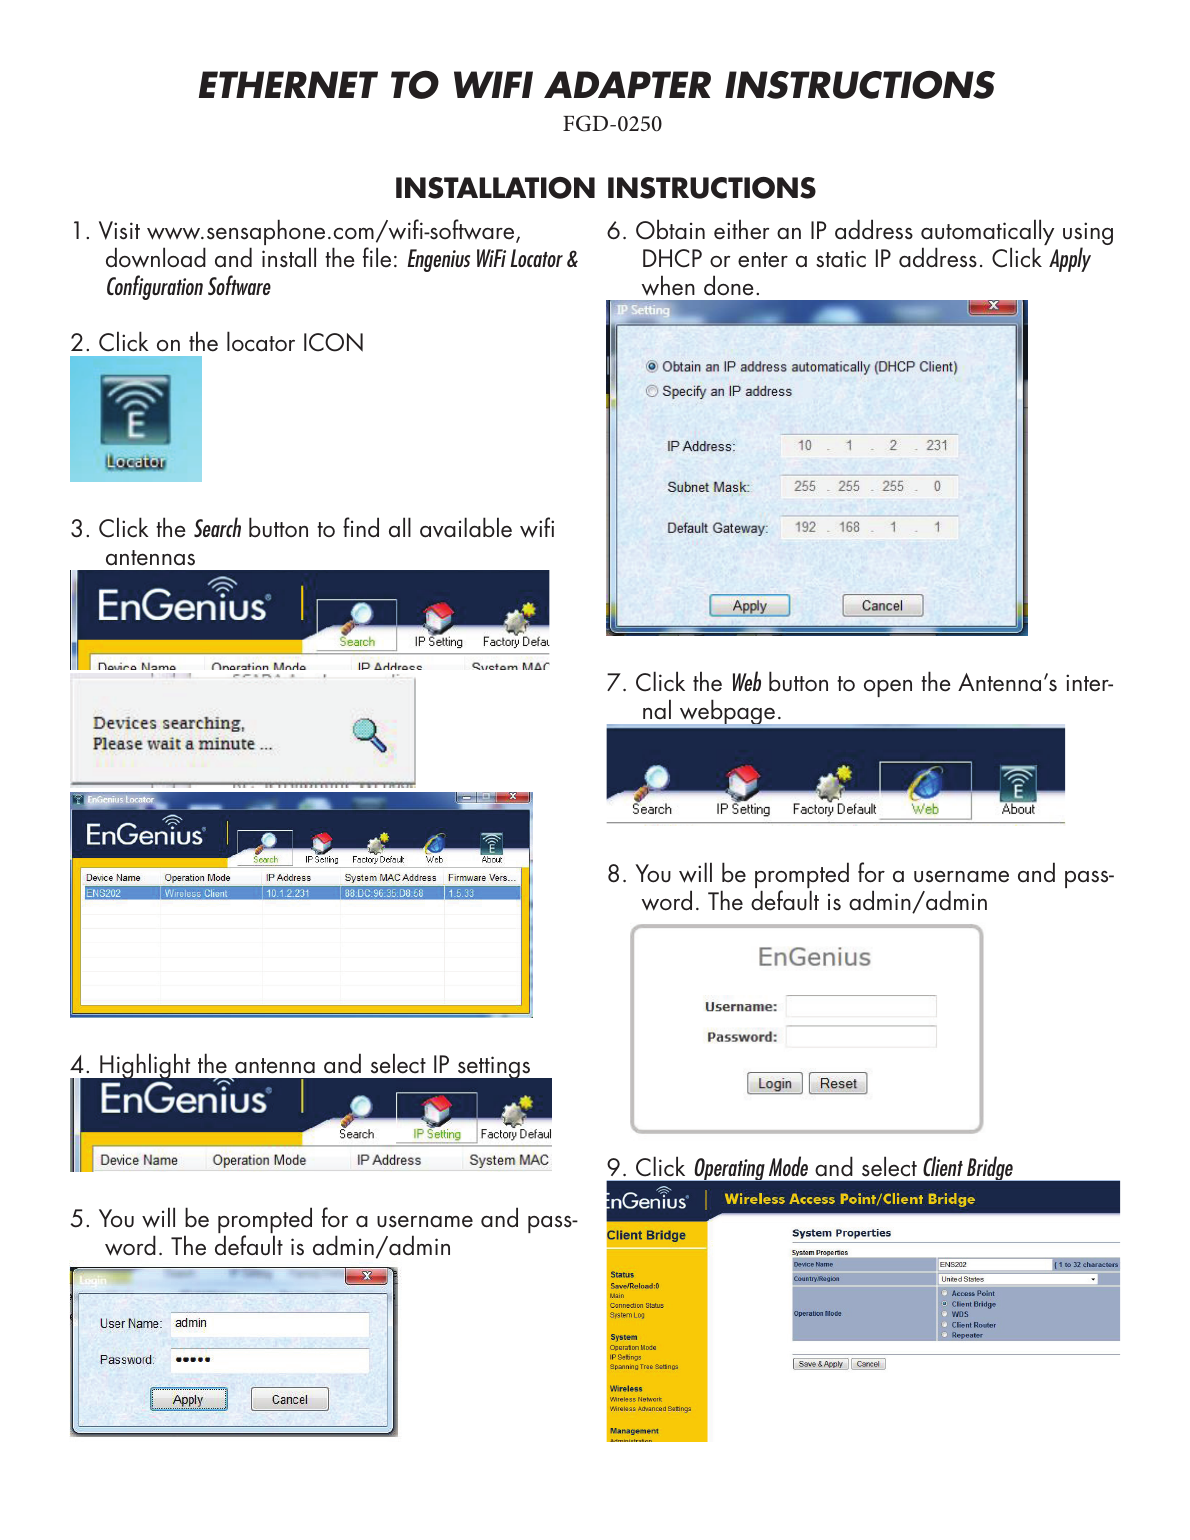
Installation Steps
- Visit www.sensaphone.com/wifi-software, download and install the Engenius WiFi Locator & Configuration Software.
- Click on the locator icon to open the software.
- Click the Search button to find all available WiFi antennas.
- Highlight the antenna and select IP Settings.
- You will be prompted for a username and password — the default is admin/admin.
- Obtain either an IP address automatically via DHCP, or enter a static IP address. Click Apply when done.
- Click the Web button to open the antenna's internal webpage.
- You will again be prompted for a username and password (default admin/admin).
- Click Operating Mode and select Client Bridge.
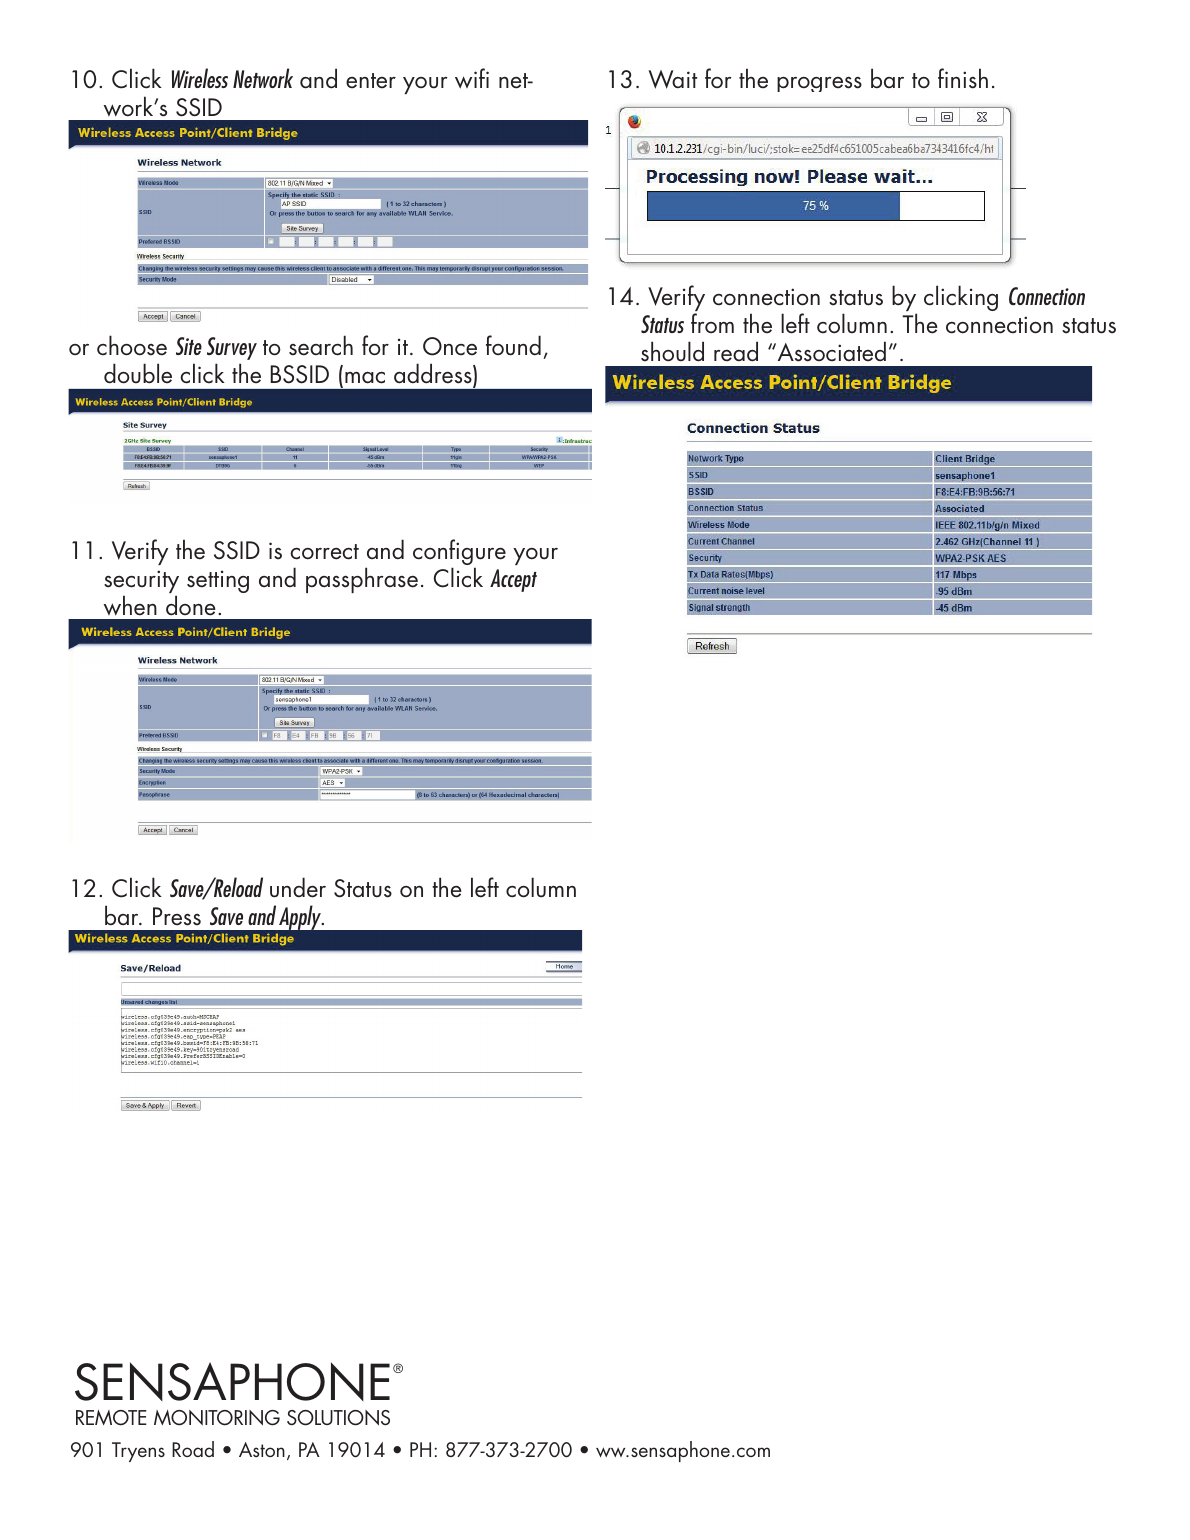
- Click Wireless Network and enter your WiFi network's SSID, or choose Site Survey to search for it — once found, double-click the BSSID (MAC address).
- Verify the SSID is correct and configure your security setting and passphrase. Click Accept when done.
- Click Save/Reload under Status on the left column bar. Press Save and Apply.
- Wait for the progress bar to finish.
- Verify connection status by clicking Connection Status from the left column — it should read "Associated".
Subscribe
Sign up to get the latest on sales, new releases and more …