
Sanus VMPL50AB1 — Full-Motion TV Wall Mount
Instruction manual for the Sanus VMPL50AB1 full-motion TV wall mount, supporting TVs up to 68kg (150 lbs).
Full text manual (for reference)
Instruction manual for the Sanus VMPL50AB1 full-motion TV wall mount — supports TVs up to 68 kg (150 lbs) with -10° to +8.5° tilt adjustment.
Important Safety Instructions — Save These Instructions — Please Read Entire Manual Prior to Use
Specifications
| Spec | Value |
|---|---|
| Weight capacity (DO NOT EXCEED) | 68 kg (150 lbs), includes TV and any accessories |
| Tilt range | -10° to +8.5° |
| Height adjust | ±0.50 in. (12.7mm) |
| Wall plate width | 17.22 in. (437.5mm) up to 18.50 in. (469.9mm), depending on configuration |
| Wall plate height | 30.00 in. (762.0mm) |
Caution — Avoid potential personal injuries and property damage:
- Do not use this product for any purpose not explicitly specified by the manufacturer.
- The wall must be capable of supporting five times the combined weight of the monitor and mount.
- This product is not designed for use in metal stud walls.
- If you do not understand these instructions, or have doubts about the safety of the installation, assembly, or use of this product, contact Sanus Customer Service or a qualified contractor.
- Sanus is not responsible for damage or injury caused by incorrect assembly or use.
Required Tools
13mm (1/2") socket/wrench, 5.5mm (7/32") drill bit, 10mm (3/8") socket/wrench, 3⁄16" hex key (included).
Choking Hazard Warning
This product contains small items that could be a choking hazard if swallowed. Before starting assembly, verify all parts are included and undamaged. If any parts are missing or damaged, do not return the damaged item to your dealer — contact Sanus Customer Service. Never use damaged parts.
Note: M4, M6, or M8 describes the diameter, and the number in mm describes the length, of screws labeled M# × ##mm. Not all included hardware will be used for every installation.
Step 1 — Install TV Brackets
Before you begin, hand-thread screws into the threaded inserts on the back of your TV to determine the correct screw diameter (M4, M6, or M8). Verify that there are adequate threads to secure the brackets to the monitor. If you encounter resistance, stop immediately and contact Customer Service.
Caution: Use the shortest screw and spacer combination that accommodates your needs. Hardware that's too long may damage your monitor's internal components.
1-1: TVs with a flat/unobstructed back
Ensure the brackets are level on the back of the TV, with the directional arrow at the bottom of each bracket pointing upward. If you require additional space for cables, recesses, or protrusions, use the offset configuration below instead.
1-2: TVs with an irregular/obstructed back
Ensure the brackets are level on the back of the TV with the directional arrow pointing upward. Standard configurations use a shoulder washer pushed through the appropriate slots and holes of the brackets, with the required spacer snapped onto the shoulder washer to clear cable connectors, recesses, or protrusions. For special applications, or if uncertain about hardware selection, contact Customer Service.
Step 2 — Mount the Wall Plate
Wood Stud Installation
- Locate studs. Verify the center of the stud with an awl, thin nail, or an edge-to-edge stud finder.
- Caution: Drywall covering the wall must not exceed 16mm (5/8 in.). Minimum wood stud size: common 51×102mm (2×4 in.), nominal 38×89mm (1½×3½ in.). Minimum horizontal space between fasteners: 40.6cm (16 in.).
- Level the wall plate and mark hole locations.
- Caution: Pilot holes MUST be drilled to a depth of 75mm (3 in.) using a 5.5mm (7/32 in.) diameter drill bit — improper drilling can reduce the holding power of the lag bolt.
- Tighten lag bolts only until the washers are pulled firmly against the wall plate. Do not over-tighten — this can reduce holding power.
Solid Concrete and Concrete Block Installation
- Level the wall plate and mark hole locations.
- Mount the wall plate directly onto the concrete surface. Minimum solid concrete thickness: 203mm (8 in.). Minimum concrete block size: 203×203×406mm (8×8×16 in.). Minimum horizontal space between fasteners: 40.6cm (16 in.).
- Drill pilot holes to a depth of 75mm (3 in.) using a 10mm (3/8 in.) diameter drill bit. Never drill into the mortar between blocks.
- Insert lag bolt anchors, seating them flush with the concrete surface.
- Tighten lag bolts only until the washers are pulled firmly against the wall plate — do not over-tighten.
Step 3 — Hang the TV with Mounting Brackets onto the Wall Plate
Caution: You will need assistance with this step.
- Install the TV/bracket assembly by fitting the top hooks of the mounting brackets over the top edge of the wall mount.
- Swing the mounting brackets down until the spring-loaded locking tabs slip over and fully engage the bottom edge of the wall mount. You will hear an audible "CLICK."
- Tilt tension can be adjusted with the vertical bracket knobs by hand, or using the included hex key.
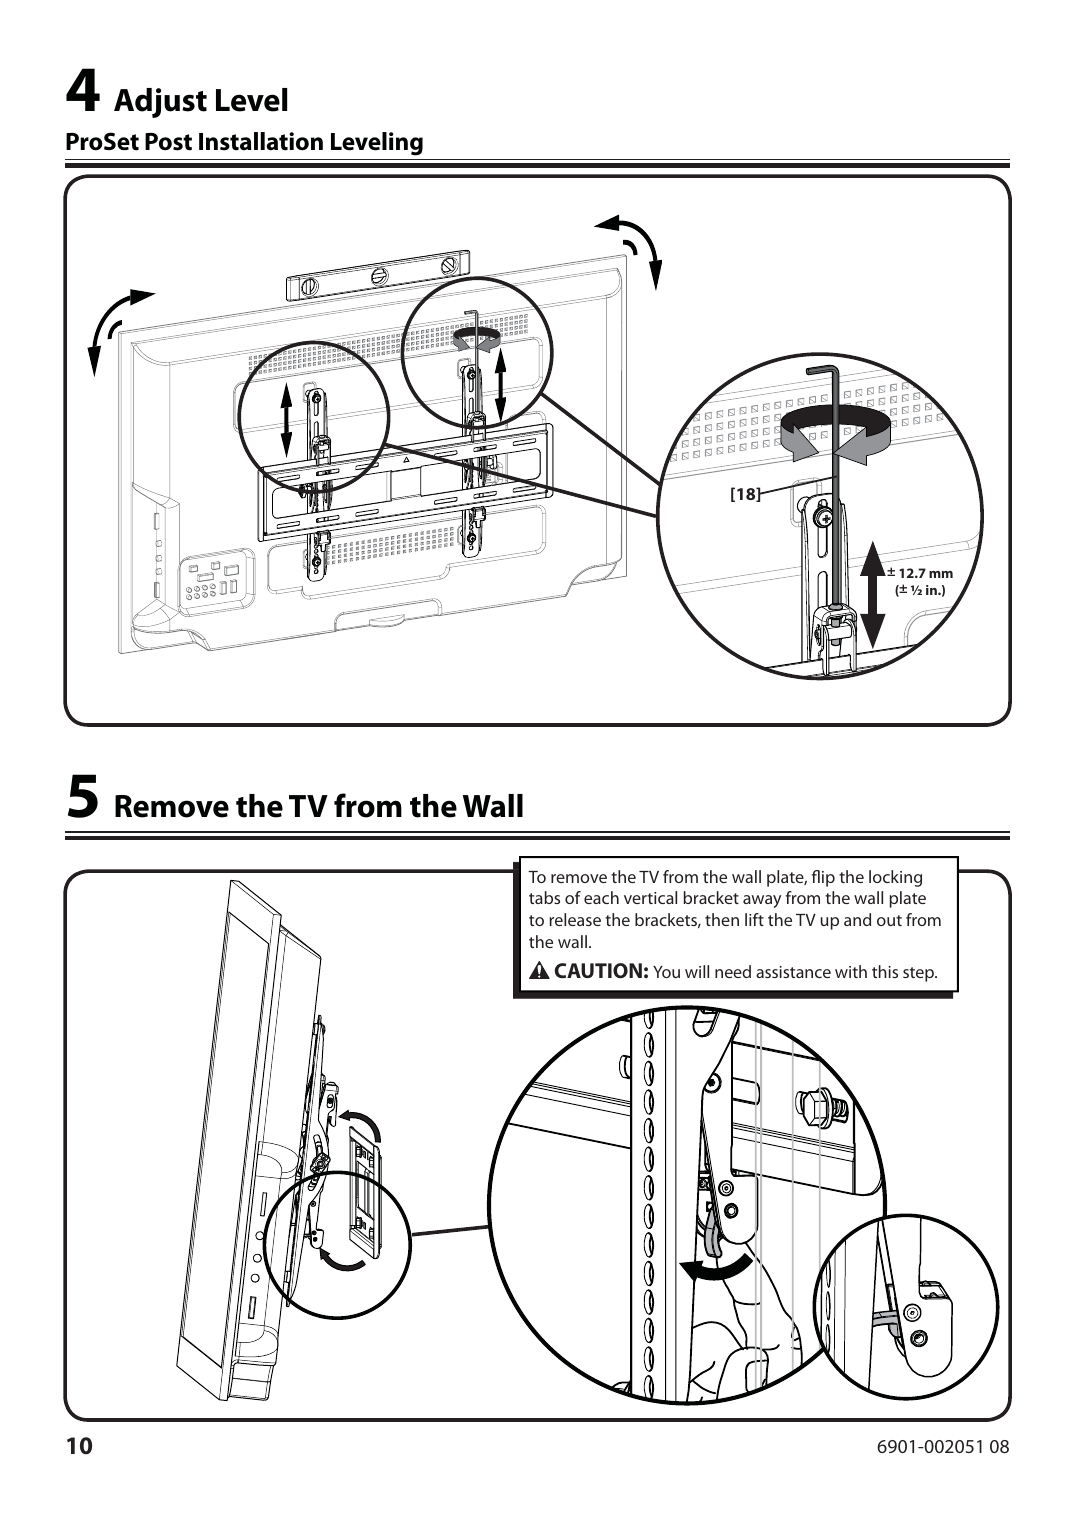
Step 4 — Adjust Level (ProSet Post-Installation Leveling)
Once mounted, fine-tune the level of the TV using the vertical bracket adjustment mechanism (hex key), with a tolerance of ±12.7mm (±½ in.).
Step 5 — Remove the TV from the Wall
To remove the TV from the wall plate, flip the locking tabs of each vertical bracket away from the wall plate to release the brackets, then lift the TV up and out from the wall. Caution: you will need assistance with this step.
Multi-Language Documentation
The full manual includes complete installation instructions in English, French, German, Spanish, Portuguese, Dutch, Italian, Finnish, Swedish, Russian, Polish, Czech, Japanese, and Chinese — each translated section referencing the same illustrations shown above.
Customer Service
Americas: 800-359-5520 • 952-225-6013 • info@sanus.com
UK: 0800 056 2853 • info@sanus.com
Europe, Middle East & Africa: +31 40 2324700 • europe.sanus@milestone.com
Asia Pacific: 86 755 8996 9226 • sanus.ap@milestone.com
SANUS • 6436 City West Parkway • Eden Prairie, MN 55344 USA