
Channel Vision 6533 2MP Mini Dome IP Camera — Quick Reference Guide
Quick reference guide for the Channel Vision 6533, a 2 Megapixel Mini Dome IP Camera with PoE.
Full text manual (for reference)
Quick reference guide for the Channel Vision 6533 — a 2 Megapixel Mini Dome IP Camera with PoE. Covers setup, mounting, wiring, and troubleshooting essentials; the full illustrated manual with every screenshot is in the downloadable PDF.
Overview
The 6533 is a 2MP mini dome IP camera with a built-in web server for live viewing via Internet Explorer, and multi-stream H.264/MJPEG/MPEG support. Video can be recorded to an NVR and viewed remotely from mobile devices (Android, iPhone, iPad apps available). It's designed to scale from a single front-door camera up to large commercial deployments with hundreds of cameras.
Key Features
- 4.2mm fixed focal length lens, 2 Megapixel CMOS sensor (up to 1280 x 800)
- Alarm trigger input and N.O./N.C. relay output switch
- 36-camera CMS (Central Management Software, included) for viewing all cameras worldwide in multiple locations simultaneously
- 720P at 30FPS, Digital Wide Dynamic Range
- Power over Ethernet or 12VDC power supply
- Vandal-proof dome housing
- Micro SD card recording slot inside the camera
- Event-triggered motion recording
Safety Warnings
- Read and keep these instructions for future reference. Heed all warnings.
- Clean only with a dry cloth. Do not install near heat sources (radiators, stoves, etc.).
- Protect the power cord from being walked on or pinched.
- Only use attachments/accessories specified by Channel Vision.
- Unplug during lightning storms or extended periods of non-use.
- Do not remove the cover — there are no user-serviceable parts inside; refer servicing to qualified personnel.
Cable Breakout Pinout
Warning: do not cut the breakout cable — cutting it voids the warranty. The breakout cable provides:
- Digital Input (GND+DI): An alarm input for devices that toggle between open/closed circuits — PIRs, door/window contacts, broken glass detectors, etc. A signal change activates the input.
- Relay Output (GND+DO): A selectable output for a relay switch (LEDs, sirens, etc.), configurable as Normally Open or Normally Closed via the web interface's "I/O Setting" section.
Mounting
Without conversion ring (flush mount): Use the three included screws to secure the camera base to the wall or ceiling, then screw on the camera cover as tight as possible. Typically used on a ceiling or where the cable can be hidden under the camera.
With conversion ring (surface mount): Use three screws to lock the conversion ring onto the ceiling or wall, then a second set of three screws to attach the camera base to the ring — the cable passes through the ring's side hole. Screw on the cover tightly. Typically used on brick walls or where the breakout cable needs to exit the side of the camera.
Assigning an IP Address
Option 1 — DHCP (default): The camera ships set to DHCP, so your router auto-assigns an IP, similar to a laptop or PC. Open "IP Installer" (on the included software disk) to find the assigned address, then double-click the camera name to open it in your browser. Default login is username admin / password admin.
Option 2 — Static IP: Use IP Installer to assign a fixed IP. Get your computer's network info first via Command Prompt (ipconfig /all) — note the Default Gateway, DNS Server, and Subnet Mask. Enter those values into the camera's network page, then assign the camera a unique IP on the same subnet as your gateway (generally using a number outside your router's DHCP range, e.g., if your gateway is 192.168.1.1, use something like 192.168.1.208). Choose a port between 5400–9000 if a specific port is needed.
Channel Vision recommends a static IP with standard port forwarding for best security.
ActiveX Install Troubleshooting
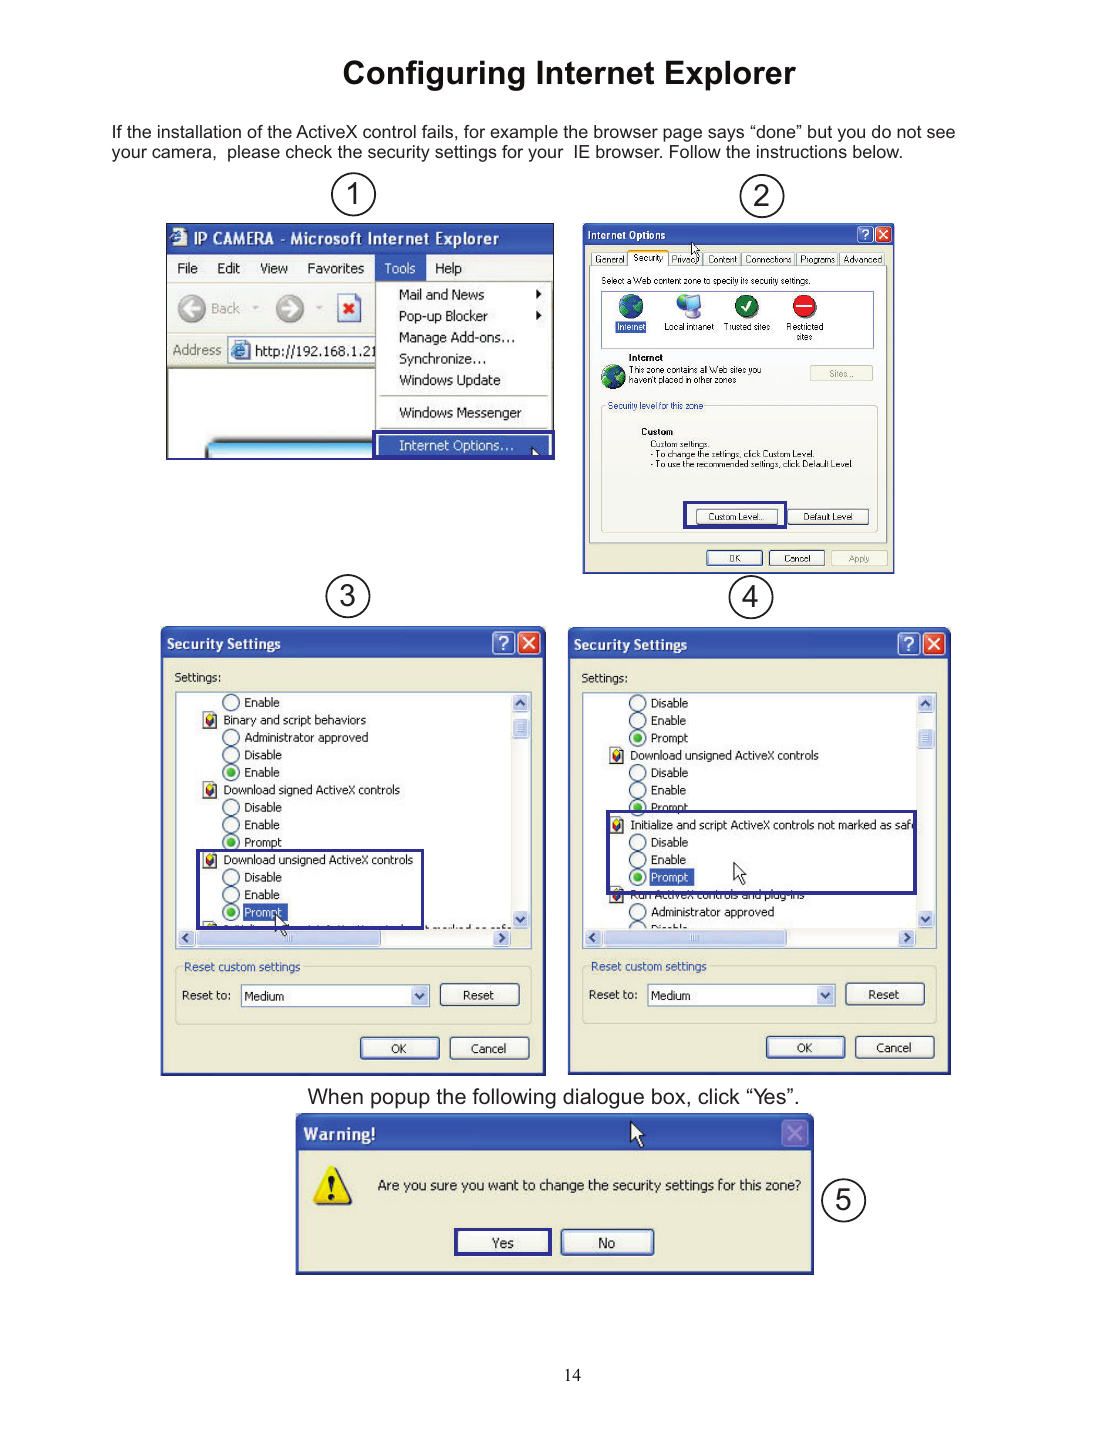
The first time you connect via Internet Explorer, you'll be prompted to install an ActiveX control — required for live viewing (IE 6, 7, 8, or 9 only). If it doesn't install automatically, allow it manually through IE's security settings as shown above.
Resetting to Factory Default
Unplug the power supply. Plug the power cable back in and press the "reset" button on the camera for 30 seconds. After 30 seconds, remove the power, then reconnect the ethernet cable. Use IP Installer to find the camera's IP (default is http://192.168.1.200, username/password admin/admin).
Power over Ethernet (PoE)
PoE delivers both power and network data over a single ethernet cable, eliminating the need for outlets at each camera location and simplifying UPS-backed 24/7 operation.
- Recommended PoE switch: 802.3at, 30.0W
- Minimum PoE switch: 802.3af, 15W
Recommended Video Settings for Limited Bandwidth
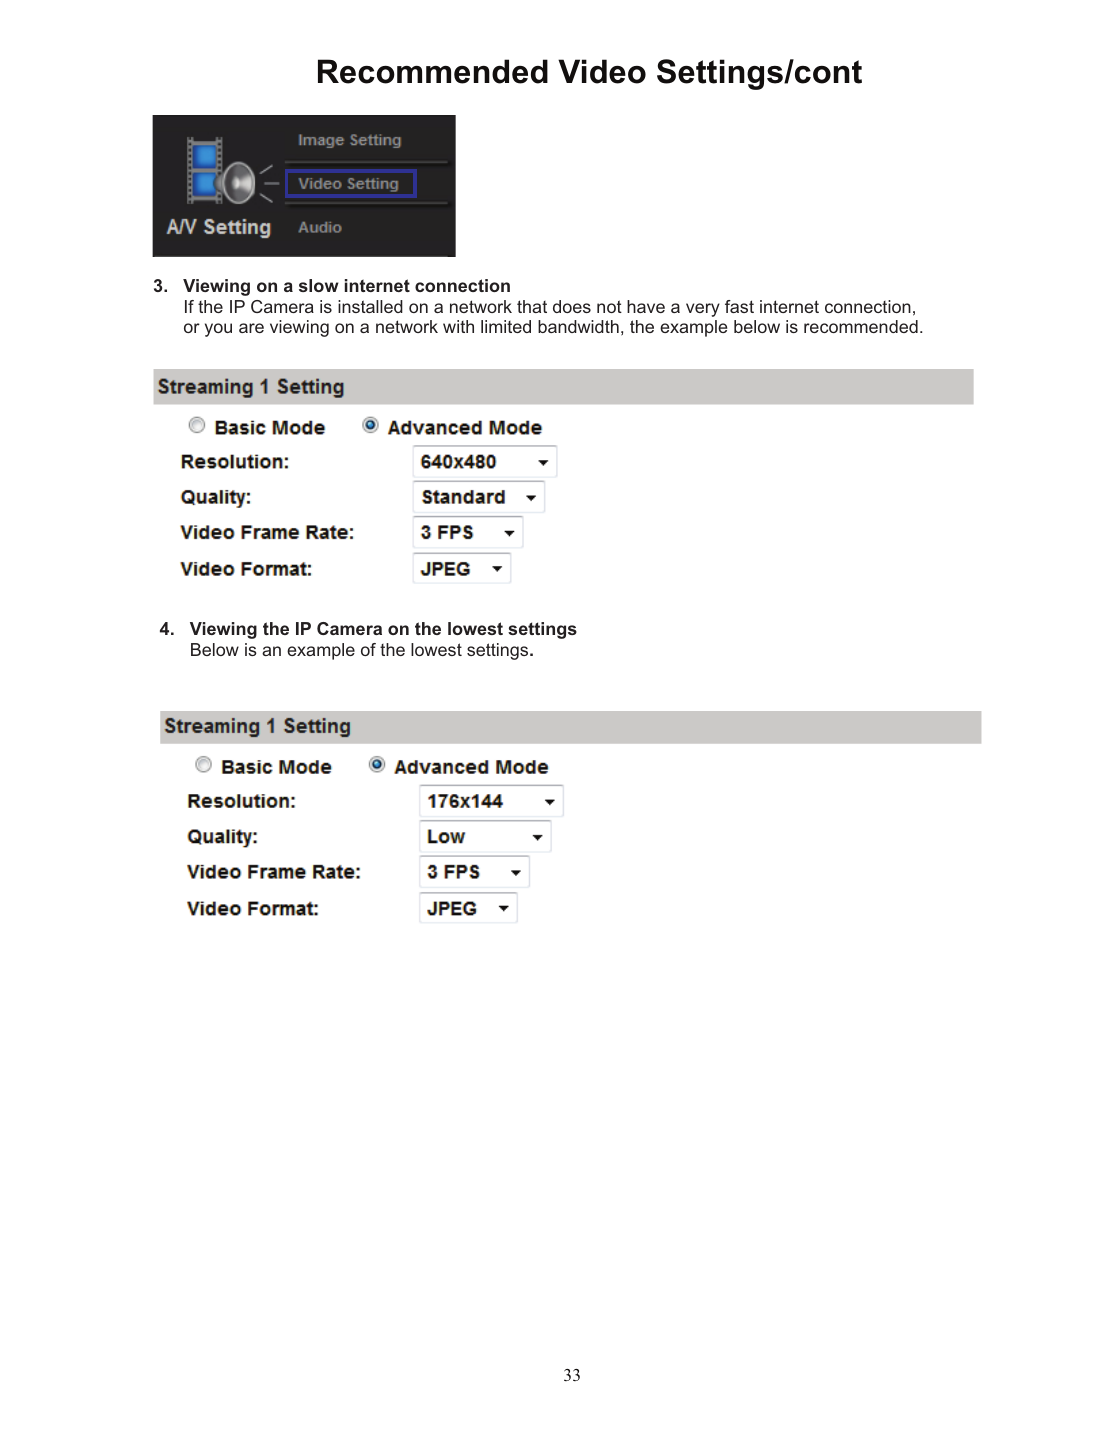
- Slow internet: 640x480, Standard quality, 3 FPS
- Lowest bandwidth: 176x144, Low quality, 3 FPS
UPnP Port Forwarding
To view the camera from outside your home/business network, either configure standard port forwarding on your router, or use UPnP (Universal Plug and Play) directly from the camera's Setup > IP Setting menu — enable UPnP, choose a port (default 80), and click Apply. Visit channelvision.com for detailed port forwarding and DDNS setup.
Specifications
| Spec | Value |
|---|---|
| CPU | ARM 9, 32-bit RISC |
| RAM / Flash | 128MB / 16MB |
| Image sensor | 1/4" 2 Megapixel CMOS |
| Sensitivity | 1.0 Lux @ 30fps |
| Shutter time | 1/5 – 1/10,000 sec |
| Lens | 4.2mm @ F1.6 |
| I/O | 1 Digital Input, 1 Digital Output |
| PoE power | 48V, max 2.8W |
| DC power | 12VDC, 170mA (2.04W max) |
| Operating temperature | 14°F to 113°F (-10°C to 45°C) |
| Dimensions / weight | 3.15" diameter x 2.64" height, 11.99 oz |
| Ethernet | 10/100 Base-T |
| Max resolution | 1280 x 800 |
| Video resolutions | 1280x800, 1280x720, 640x489, 320x240, 176x144 (30FPS) |
| Motion detection | Yes, digital, 3 different areas |
| Triggered actions | Mail, FTP, Digital Output, Samba |
| Security | Password protection, IP filtering, HTTPS encryption, 802.1x port authentication, QoS/DSCP |
| Vandal-proof | Yes |
| Max users | 10 |
| Micro SD recording | Triggers: motion detection, IP check, network breakdown, schedule. Formats: AVI, JPEG. Playback and delete supported. |
Warranty
One-year limited warranty (parts/labor) from date of original purchase, no mail-in card required. Does not cover shipping damage, third-party product failures, or damage from accident/misuse/abuse. Call (800) 840-0288 for a Return Authorization before mailing in for service.