
Autoslide MultiDrive — Automatic Sliding Door Installation Manual
Quick reference guide for the Autoslide MultiDrive automatic sliding door opener — safety, installation overview, controller/DIP switch guide, and troubleshooting.
Full text manual (for reference)
Quick reference guide for the Autoslide MultiDrive™ automatic sliding door opener — a retrofit automation system for residential and light commercial framed sliding doors. This page summarizes safety warnings, installation overview, control panel/DIP switch reference, and troubleshooting. Full step-by-step illustrated installation instructions are in the downloadable PDF.
What It Is
The MultiDrive is an automatic door opening system for residential and light-use commercial sliding doors. Once installed, the mechanism is hidden behind an aluminum cover that blends with the sliding door frame (mill finish unless otherwise ordered; may need powder coating to match). The MultiDrive can be retro-fitted to any framed sliding door, including bi-parting and non-bi-parting (single or telescopic, left- or right-sliding) doors.
Safety Warnings
- Any manual lock on the sliding door should be removed or deactivated — the MultiDrive may be damaged if activated while the lock is closed.
- Not for use in high-traffic environments (large office building entrances, big-box stores).
- May be used in light commercial environments — consult an authorized Autoslide representative before purchase and installation.
- Every unit has a built-in safety feature: if the door hits an obstruction while closing, it automatically reverses.
- If power is lost, the motor and lock fully disengage and the door reverts to fully manual operation.
Installation Overview
A standard install runs through four stages, roughly 90 minutes total:
- Prepare — check door readiness, test drag force, plan the mounting approach, gather tools/materials.
- Install — mount the MultiDrive drive system to the door frame, then attach the belt and brackets to the sliding door panel.
- Operate — connect power, program the controller, then synchronize wall push buttons and/or sensors and test operation.
- Finalize — replace the cover on the drive unit and conceal cables (a valence with access panel is recommended if concealing further).
Before you begin: confirm a power outlet is reachable near the installation position (or use a heavy-duty extension cable). Check that the door slides smoothly and is level, and that the track is clean. Sliding friction should be under 35 lbf (155 N) at a steady 4"/second (100 mm/second) — measure with a digital hook scale; if higher, consult an authorized Autoslide representative. The MultiDrive requires 3.15" (80 mm) of clearance below the transom (can also flush mount).
Control Panel & Mode Guide
The controller includes an open-time dial (0–24 seconds before auto-close), 8 DIP switches for setup, a power switch, a sensor learn button, a red status LED, and 4 sensor ports.
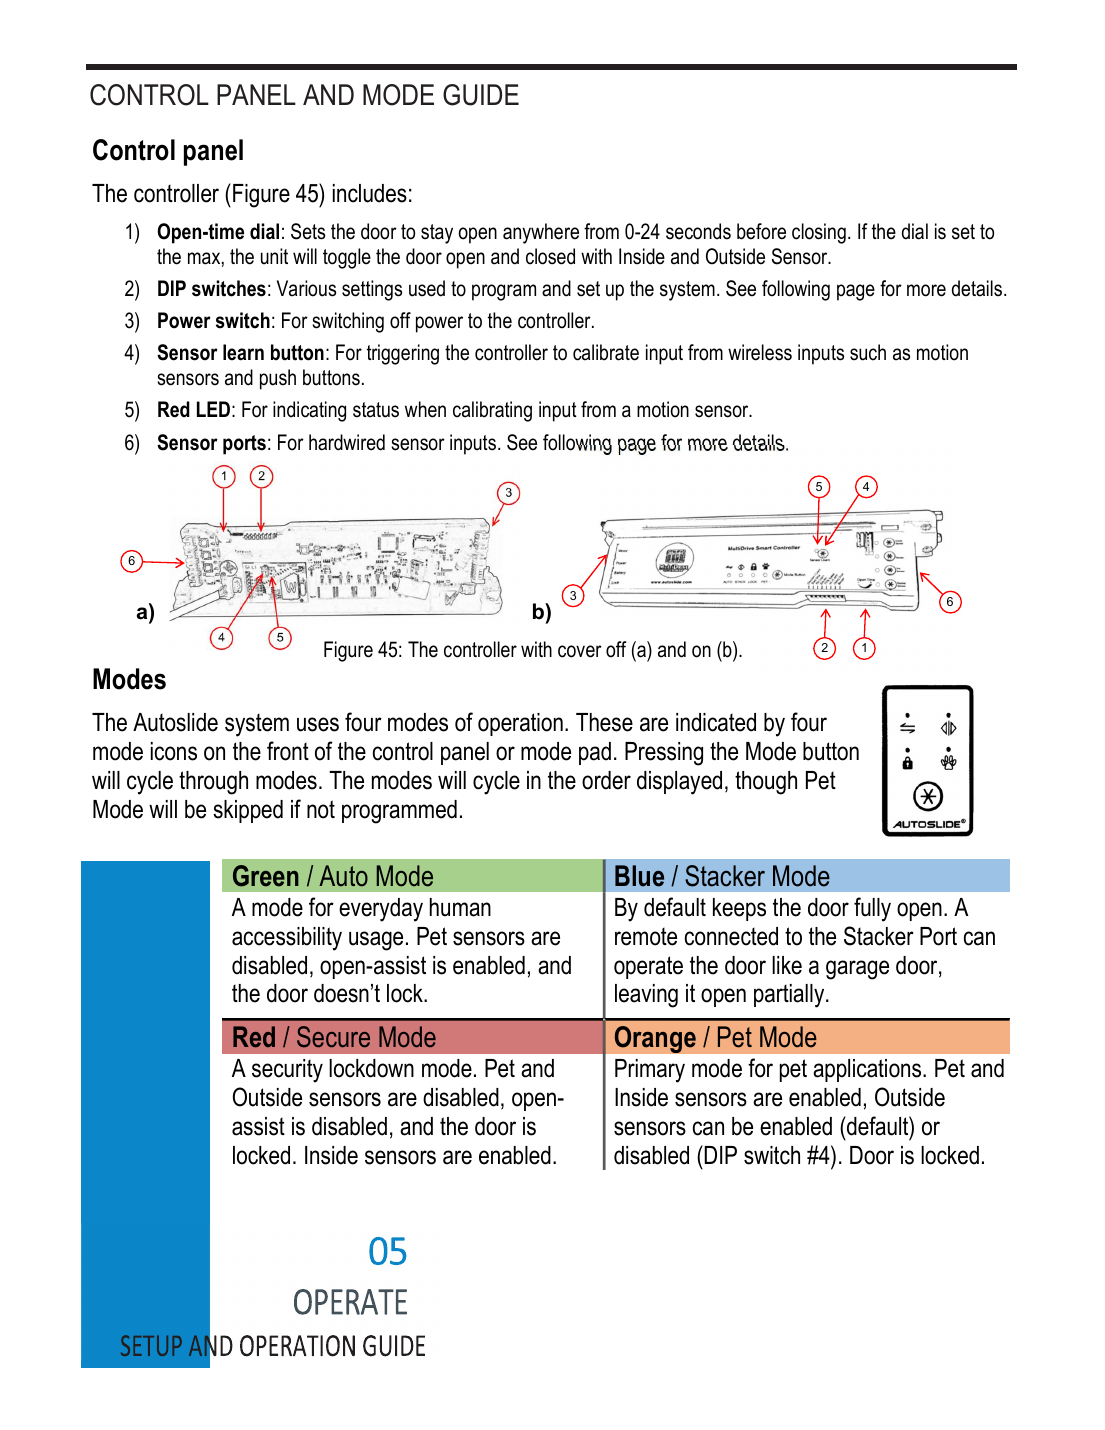
| Mode | Description |
|---|---|
| Green / Auto | Everyday human accessibility. Pet sensors disabled, open-assist enabled, door doesn't lock. |
| Blue / Stacker | Keeps the door fully open by default; a remote on the Stacker Port can operate it like a garage door, leaving it open partially. |
| Red / Secure | Security lockdown. Pet and Outside sensors disabled, open-assist disabled, door is locked; Inside sensors remain enabled. |
| Orange / Pet | Primary pet mode. Pet and Inside sensors enabled; Outside sensors optional (DIP #4). Door is locked. |
Sensor Ports & DIP Switches
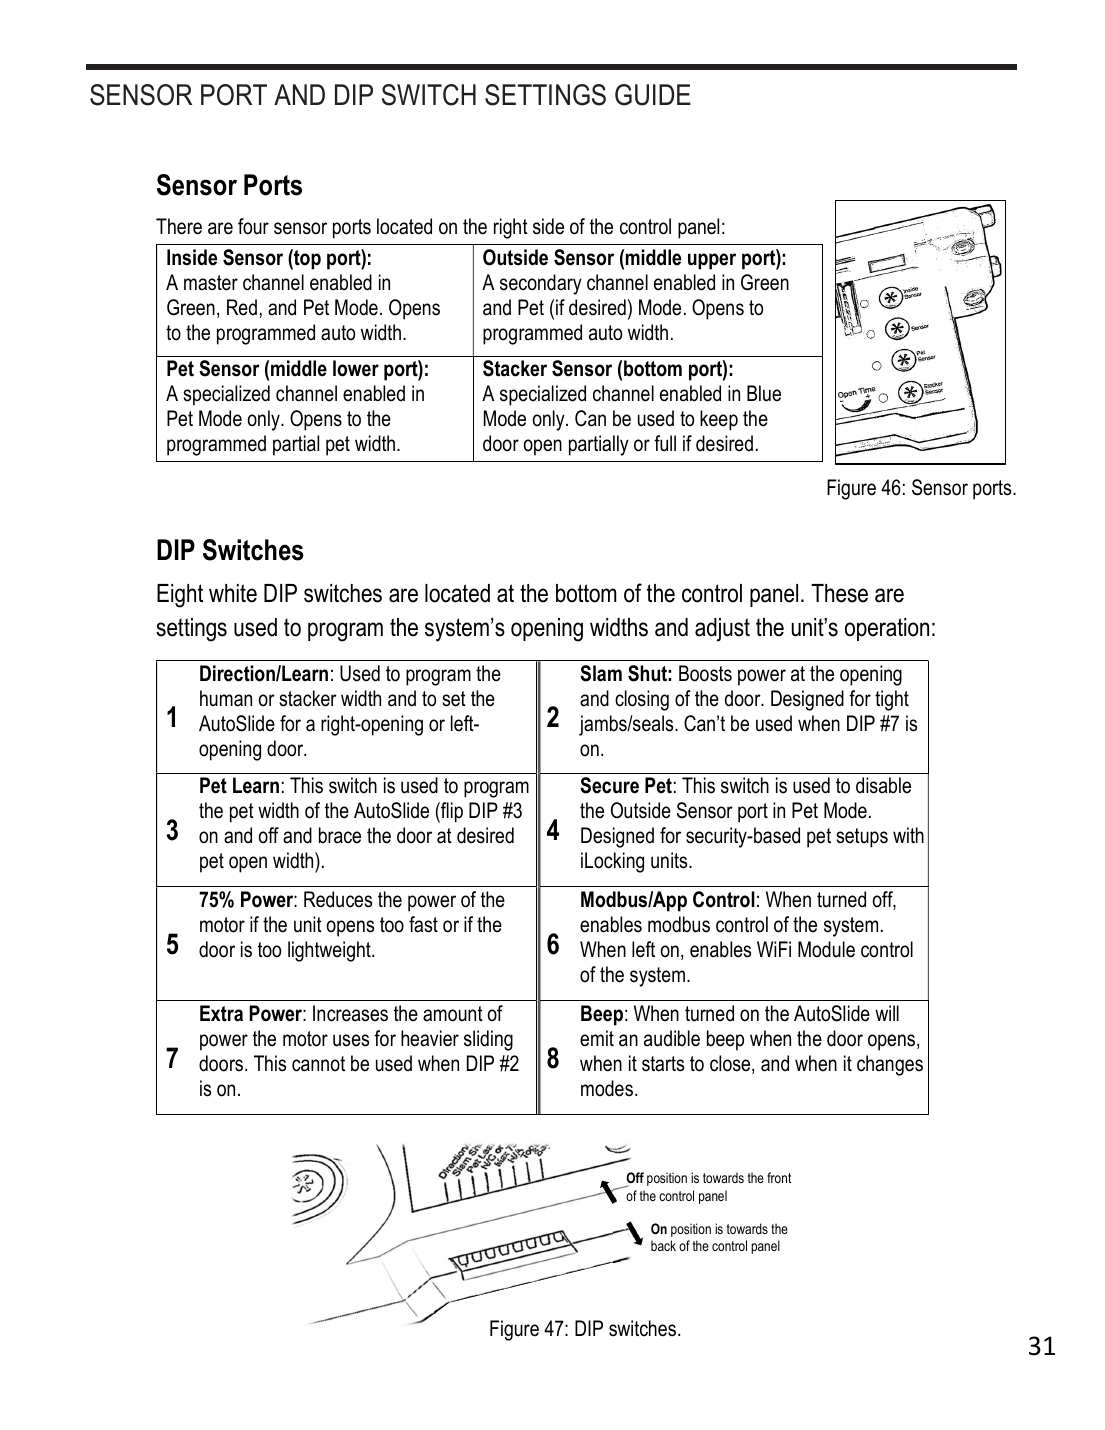
Four sensor ports: Inside Sensor (top), Outside Sensor, Pet Sensor, and Stacker Sensor (bottom). Eight DIP switches configure opening widths and operation — including direction/learn, slam shut, pet learn, secure pet, 75%/extra power, Modbus/App control, and beep.
Programming (High-Level)
- Power on with all DIP switches off, verify the door closes correctly (flip DIP #1 if it opens instead of closes).
- Toggle DIP #1 off-then-on to program the human (Auto) opening width — the door will cycle open/closed automatically.
- Switch to Blue/Stacker mode and repeat the DIP #1 toggle to program the stacker width.
- For pet applications, from Green mode flip DIP #3 on and off to program the pet opening width (must be >17" / 0.43m for full speed).
- Pair wireless wall buttons/sensors via the Sensor Learn button (press once, trigger the device, wait 4 seconds, trigger again).
Common Issues
| Issue | Cause | Solution |
|---|---|---|
| Door doesn't open to correct width after programming | Incomplete learn cycle | Remove cover, power cycle, then reprogram by flipping DIP #1 back and forth once door is closed. |
| Both wall buttons trigger the same sensor | Buttons set to same channel internally | Open a wall button, set the internal switch to the desired channel (I/S, O/S, or ST). |
| Door opens partially and re-opens after every close | Calibration thinks the close jamb is an obstacle | Power cycle to reset closed position; check belt tension isn't bending the motor axle. |
| Door opens/closes very slowly | System not configured for door's drag weight | Turn on DIP #7 to increase motor power. |
| Door can't overcome starting friction | Door locked or excess friction | Confirm unlocked, investigate friction manually, turn on DIP #2 for extra starting power. |
| Door labors / excessive noise | Belt tension too high | Loosen belt tension so the motor wheel axle isn't bent by the belt. |
| Door opens at random | RFID interference or falsely tripping sensor | Hold Sensor Learn to clear all wireless sensors, then re-pair one at a time to isolate the culprit. |
Maintenance & FAQ Highlights
- Can be installed outdoors but should stay covered/out of direct rain or snow; performance may suffer below 32°F.
- An optional WiFi module allows phone-app control; a key switch cable enables home automation integration via a momentary relay.
Warranty
Two-year limited manufacturer's warranty on materials and workmanship (original retail purchaser, USA/Canada only). Requires proof of purchase and an RMA number; product must be returned at customer expense. Excludes normal wear, misuse, non-Autoslide accessories, removed/altered serial numbers, batteries, and commercial-use products.
Contact & Support
Web: autoslide.com · Email: info@autoslide.com / support@autoslide.com · Phone: (833) 337-5433